Dry January – Week 4

Uncategorized

For me, this week was the test. Our book launch on the 25th, a Burn’s Night dinner on the 29th and in-between the start of our kitchen renovation. All occasions where I would normally have a glass of something cold and very very strong. How did it go?

Book launch

Jonathan Rose Photography

Dry January – week 3

Uncategorized

We find ourselves at the hump of the month, with still a way to go to the finish line. Richard asked me at the weekend if he could make me a drink and without hesitation I asked for a booze-free dirty martini. We’ve got a recipe for one in our book – page 38 – the dirty rosemary-tini, to be precise, and it’s a good’un. We went for an extra lazy approach of making it with a blend of some faux gins instead of the rosemary infusion the recipe calls for and it wasn’t bad, but I think the infusion works better in this case (not just blowing my own trumpet) because the strength and method quality of the rosemary balances out the brine a lot better. But it was still pretty good.

Dry January – week 2

Uncategorized

It’s getting serious now – we’re on week 2, gang. How’s it going with you? For me, I still haven’t really got back into socialising yet since all those lockdowns. Popped round to a mate’s for coffee this week but it’s the first time I’ve done anything like that in a couple of months, and I’ll easily spend two or even three days not leaving the house. I’m confessing my hermit status because perhaps that is what is making Dry January so very much easier than I thought it would be. I’m not going to the pub, so it’s a doddle and, dare I say it, kinda fun.

The confessions continue…

Right so the Christmas tree and decorations all came down and got put away or recycled accordingly before twelfth night, but this Christmassy can- Lervig’s No Worries – Driving Home From Christmas slid into the week after, shock horror! Also, it’s O.5%! So not totally booze-free!! Lol, course it is, half a percent is less than what’s in bread so I think we’re groovy. This beer was just what I needed on a particularly cold evening after a moderately rubbishy day. It’s a super dark beer, if you like stouts and porters grab a can while you can. Hint of festive spice and lovely bit of bitterness. Beaut.

Dry January – week 1

Recipes

Happy New Year! Fingers and toes crossed that this year is much improved for you all.

Still, with so much uncertainty I’m avoiding big bold new year’s resolutions. Phrases like “travel more” or “spend more time with friends and family” and I just hear a grotty “mwahahhah” from the gremlin that is Covid-19. But I am going to do dry January. Simply because I’ve not done it before, and I’m curious to see if it has any benefits on my mood and health more generally. I’m also really keen to try some of the non-alcoholic drinks on offer…and it’s a good excuse to revisit some recipes from our book!

First hurdle

When does it officially start? If you go by the stroke of midnight on the 1st of Jan then I have failed, I was definitely double-parked at that point with a glass of fizz and a brandy, ‘hic’. Spent mostly under a duvet, the rest of the 1st was unsurprisingly a lot easier to abstain. With the 2nd being a bank holiday I just fancied a glass of fizz. I know, that might make me sound slightly ridiculous but there we are. So I popped down the shop and bought myself a bottle of appletiser. Yes, it’s just sparkling apple juice, but served well chilled in a champagne coupe, it’s not that far off that first super-sweet sip of not particularly posh Prosecco – just what I was after! I thought it needed something extra though, something to kick the sweetness down just one notch so I took a strip of lemon zest, twisted it over the glass so plenty of the lemony oils spritzed in, then dropped it into the drink. It worked! Super simple, inexpensive but felt v. fancy.

Mini zine launches

illustration

Hi there, how are you all doing? Weird times we’re all facing, aren’t they?

Everyone is dealing with this in their own way and those ways may even change over time. For me, right now, I really needed a project that I only did at weekends, something to pass the time. Also my flat is now my office, a yoga space, a photography and video studio etc.. so I needed an excuse to pack things away on Friday night…and not just to turn it into a tiny pub (although I have basically done that too!). My solution was to make what I’ve been dreaming of making for so long now: I made a zine.

I’ve gone with the mini format at the moment  – you can see the whole issue on my illustration instagram page but I’ve also scanned it and made it a pdf should you want to print it at home:

issue1

If you do print it, please fold it into the 8 pages, then fold it in half along the long side and cut through the middle (hopefully the pictures will help!) I’ll do a video and pin it to my instagram account  @miriamniceillustration 

I hope you enjoy this little bit of silliness. I’m aiming to do one of these a week and I’ll post the issues ready for download on a new page here so keep a look out. I may take a break some weekends and just sit on the sofa eating ice cream, we shall see.

Sending good vibes and best wishes to you all.

Miriam x


Stuff to read

update

Since the April 2018 issue of the magazine I’ve been fortunate enough to write a regular feature for BBC Good Food. It’s called Miriam’s foolproof hacks. 

Miriam's foolproof hacks

stuffing copy.jpg

“What the heck is a hack?” I hear one person at the back yell (which may or may not be me). Excellent question; I take it to mean an easier, quicker or nicer ways of doing something, that you may not have done before. When you see it, you probably groan at the way you were doing it in the past. For my hacks I’ve taken a different subject each month and done a whole bunch of researching, testing and generally faffing around in the kitchen to try out suggestions and ideas of how to make various cooking tasks a little easier or tastier. I then measured them against my own specially designed groan-o-meter (patent pending) to find out how useful they are. Anything from, a “pretty handy” idea all the way up to the “Christmas-cracker-joke levels of can’t believe I didn’t think of that” makes the cut.
If you didn’t catch them in the magazine the guides are now available online, click on the links or images below to find out more. I hope you enjoy!

April 2018 – get the most from your roast

IMG_20180326_120824.jpg

May 2018 – how to master pastry

cheese biscuits

June 2018 – top tips for speedy suppers

garlic

July 2018 – how to win at barbecues

GFO_0718_p038_HacksF1

August 2018 – let’s eat more picnics

courgettefrittatas


Website refresh!

update

Good evening to you dearest reader. It’s been too long. So, turns out it’s been nearly 3 years since I posted anything, which is pretty unforgivable. What have you been up to? You can see a chunk of what I’ve been doing if you like over here https://www.bbcgoodfood.com/chef/miriam-nice – somewhere in the region of 300+ recipes, plus some food writing, travel writing, food styling, videos and art direction. But enough of my excuses, let’s get back to business.

Website is all tidied up and optimised for mobile (I think) – let me know if it looks a bit potato on your screen though please. You’ll probably notice a few other changes too, there’s some illustration kicking about for one thing, and my blog posts might start to take a slightly more varied direction…

Thank you so much for all the support over the last few years, especially all the instagram fun-times. This year is going to be a good one I think, not only am I planning our wedding (happening next year – ridiculously excited) but my book Cooking Without A Kitchen is going to be 5 years old in September, so I have half a mind to do something but still trying to work out how best to mark the occasion so if you have any ideas answers on a postcard please (or just use the contact form)

I shall leave you with a bizarre and unexplained selection of photos from the last 3 years. xx

Busy Dinners

Cooking, Recipes

A new #askmim request appeared in my inbox the other day, this one is from Veena. Ahoy there Veena!

Veena said:

“I’m a fish eating veggie and am going back to a really full on job after having a baby. I want to be able to cook something delicious and healthy when I get home, that isn’t pasta, and doesn’t mean that I spend ages in the kitchen away from my daughter when I should be spending time with her. Any ideas?”

Good challenge. Righteo, I’ve spent some time cooking up a few  ideas this week and come up with 3 tasty new mid-week suggestions for you.

Mackerel Rice Bowl

Easy Mezze

The first was inspired by some of my favourite sushi ingredients. You can vary it too though, tofu would be ace instead of mackerel and any green veg like spinach or green beans could take the place of the seaweed as it can be a bit tricky to get hold of.

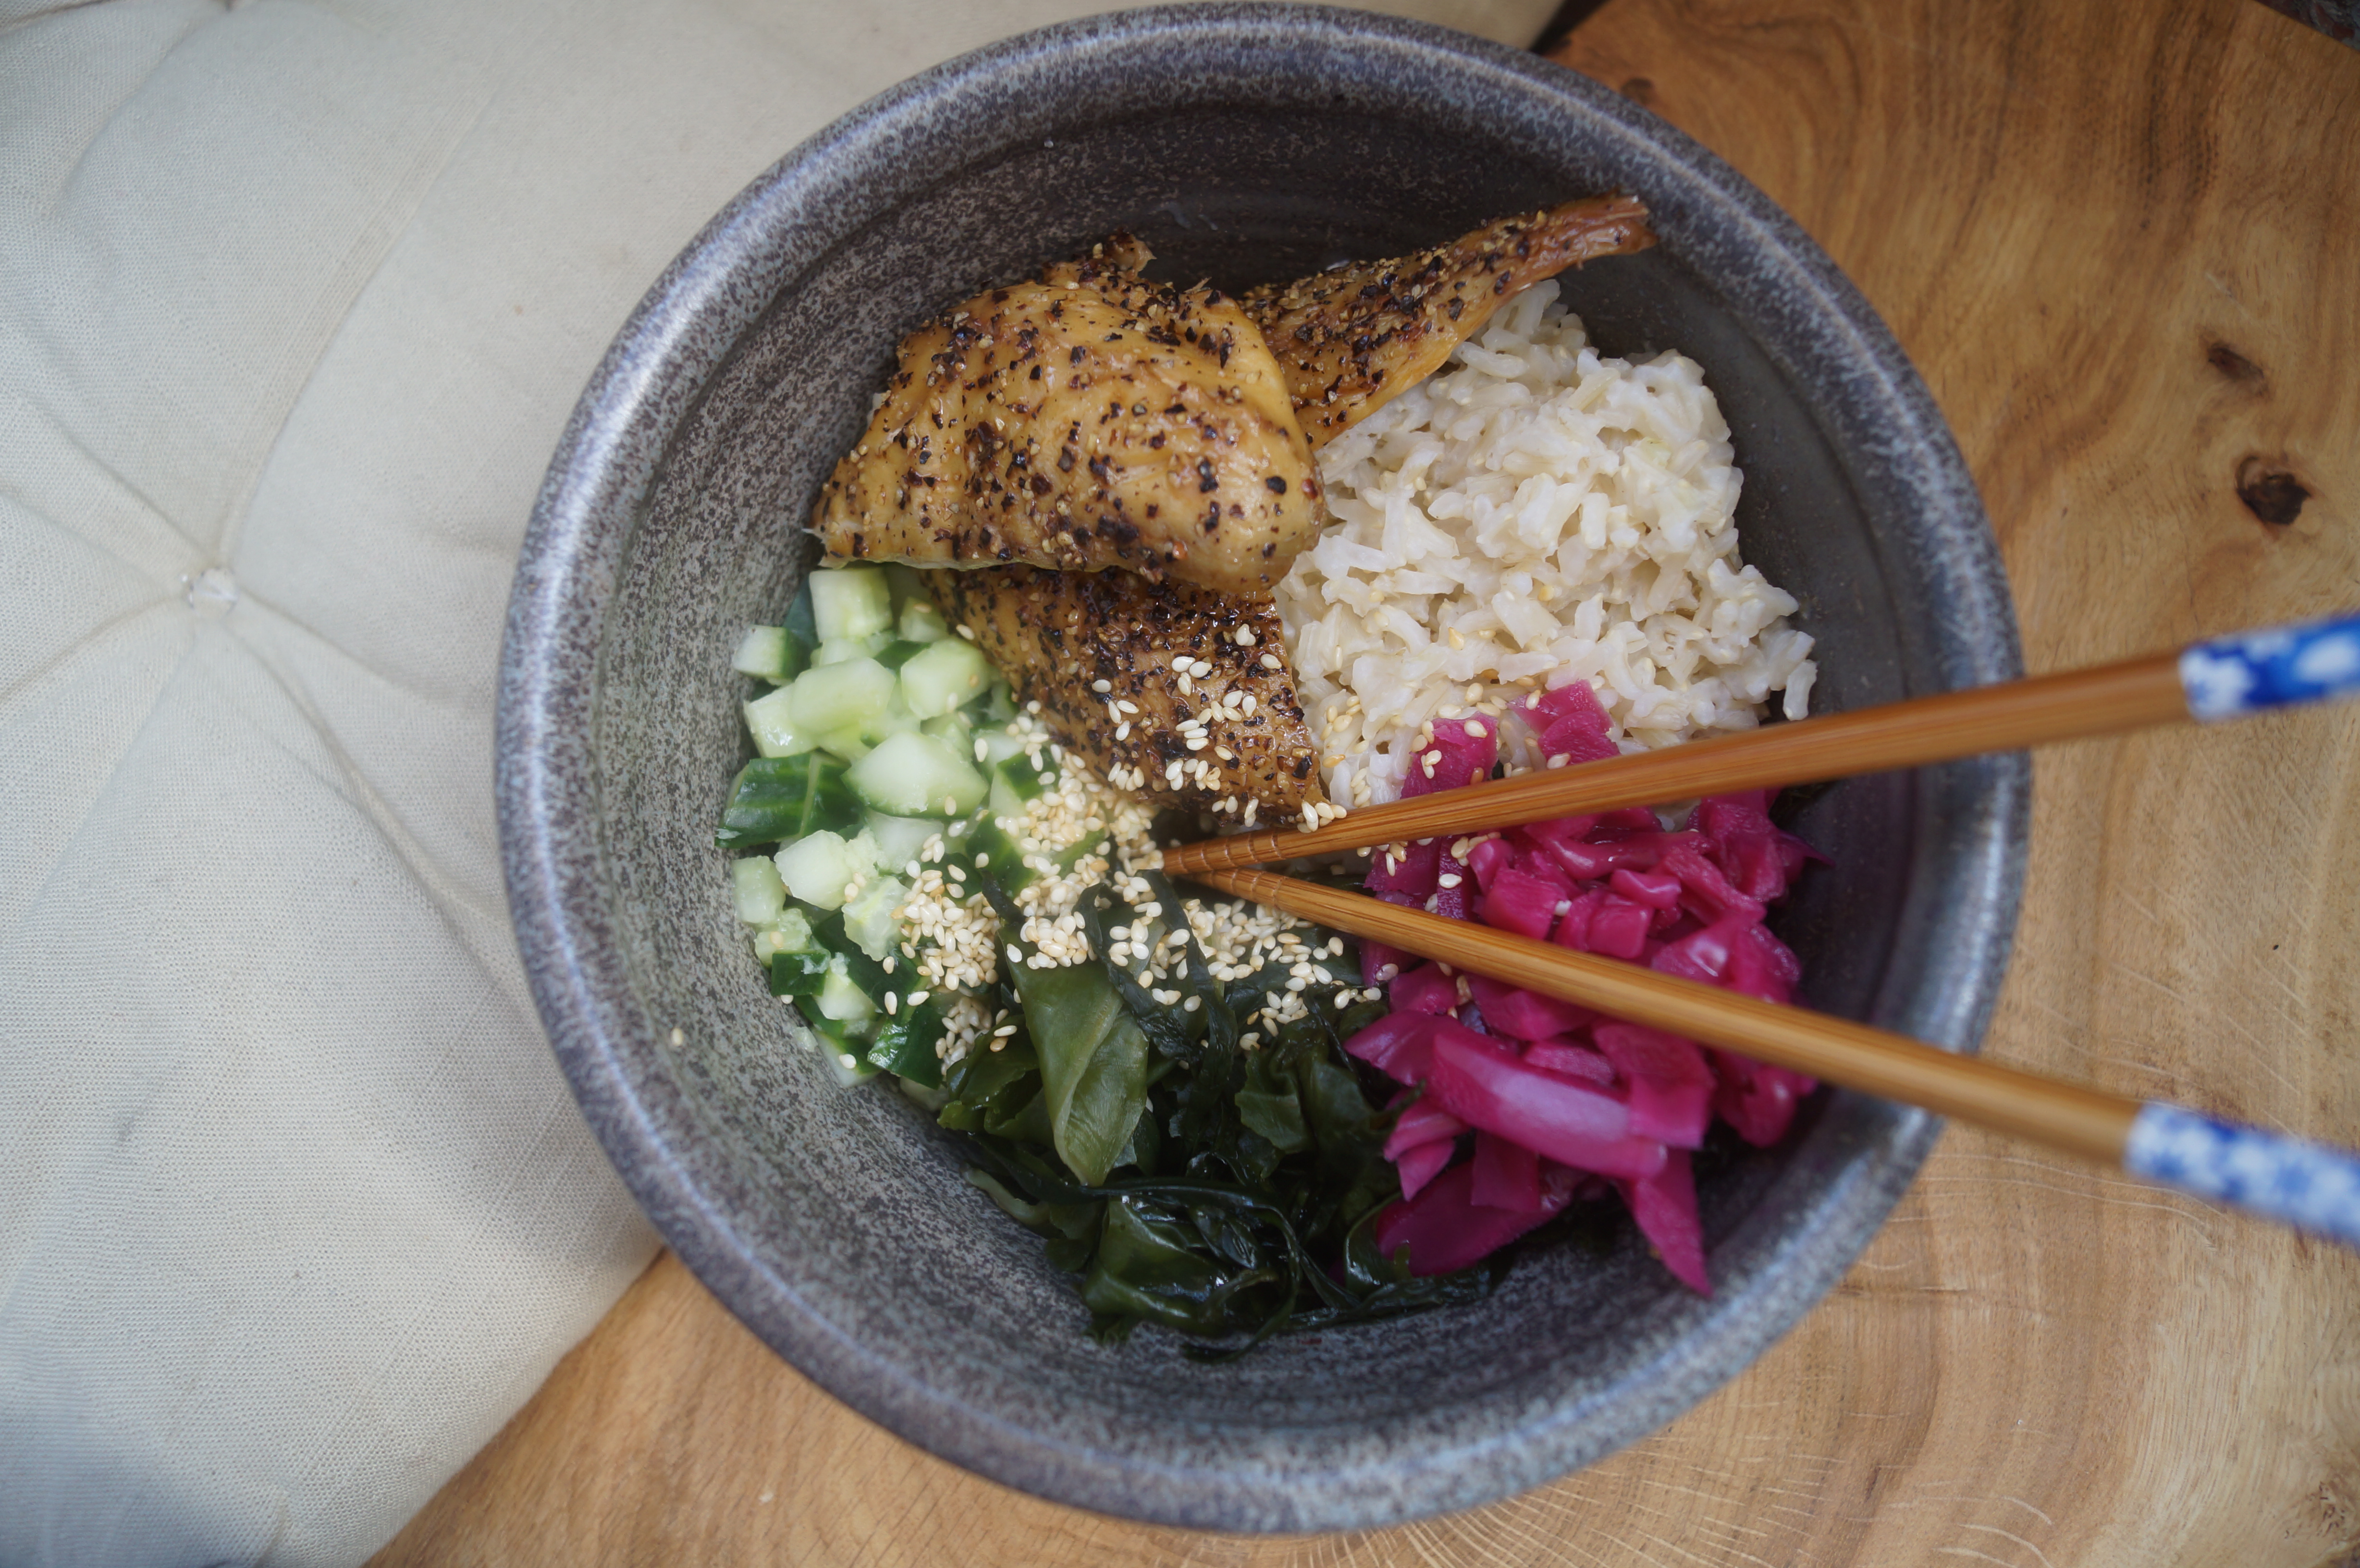
Smoked Mackerel Sushi Bowl

Serves 1

Ingredients

75g brown rice (dried or a sachet of microwave brown rice)

chunk of cucumber (I used about 50g)

1/2 teaspoon of finely grated fresh root ginger

2 teaspoons of rice vinegar

1 tablespoon of toasted sesame seeds

1 or 2 smoked mackerel fillets

To serve

1 tablespoon of pickled red cabbage

a handful of dried seaweed (which has been rehydrated in some boiling water – check pack for guidance) or some wilted spinach

Method

1. If you’re using uncooked rice pop that on to boil for 20-25 mins (check the pack for proper timings). If you’re using the microwave kind (nowt wrong with that – check the pack but all they usually add is a dash of veg oil to stop it sticking together) heat that up at the last minute.

2. Next mix the cucumber, grated ginger and rice vinegar together in a nice bowl or soup dish then nudge it to one side to make space for everything else. Pile the cooked rice in down one side, tuck in the mackerel fillets, add the seaweed or spinach then the pickled cabbage and finally sprinkle the toasted sesame seeds over the rice. Add a spritz of soy sauce if you like but I’m not sure it’s necessary. Dig in!

Mackerel sushi bowl

Sometimes all I want for dinner is a big sandwich and this one is great as it’s so quick, filling and probably jolly healthy too as the fish is poached gently in water.

Poached Salmon Pittas 

Serves 2

Ingredients
2 salmon fillets
5 black peppercorns

1 tablespoon of Greek yogurt or sour cream

handful of soft fresh herbs (I used a mix of dill and basil but parsley, chives or tarragon would also be fine)

2 wholemeal pitta bread

handful of salad leaves

1/2 punnet of salad cress

Method

1. Half fill a deep sided sauté pan or medium sized saucepan with water and add the peppercorns. Bring to the boil then add the salmon fillets. Turn the heat right down and simmer gently for about 10 minutes or until the salmon is just cooked through and when you break a piece off the flesh is opaque pink.

2. Take the salmon out of the water with a slotted spoon, discard the peppercorns and leave the fish to rest just while you pop the pitta bread in the toaster.

3. Chop the herbs with scissors and stir into the sour cream or yoghurt. When the pitta is ready, cut a slit in each one along one of the long sides and divide the herby mixture between them.

4. Peel the skin away from the salmon (if it had it on) then gently break the fish into pieces and put them inside the pittas. Stuff with salad leaves, sprinkle in the cress and serve.

Poached Salmon Pitta

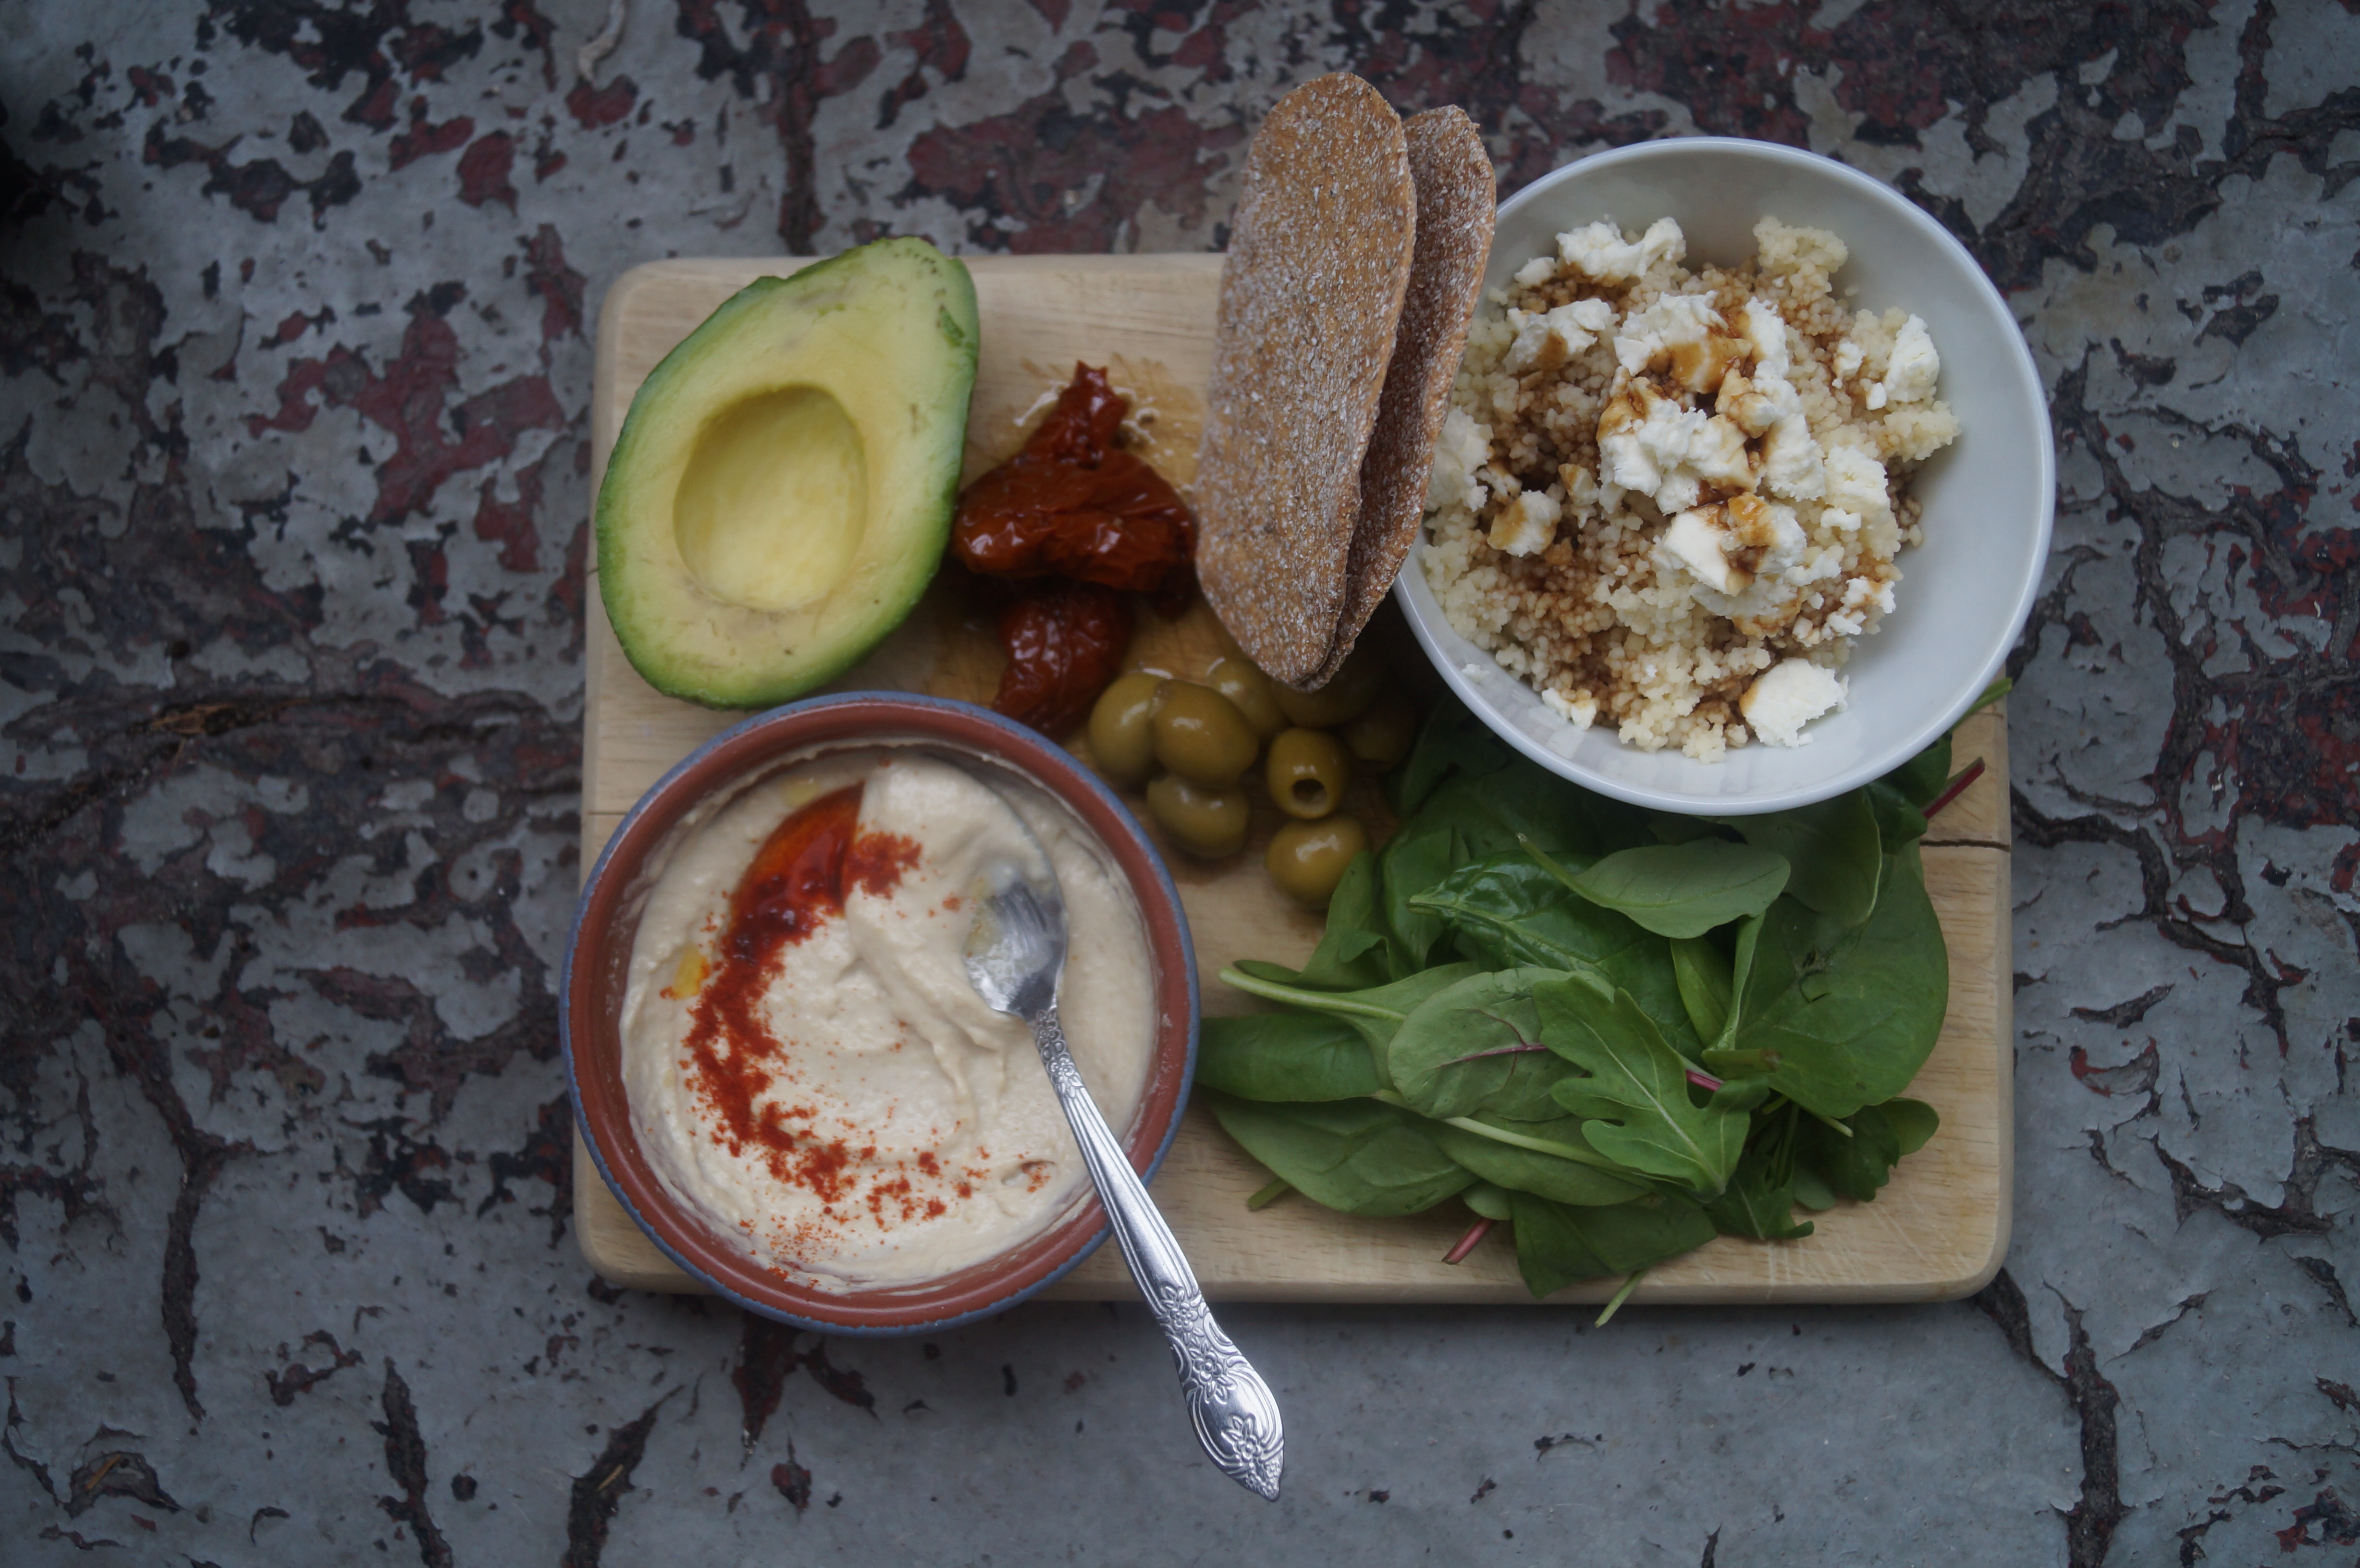
And finally a bit of a treat, even midweek…perhaps especially midweek! Pretty much everything on this platter keeps really well in the fridge, so can be hurled together whenever you need a little lift, like your own mini party!

Storecupboard Mezze

Ingredients

1 espresso cupful of couscous

1 tablespoon of light tahini

pinch of smoked paprika

3 mini crisp breads or 1 flatbread of your choice

few olives

few sundried tomatoes

1-2 tablespoons of feta cheese

1 teaspoon of pomegranate molasses

1/2 an avocado

Method

1. Pour the couscous into a heatproof bowl then add 1 1/2 espresso cupfuls of boiling water. Leave to stand whilst you prepare the rest.

2. In a small bowl mix the tahini with enough cold water to make a houmous-like consistency. Keep mixing until it’s nice and smooth then sprinkle the smoked paprika on the top and if you like a little drizzle of the oil from the sundried tomatoes.

3. Once the couscous has absorbed the water, fluff it up a bit using a fork to break up the grains then add the feta and the pomegranate molasses.

4. Pop everything else on a platter and dig in, cold glass of something lovely (alcoholic or otherwise) is a jolly nice addition.

Storecupboard Mezze

Hope you like the recipes, do let me know what you think x

If you would like me to write a recipe for you too or answer a burning kitchen conundrum please get in touch via facebook, instagram or twitter using the hashtag #askmim.

Homemade Pasta

Cooking, Recipes

The latest #AskMim request comes from Elaine, hello Elaine! She wanted to know how to make fresh pasta and a good recipe for goat’s cheese & watercress tortellini…no problemo!

fresh pasta

Some of my favourite recipes are so neat, and once they’re in your head they stick there forever, always ready when you need them.

tagliatelle

Fresh pasta is just such a recipe, once you know the formula – it’s with you forever and you can play around with it all you like.

1 large egg + 100g pasta flour = 1 portion of fresh pasta.

(Use grade ‘00’ / pasta flour if you can get it, if you can’t try strong white bread flour or ordinary plain flour.)

Method

1. Tip the flour into a large mixing bowl, make a well in the centre and add the egg. Using fork beat the egg into the flour then pop the fork down and get stuck in with your hands. Knead it really well for about 5 minutes until it’s smooth and elastic.

2. Wrap the ball of dough up in cling film and leave it in the fridge. It will keep happily in there for about half a day, any more than that and the dough tends to oxidise and you get a grey tinge to the outside which looks a bit dodge.

3. If you want to serve the pasta with something slow cooked like a rich tomato sauce or a ragu, now is the time to get cracking on that.

4. To shape the pasta, press it gently with your hands so it’s like a pitta bread and rub it with a dusting of flour. Set your pasta rollers to the thickest setting on the machine. Run the pasta through twice, rub again with a little flour then switch it to the next setting down. Again run the dough through twice. Keep going, rolling and dusting with flour until you’ve been through all the settings, or until it’s the thickness you want. If you have one, add the cutting attachment for spaghetti or tagliatelle and run it through to cut it up. Alternatively, fold it into a concertina and slice it to get long ribbons of pappardelle or cut into squares with a knife, or circles with a cookie cutter, for tortellini and ravioli. If you don’t have a pasta machine, don’t fret. You can roll it out with a rolling pin (I usually do, I borrowed the pasta machine especially). Rolling it out by hand works fine, but it can be a bit heavy going, especially when you want to get it really thin. 

Homemade pasta

5. Pop some flour (or fine semolina) onto a work surface and toss the pasta ribbons in the flour so that they don’t clump together.

fresh tagliatelle

6. Bop it into a large pan of boiling water, (salted or fling in a glug of olive oil in there if you like) and cook for 4-5 mins or to your liking. Scoop the pasta out of the boiling water with a slotted spoon/pasta spoon, straight into a serving dish or into the pan with the sauce in. A splash of pasta water is good for thinning down a thick sauce that needs a little more movement. Serve straight away.

tortellini making

For the goat’s cheese tortellini

Ingredients

2 portions worth of fresh pasta, as above (rolled out into sheets and cut into squares approx. 7 – 8cm square)
100g soft goat’s cheese
1 clove of garlic, crushed
50g watercress, finely chopped
1 egg
1 tablespoon of pine nuts, crushed
3 tablespoons of finely grated parmesan
pinch ground nutmeg
salt & black pepper

Method

1. In a small saucepan mix all the ingredients together, then cook gently over a medium heat for about 5 minutes or until thickened, stirring all the time as if you were making scrambled eggs. Remove from the heat and allow to cool, then it’s ready to pop into the pasta.

cheese and watercress filling

2. Place 1/2 teaspoonfuls of the mixture into one corner of each pasta square. Fold the oposite corner over it to seal it in. You might want to use a little water or egg wash to seal it. Push the air out carefully then roll the triangle up twice (like when you roll a neckerchief in the scouts/guides). Turn the parcel over and fold the ends to the middle then to the back, pressing gently but firmly to make sure it’s sealed well.

Folding tortellini

3. When you’ve repeated the process with all of the pasta and the filling, drop them carefully into boiling water for 3-4 minutes or until they’re starting to bob merrily on the surface. Scoop out with a slotted spoon. I like to serve mine very simply with a little more finely grated parmesan and some salt and pepper.

Buon appetito!

x

Goat's cheese and watercress tortellini

If you would like me to write a recipe for you too or answer a burning kitchen conundrum please get in touch via facebook, instagram or twitter using the hashtag #askmim.

Happy Cooking and thanks Elaine for getting in touch. Hope you have fun making pasta. xx

Lazy Carrot & Potato Tartiflette

Uncategorized

Tartiflette

It snowed…in London! I’m convinced this never happens, but on Monday night it blooming well did!
I’d been complaining about a headache in the office on Monday afternoon, and threw out a comment that I only ever get headaches like that when there’s going to be a storm…so now my colleague is totally convinced I’m psychic. Before I get taken away for scientific analysis, here’s my recipe for a tartiflette inspired bake that’s going to bring a bit of a ski lodge vibe to your weeknight supper.
It’s so easy (I’ve called it lazy) because there’s no par boiling of the potatoes, or even slicing them, and the bacon goes in raw so there’s no frying either!

Serve with a glass of chilled white wine…I like Gewürztraminer because it cuts through the richness of the cheese and because I really like saying Gewürztraminer x

Carrot and potato tartiflette

Lazy Carrot & Potato Tartiflette

Serves 3

Ingredients

500g of baby new potatoes (I used a mixture of red and white ones but any are fine)
250g baby carrots
6 baby onions or small round shallots
2 garlic cloves, unpeeled
25g butter
200g smoked bacon lardons
2 tablespoons of white wine, plus more for drinking if you like, and if you’re old enough of course!
150g – 200g reblochon cheese, sliced
2 tablespoons of crème fraîche

Small bunch of tarragon, chopped
1 little gem lettuce
Baguette (optional)

Method

1. Preheat your oven to 200°c. Peel the baby onions and trim off any roots. Pop them in a large oven proof dish with the potatoes, carrots, garlic cloves, and butter then scatter over the bacon lardons.

2. Bake for 50 minutes to 1 hour, stirring occasionally during cooking (oh and if the potatoes start to whistle prick them with a sharp knife, I was a bit worried mine were going to explode so keep an ear out)

3.  When the bacon is cooked and starting to crisp up and the potatoes are tender and it’s all looking generally ace, take the dish out of the oven and with the back of a fork gently crush some of the potatoes. You just want to flatten them a little bit, don’t totally mash them. Now pour over the white wine and season well with black pepper and a pinch of salt. Next lay the sliced reblochon cheese on top and return it to the oven for another 5 or 6 minutes to allow the cheese to melt, and that’s pretty much it.

4. When the tartiflette is ready, add a dollop of crème fraîche and the chopped tarragon. Serve with chunks of warm baguette, put on your slipper socks and relax.

Happy cooking!

What do you eat when it snows? Gimme a shout on twitter or facebook  #askmim

xx

Easy tartiflette

Lazy carrot and potato tartiflette