My latest foodie adventure has begun by signing up to be a foodie penpal via Rock Salt (who got the set up from The Lean Green Bean)…and it’s bloody brilliant! Basically, you’re added to a database of foodies. Each month the coordinator picks someone from the database to send you a parcel of interesting foodie goodies and at the same time you’re chosen to send a parcel to someone else. Then you get in touch (to say thanks or check it all arrived ok) and then blog about what you got. Easy.
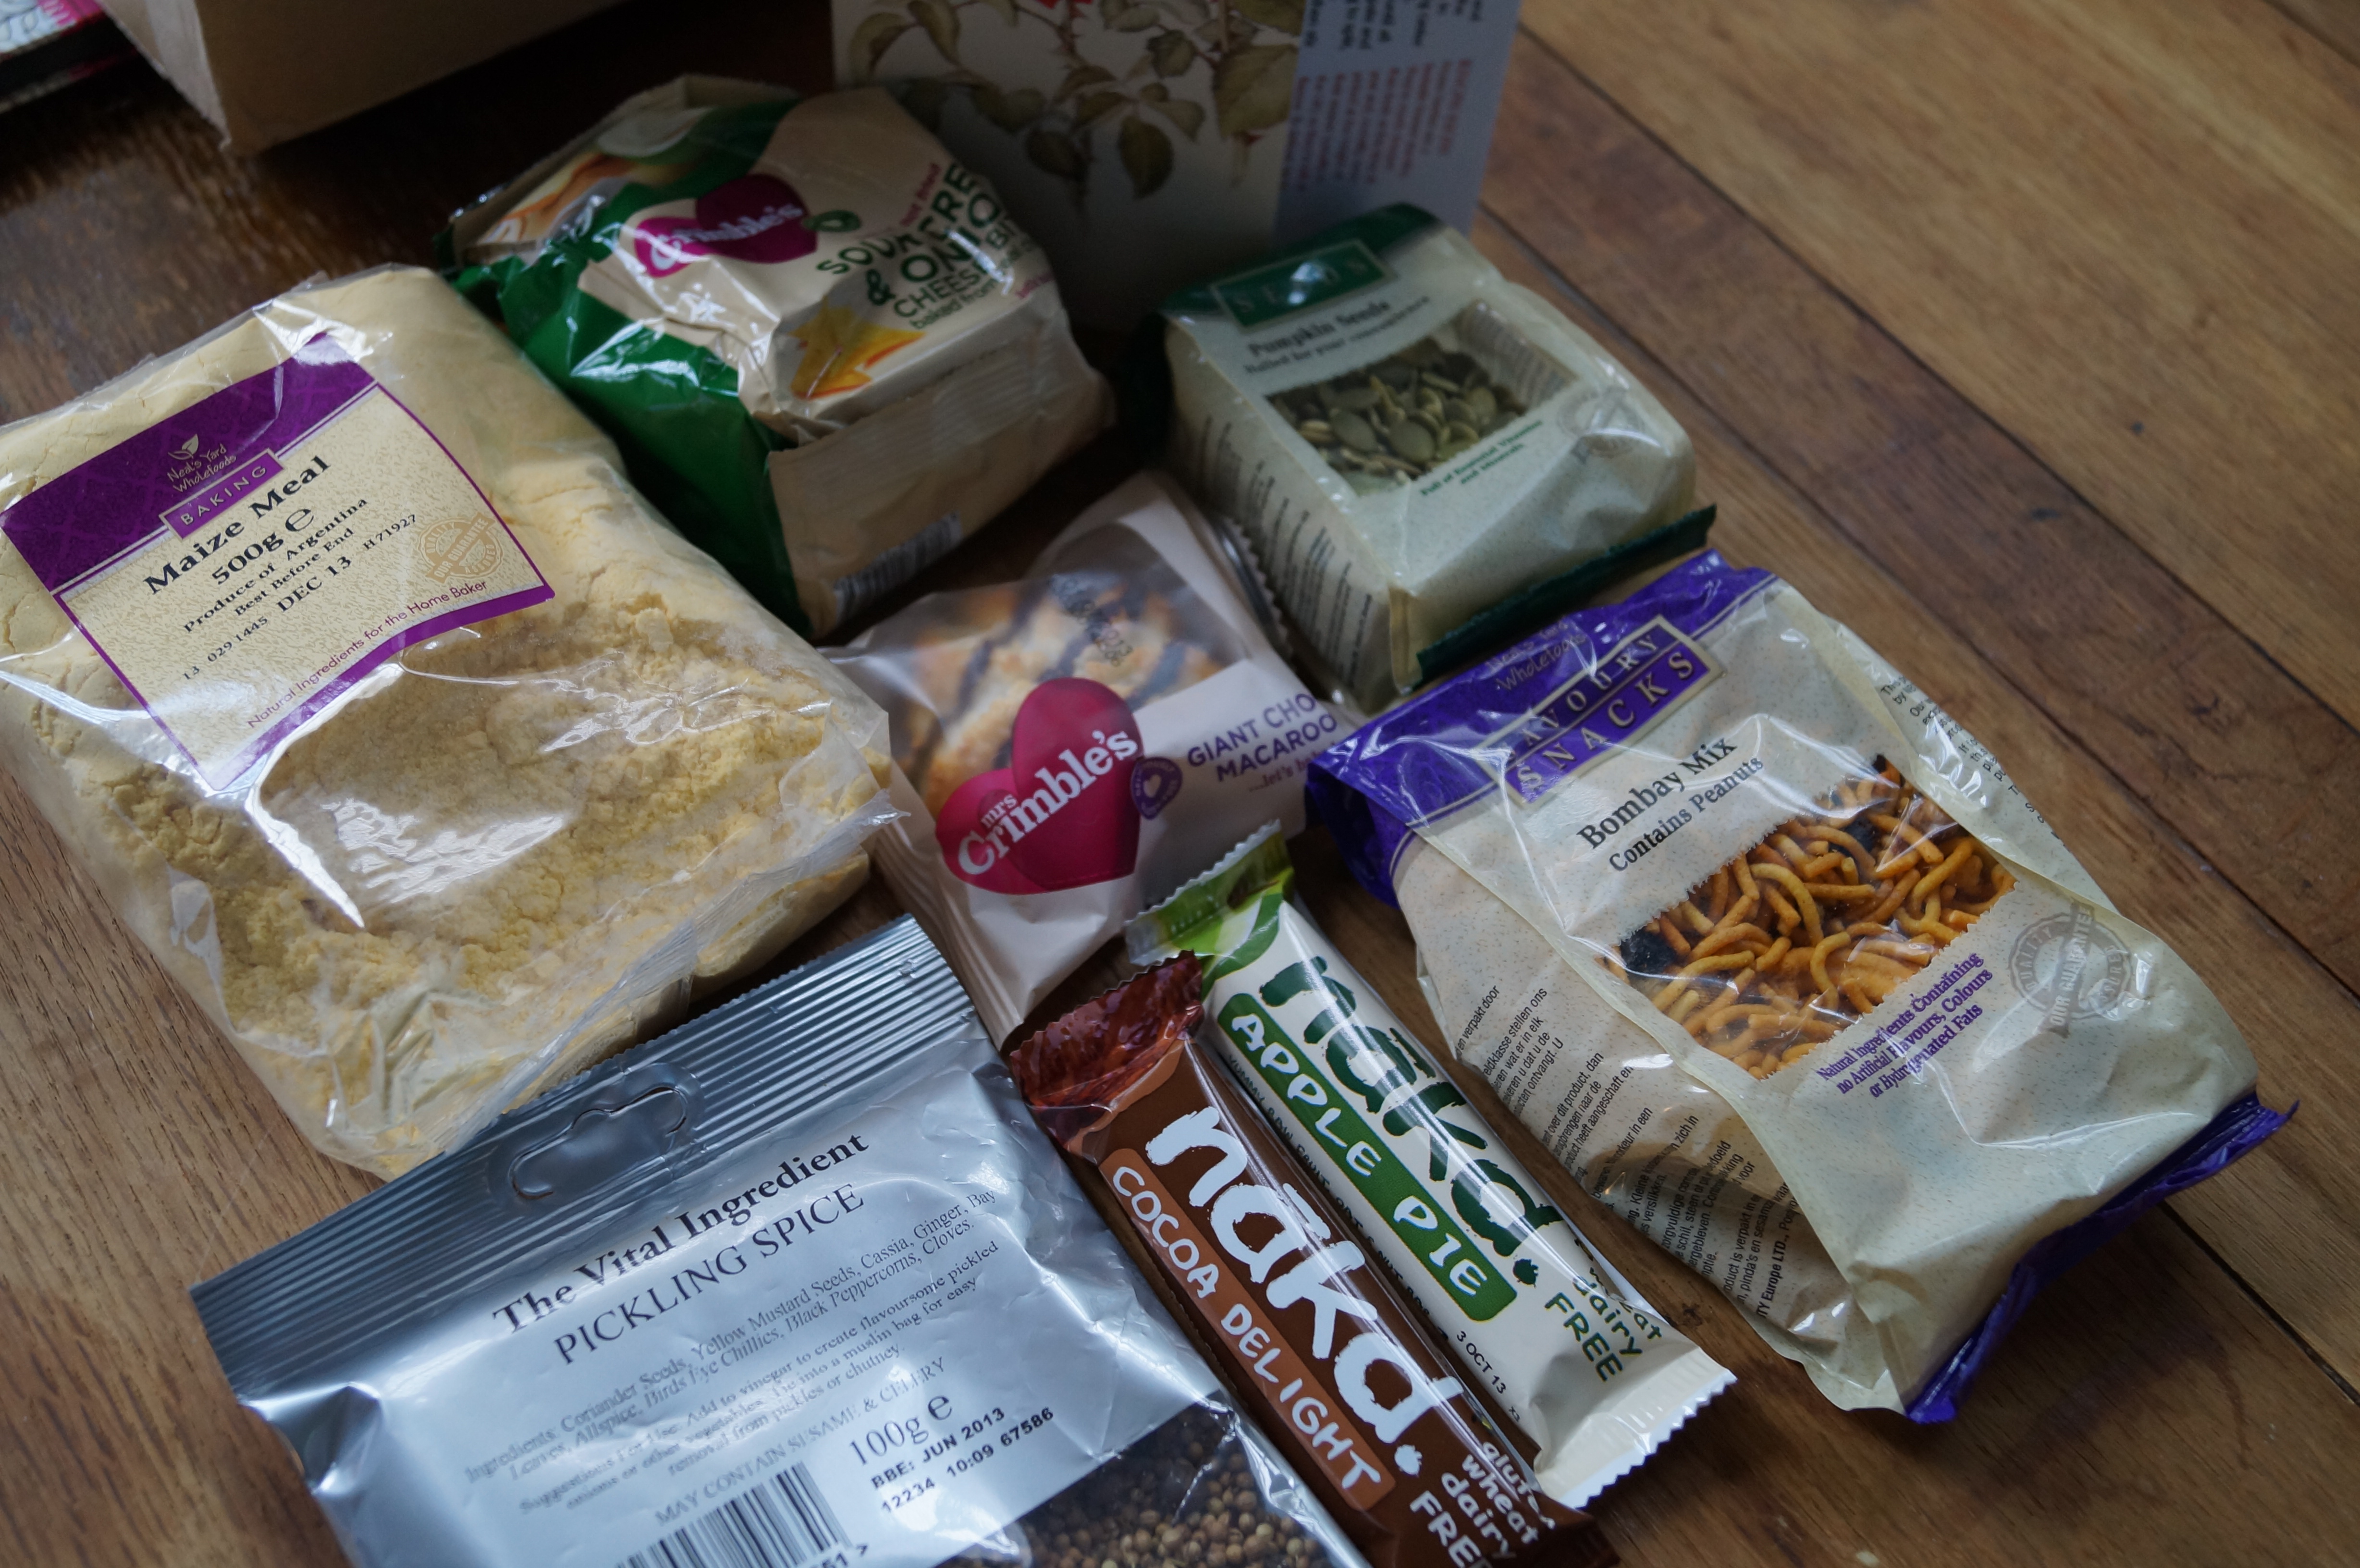
A couple of weeks ago my first parcel arrived, it was like an early birthday present, with a card and everything! The lovely Teresa had neatly packed a wonderful mix of goodies and cooking ingredients and tucked into the card was one of her favourite recipes for me to try.
I made very short work of the nãkd. snack bars, and coconut macaroon, but I did then share the bombay mix with Richard so I’m not a total meanie.
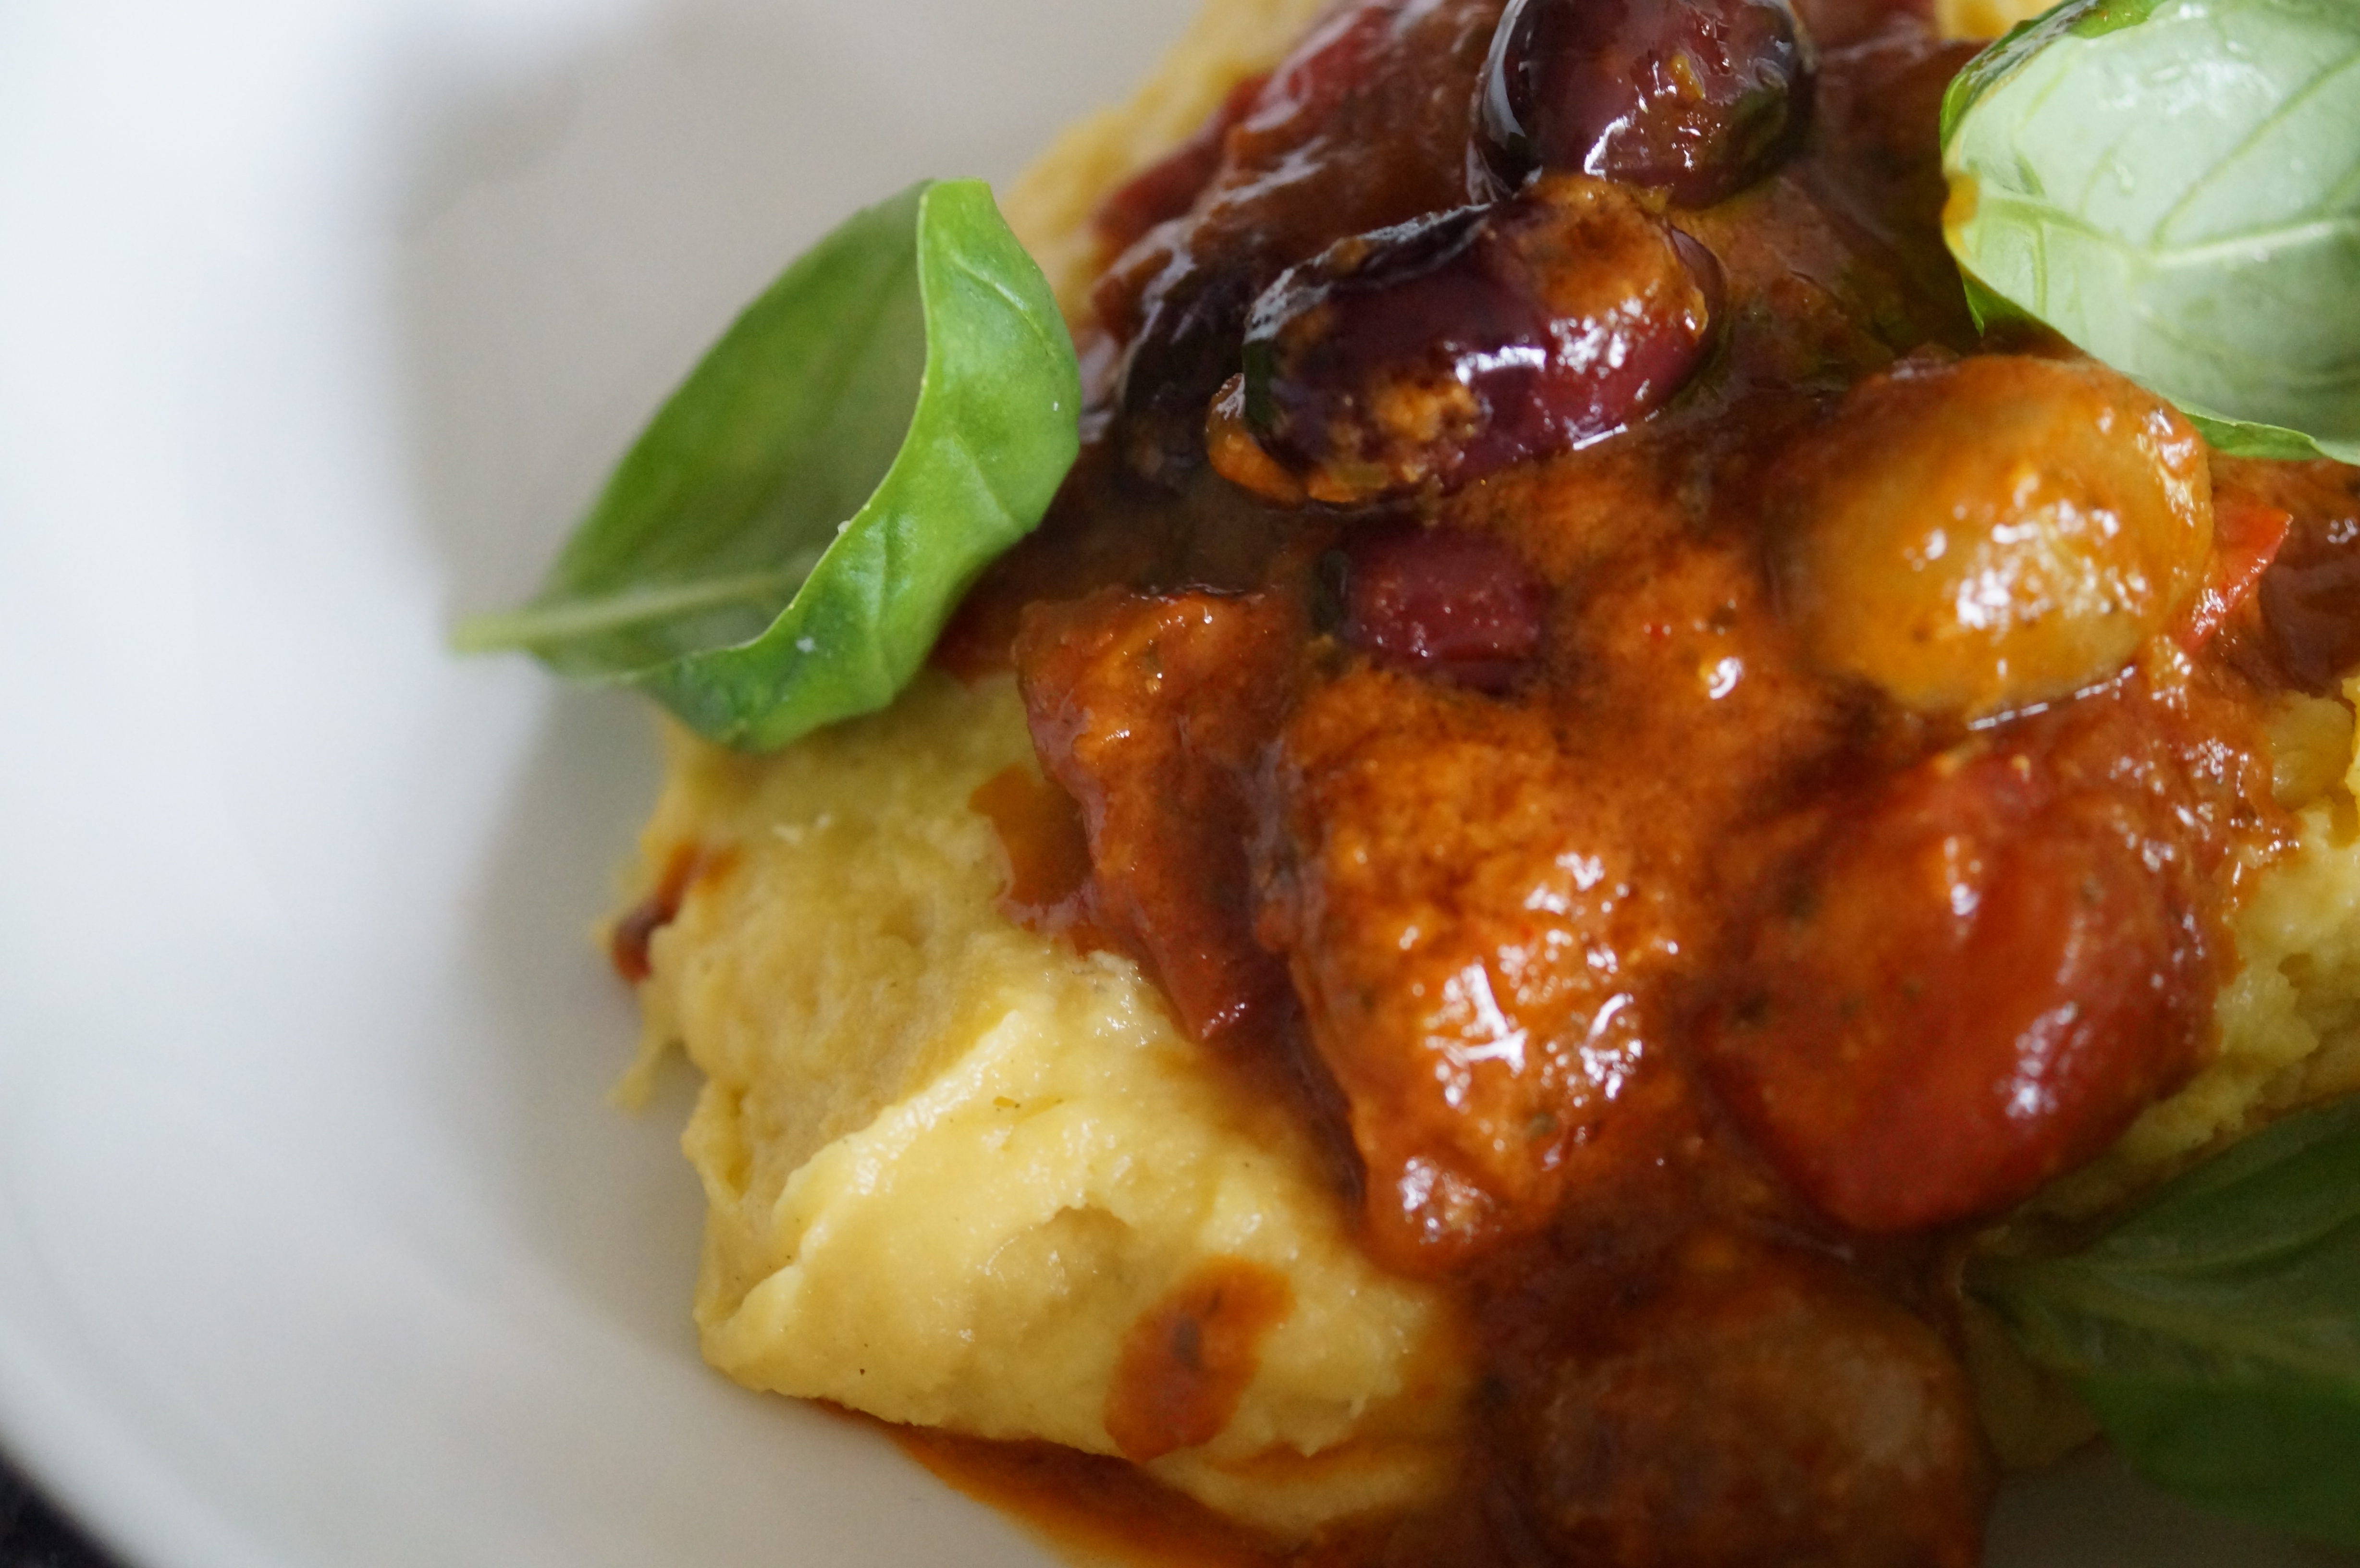
The maize meal (fine polenta) was my favourite ingredient in the parcel because I’ve hardly ever used it but kept meaning to.
I was surprised how easy it is to make soft polenta and I followed this recipe which turned out great. I had planned to put any leftovers into an oven proof dish so they could set, allowing me to slice it and make polenta chips…but there were no leftovers 🙂
To go with the polenta I just grilled a few tomatoes, then at the end I threw in a few olives and a tablespoon of sundried tomato pesto, then returned to the grill just to warm everything briefly. Serve the tomato and olive mix over the polenta with some fresh basil and black pepper.
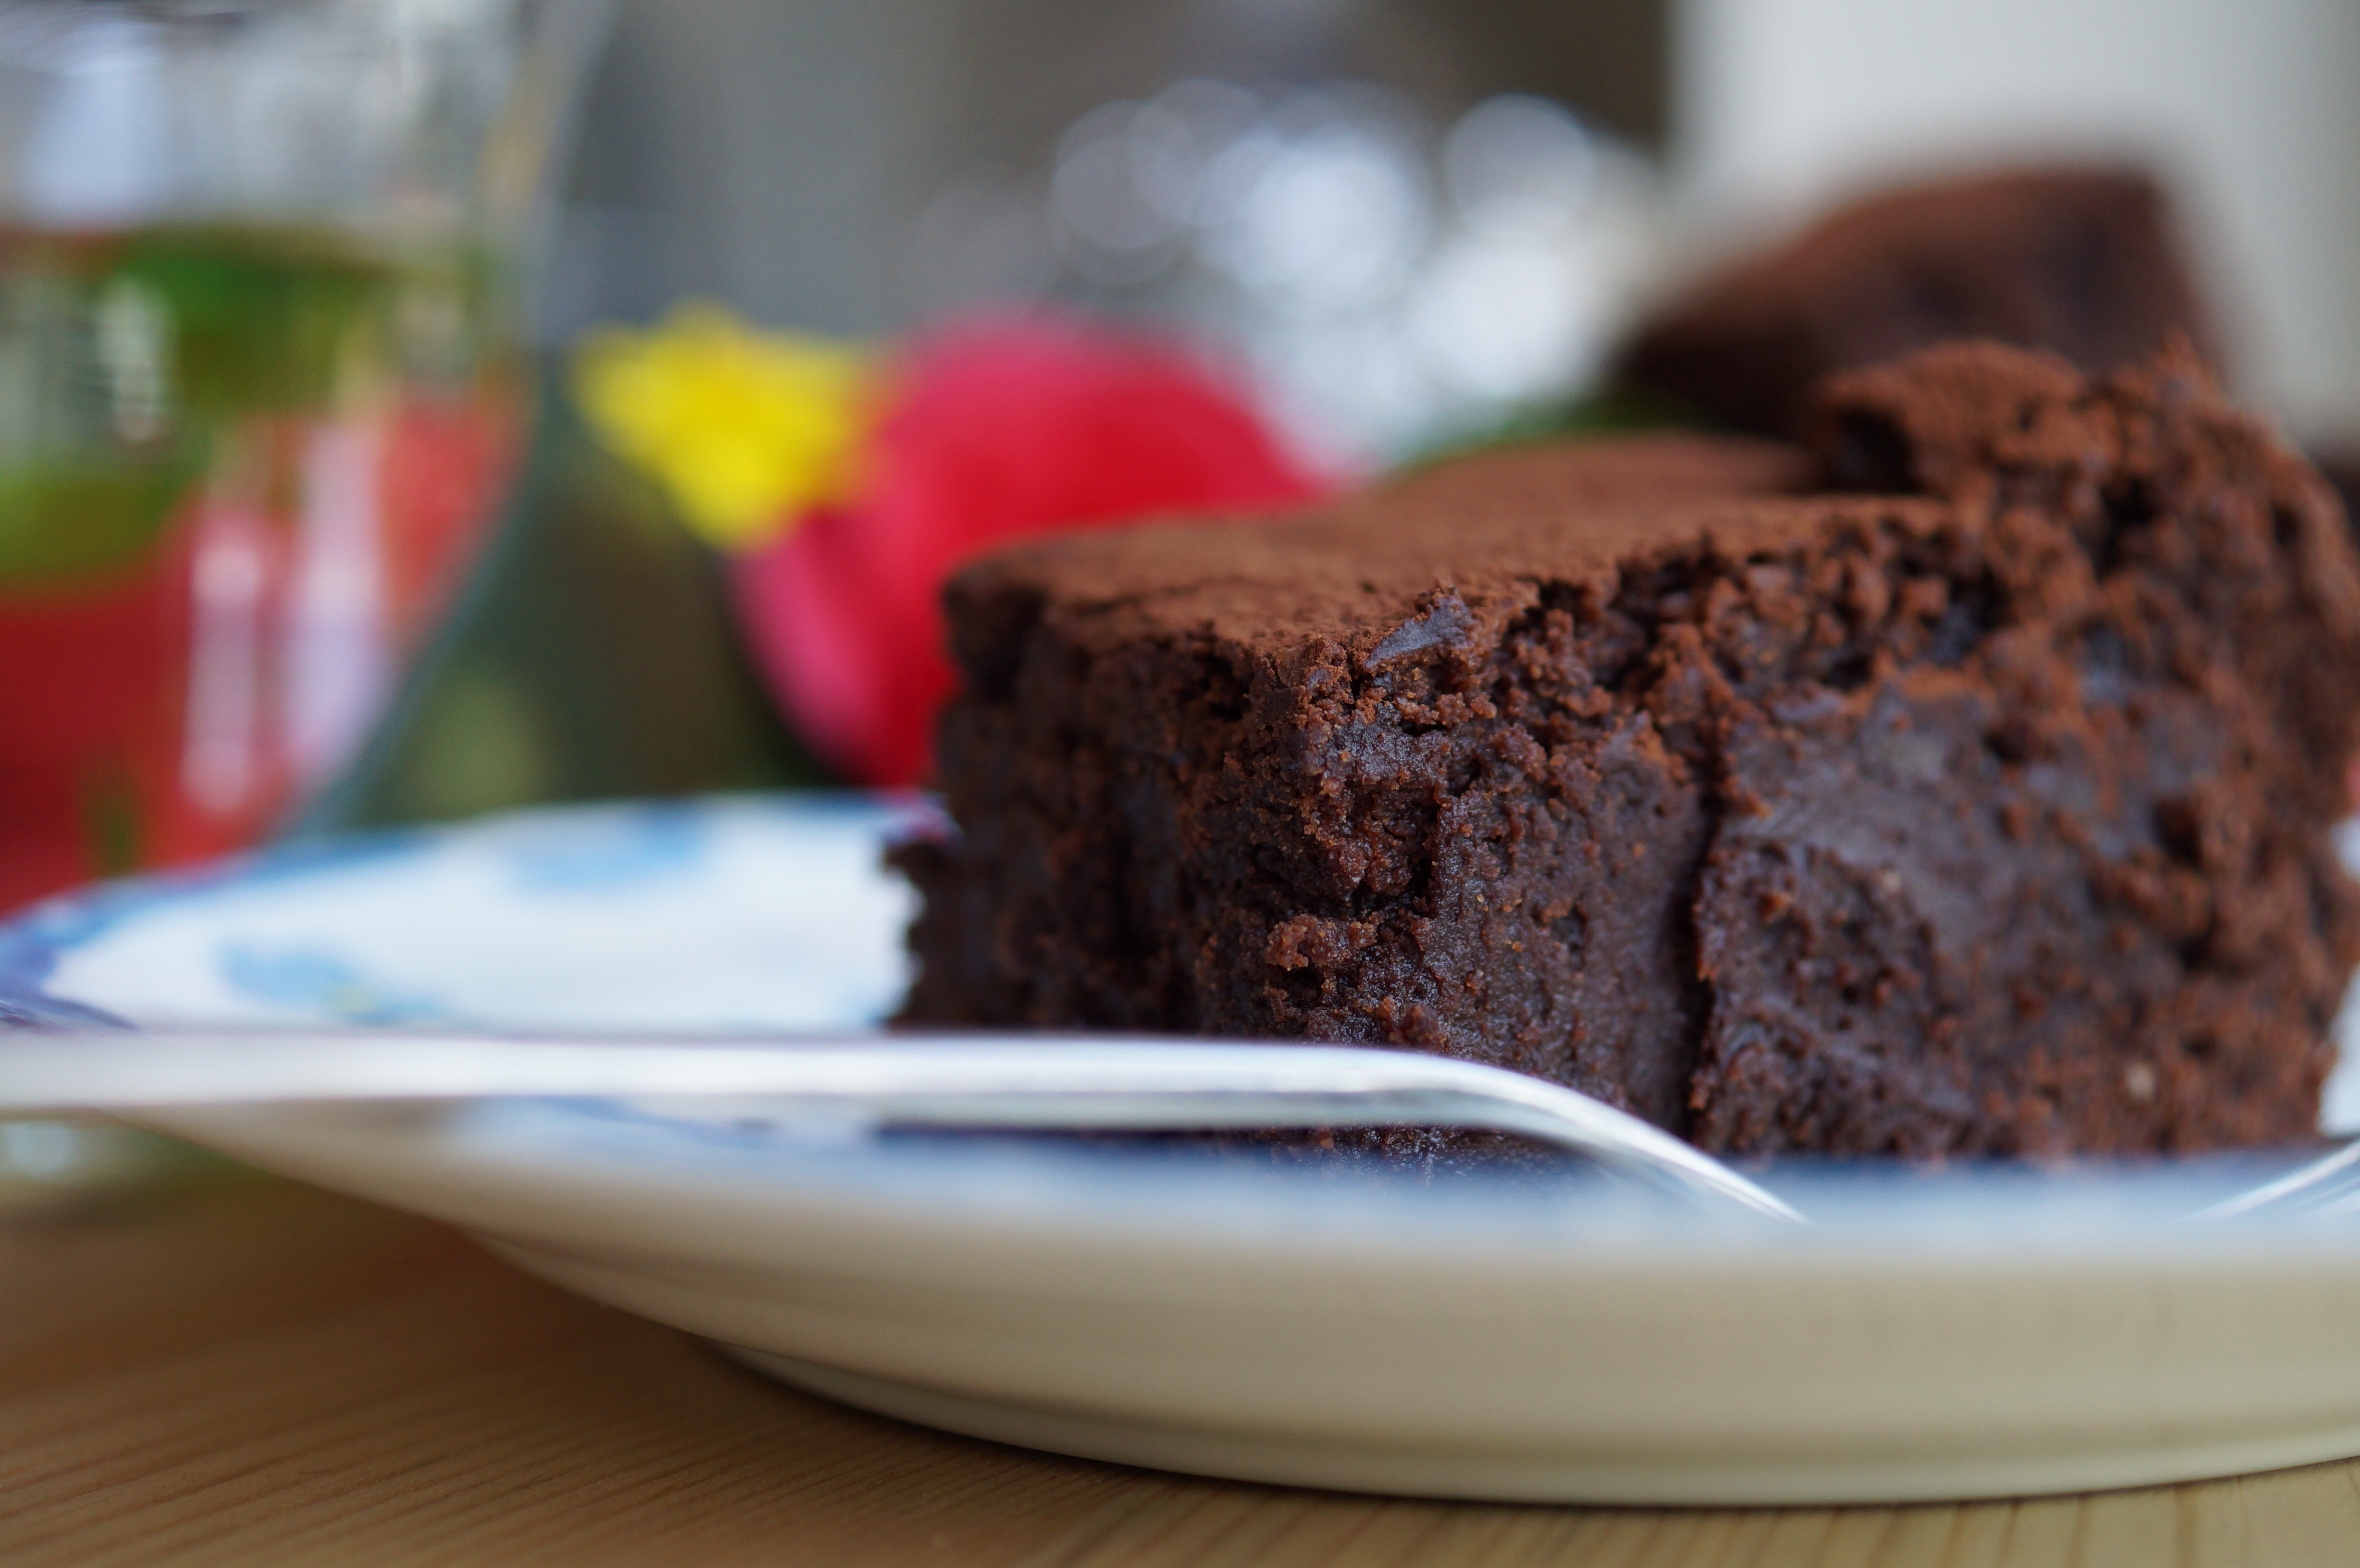
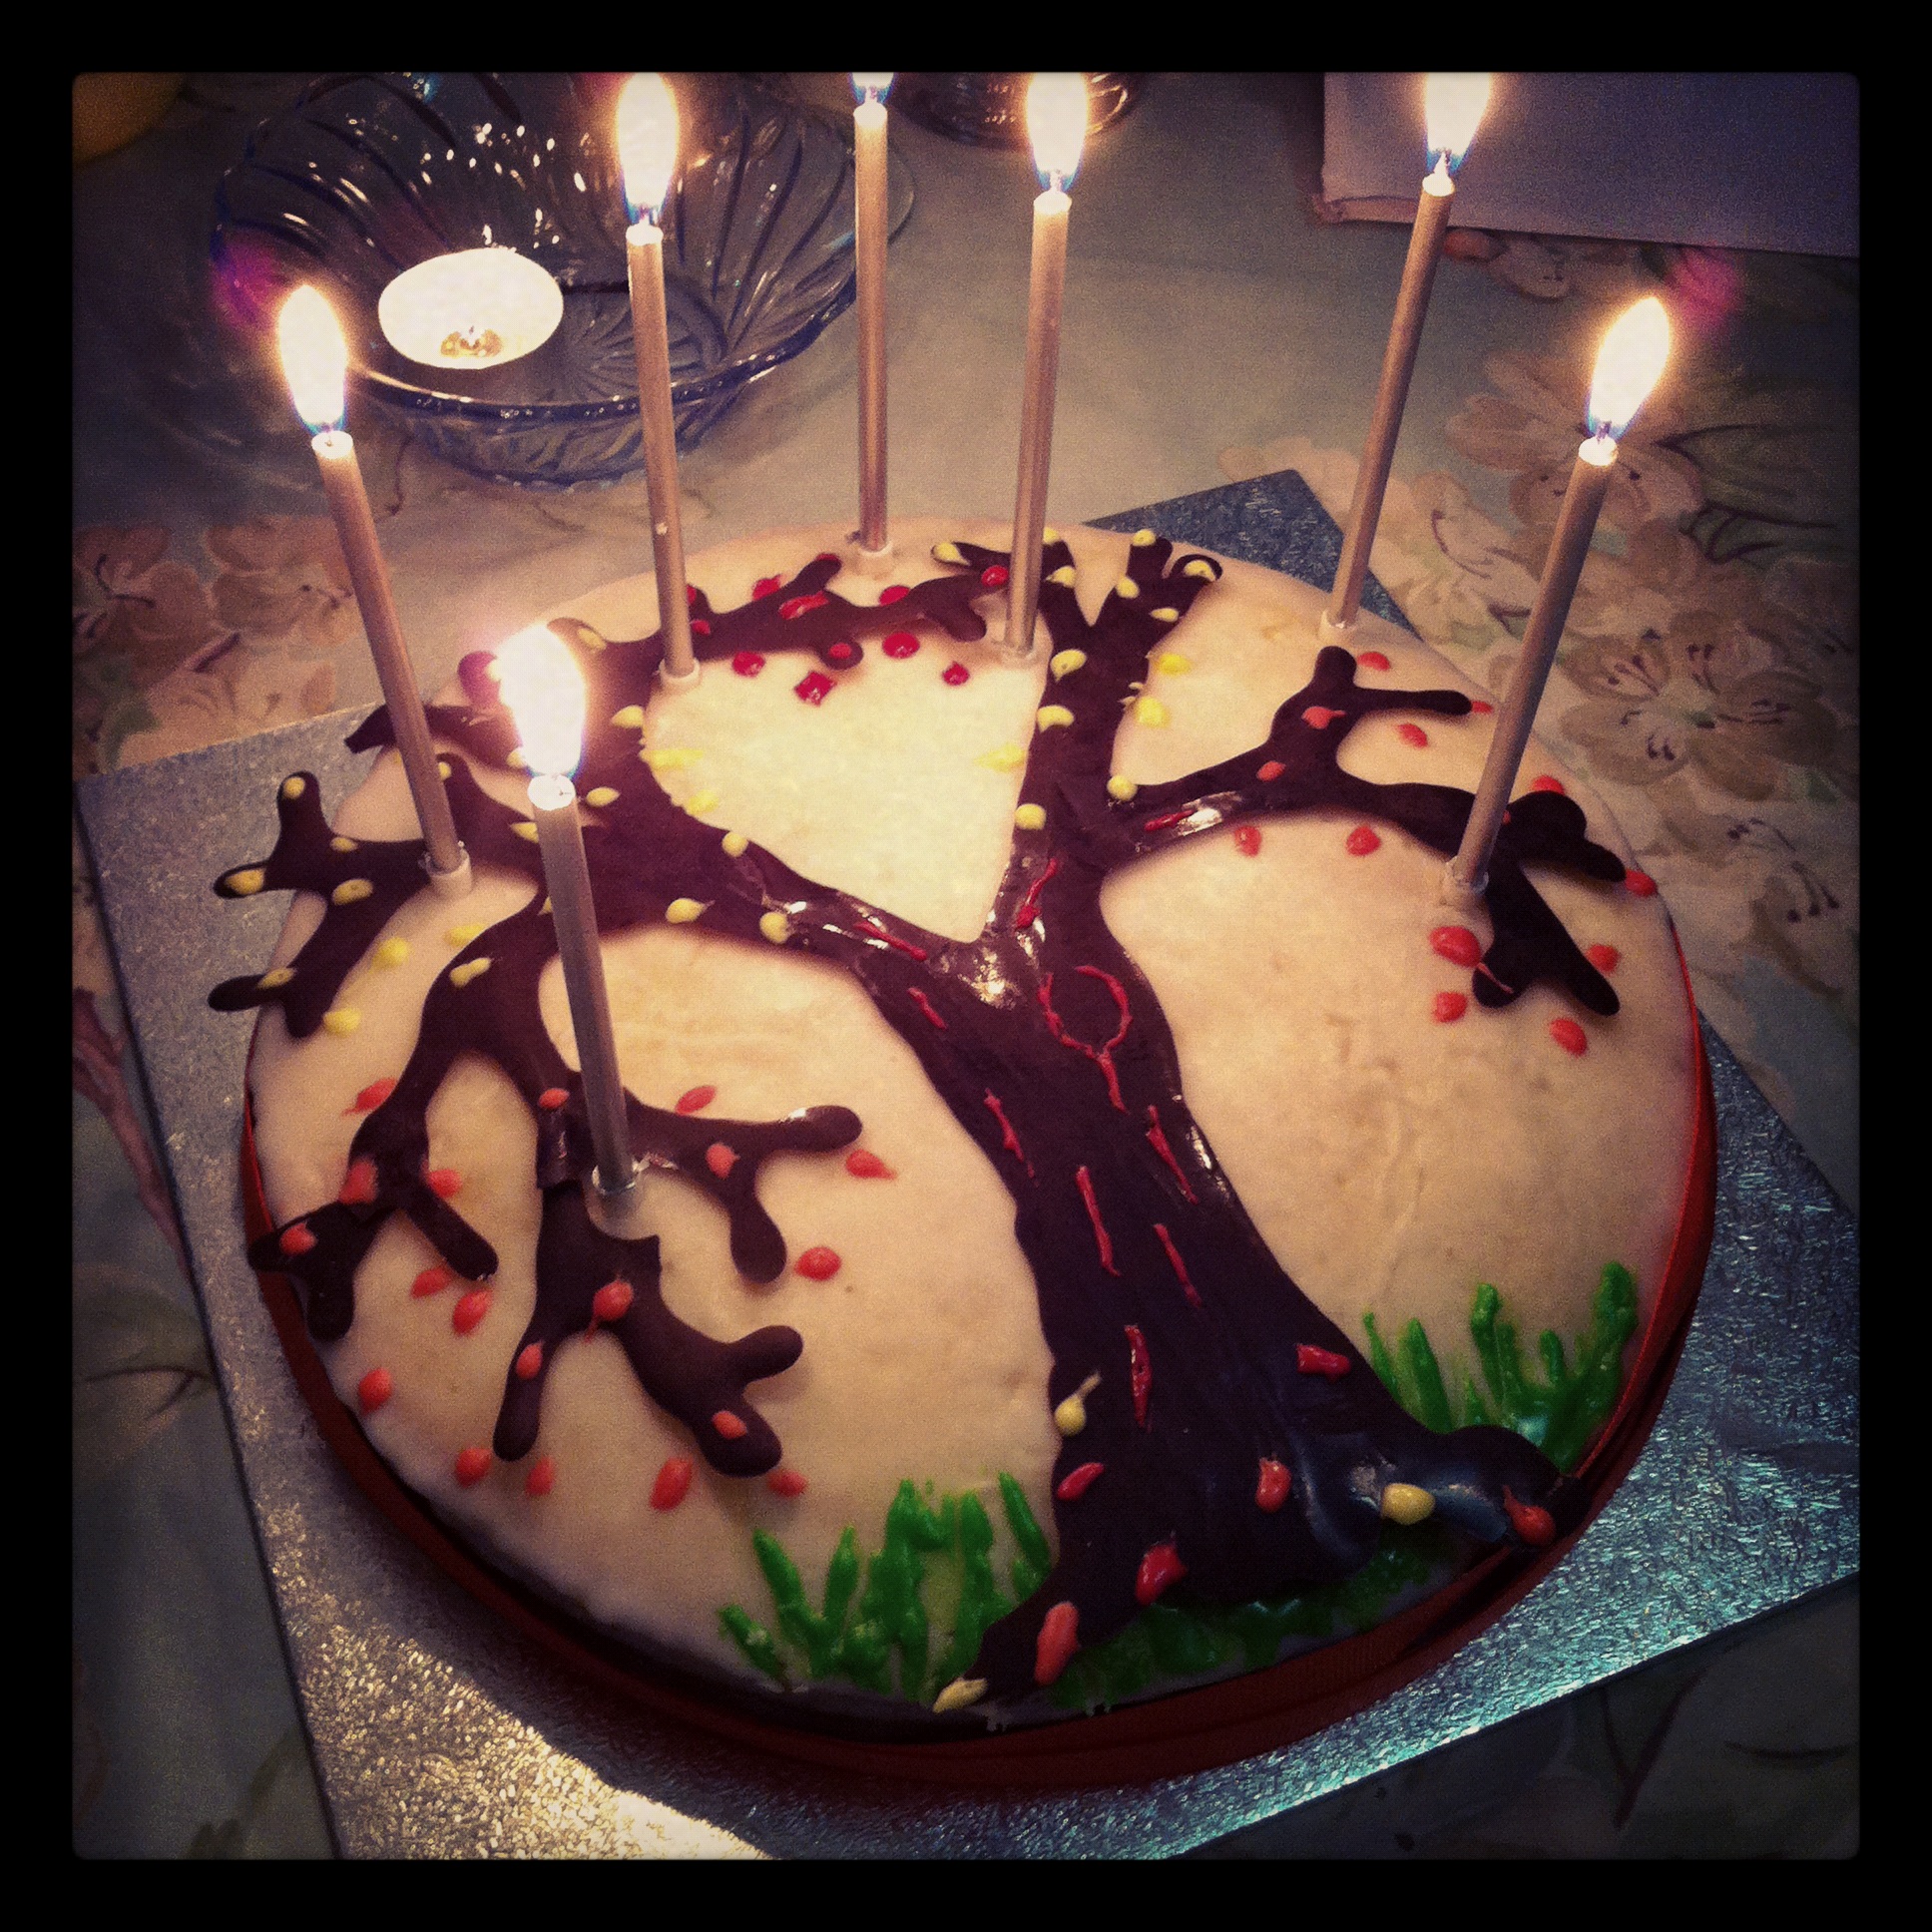
I made these when I was very, very cross. In fact, I’m just gonna go ahead and say it, I had PMT. I was so grumpy, it was actually ridiculous. I shouted at a sofa, a laptop, my phone and Richard. Luckily he’s very patient and extremely understanding so just laughs at me when I lose my temper at everything! In return for his patience I shared my anger quashing brownies. I find that chocolate is good for when my hormones are on the blink and I add extra chocolate enhancing flavours like cardamon and coffee to make them even more consoling.
Anger Management Brownies
Ingredients
100g butter (plus extra for greasing)
200g dark chocolate
4 eggs
200g golden caster sugar
1 teaspoon of ground cardamom
1 espresso (or 50ml of very strong coffee)
50g honey
1 teaspoon of rosewater
130g plain flour
1 tsp of baking powder
30g cocoa, and a bit more for dusting
Method
Line a 20cm square cake tin (or similar sized rectangular one) with a piece of baking paper and grease well with butter. Preheat the oven to 180°C.
Put the chocolate and butter in a bowl which is fitted on top of a pan of just boiling water, heat until both are melted.
Whisk the sugar and eggs together until the mix has about doubled in size and is a lot paler than it was when you started whisking.
Add the espresso, ground cardamom, honey and rosewater to the egg mixture and whisk again to combine.
Now pour the melted butter and chocolate into the egg mix and whisk once more until smooth.
Then fold in the flour, baking powder and cocoa and then tip the mixture into the prepared tin.
Bake for 20-25 minutes. Don’t worry if it’s still quite wobbly in the middle, it will set more when it’s cold.
Leave to cool (if you can wait that long) then slice into squares, dust with cocoa powder if you’re feeling fancy.
I like to serve mine (if I’m feeling particularly grumpy) with a good slice of action movie! Yippee–ki–yay!
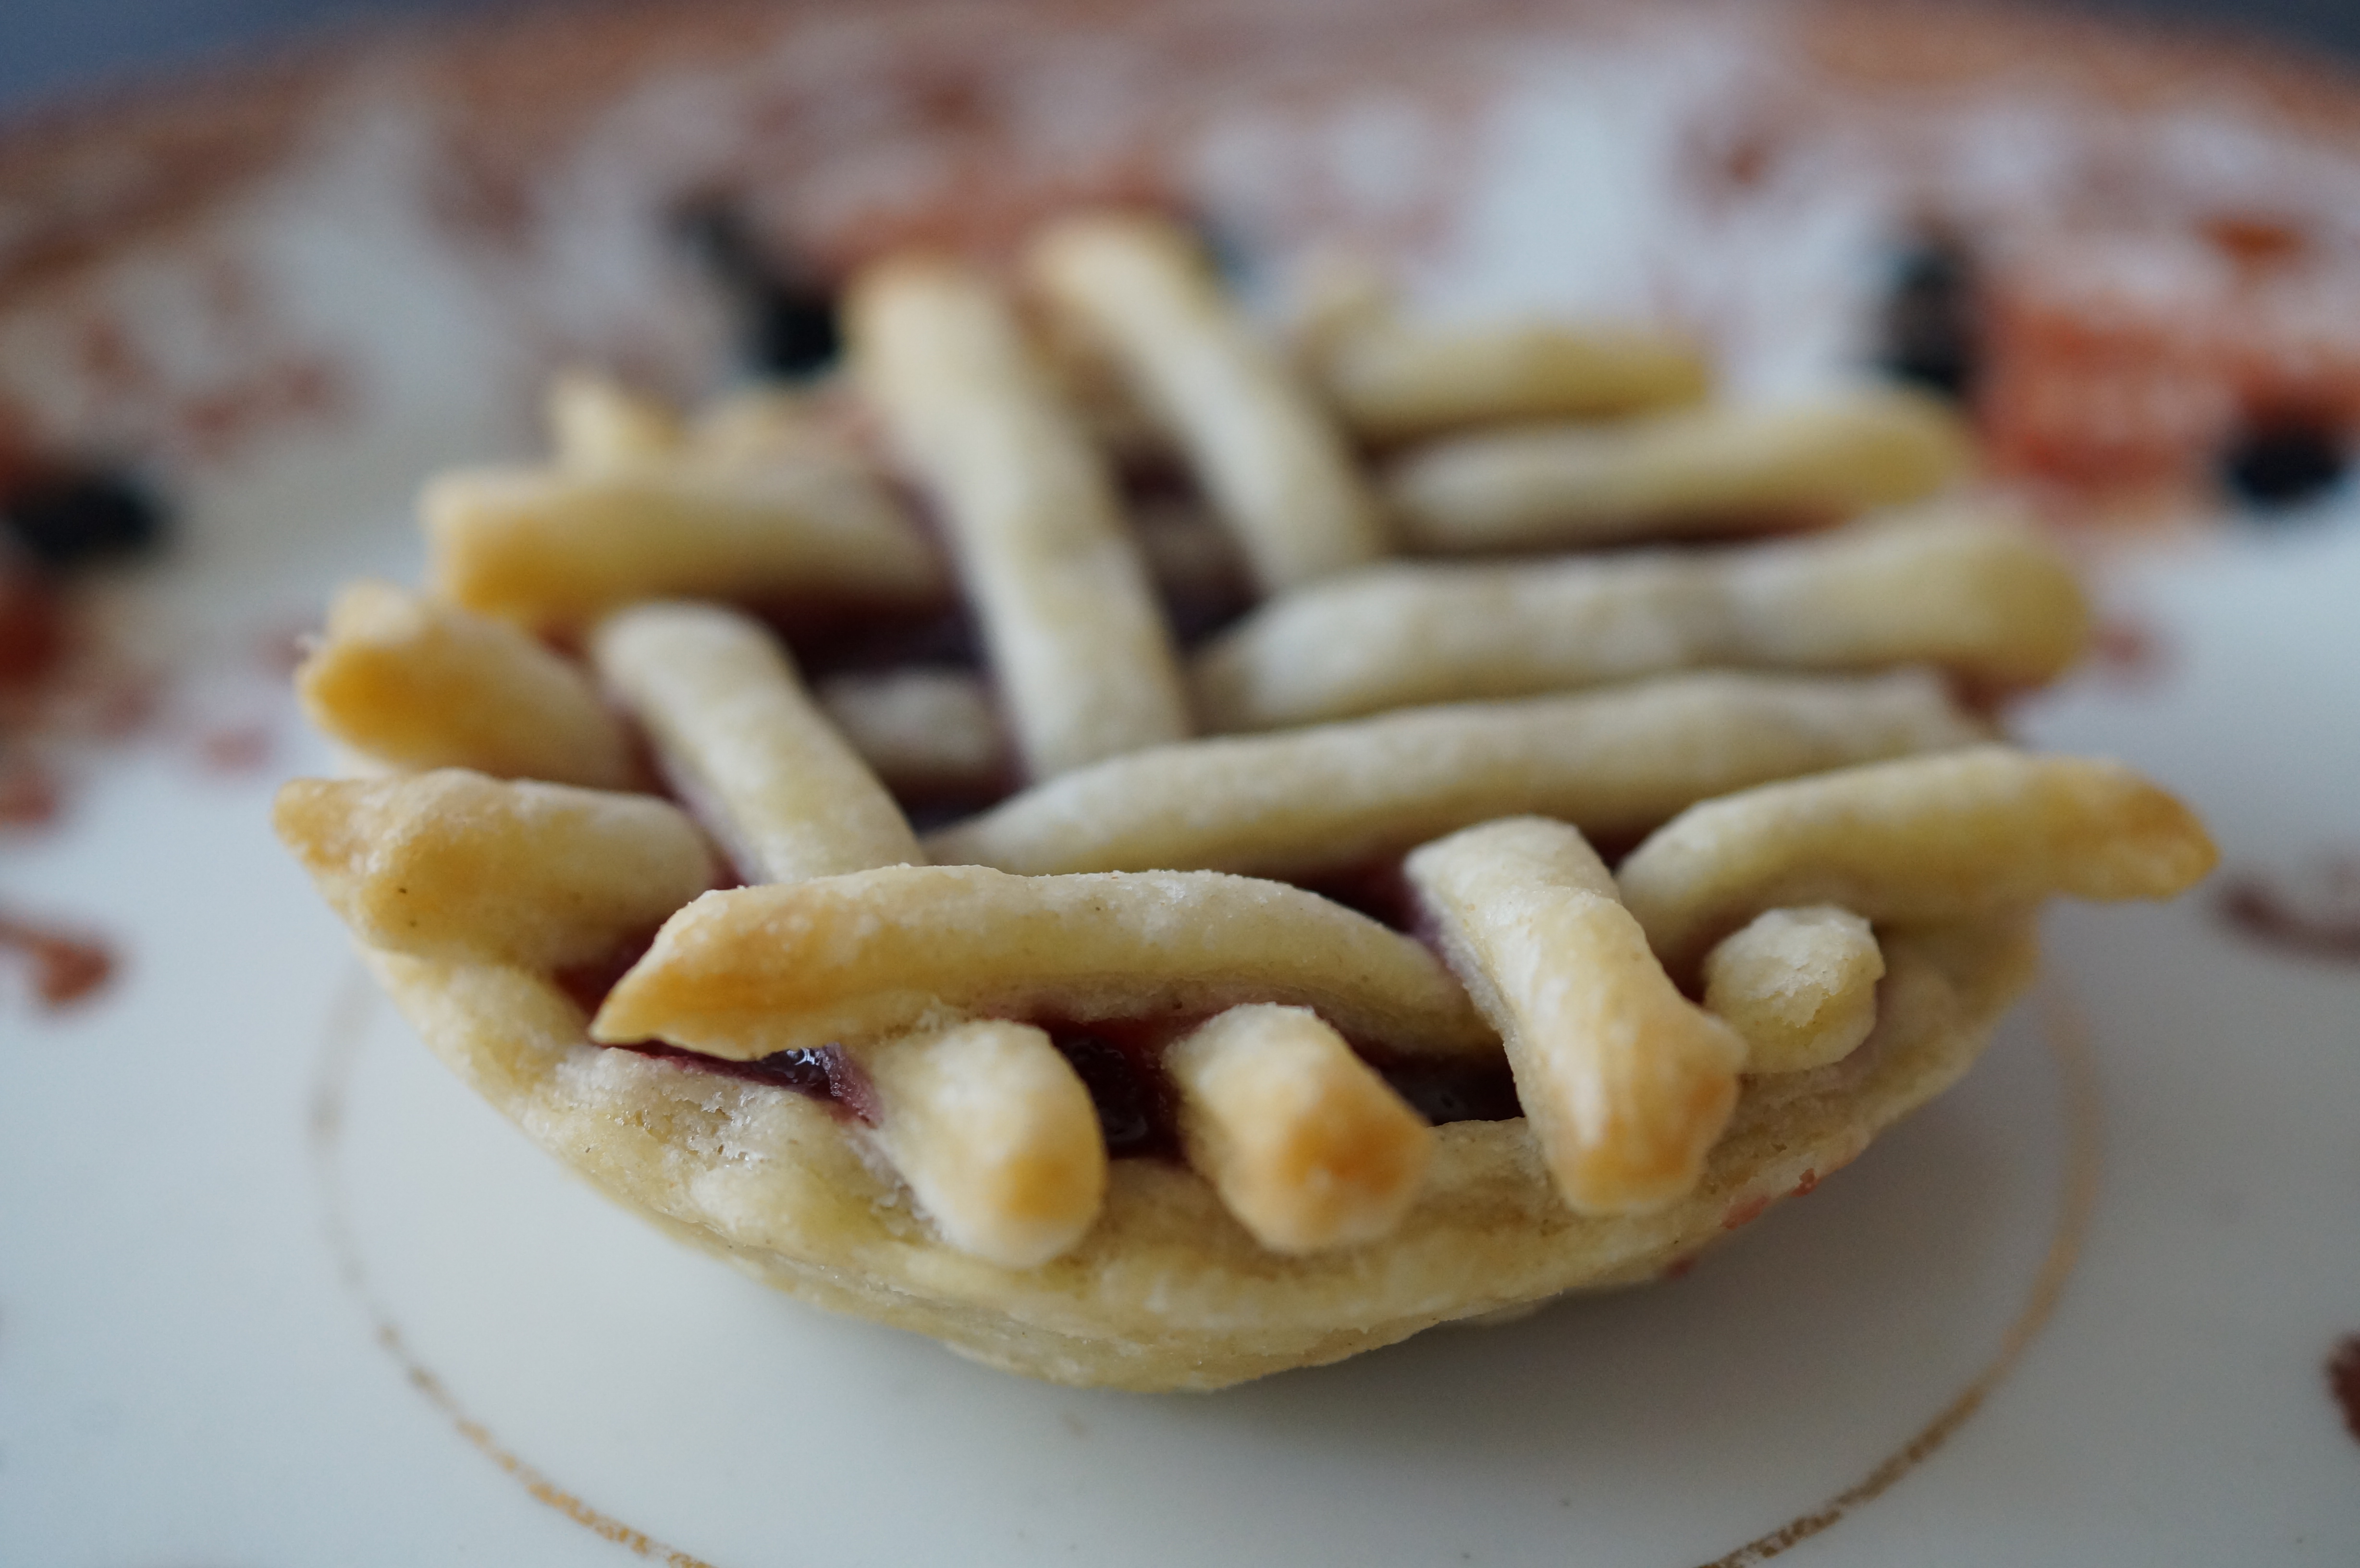
Ok, so Jam Tarts haven’t disappeared completely, but as cake trends go…they’re no macaron right now.
Well, take a hike cupcakes and cake pops, move over oversized meringues and make room for the Jam Tart because…
Firstly, Jam tarts are easy to make – comprising of only 4 ingredients
They’re cheap to make – one of the 4 ingredients is water and another could be any old jam at the back of the cupboard!
Speedy, too – needing only 15 minutes in the oven!
and they’re a bit magic – well not actually magic but there’s definitely something very exciting and totally delicious that occurs when jam is baked in pastry
Yes they’re simple, but some of the best things are. You really don’t need to spend all day in the kitchen to bake these and the house will get that wonderful homely smell without so much as a balloon whisk in sight.
Jam Tarts
Makes 12 small tarts
Ingredients
100g plain flour (plus a little extra for rolling out)
50g butter
cold water to bind
Jam, marmalade or fruit curd of your choice
Method
1) Rub the butter into the flour until the butter is well incorporated and the texture is sandy or like fresh bread crumbs
2) Mix in enough cold water to bring the mixture together to make a smooth dough which picks up all the flour in the bowl – I used about 3/4 of an espresso cup full of water…if that helps 🙂
3) Leave the dough in the fridge to rest. You can leave it in there for about 30 minutes but I don’t usually time it. Instead, I just leave it in there until I’ve preheated the oven to 180°C, cleaned and floured the surface, found my rolling pin and pastry cutters and greased a 12 hole bun tin.
4) When you’re ready, roll out the dough onto the floured surface til it’s about 2-3mm thick and cut out 12 circles.
5) Line the prepared bun tin with the pastry discs and fill each one with a level teaspoon of jam
6) Bake in the oven for 12-15 minutes or until the pastry is cooked through and the jam is bubbling (just enough time to put away the rolling pin and get the coffee on)
Before Baking
After Baking
7) Once baked, let them cool in the tin before transferring to a wire rack to go completely cold.
If you’re still not convinced that Jam Tarts are snazzy enough for your fanciest of guests, then do go ahead and add an arty drizzle of chocolate, dusting of icing sugar, scatter a few slivers of lemon zest or use any leftover pastry to well, tart up your tarts!
x
Are there any old fashioned foods you’d like to bring back, or any trends you could do without? Let me know – I’d love to hear from you. x
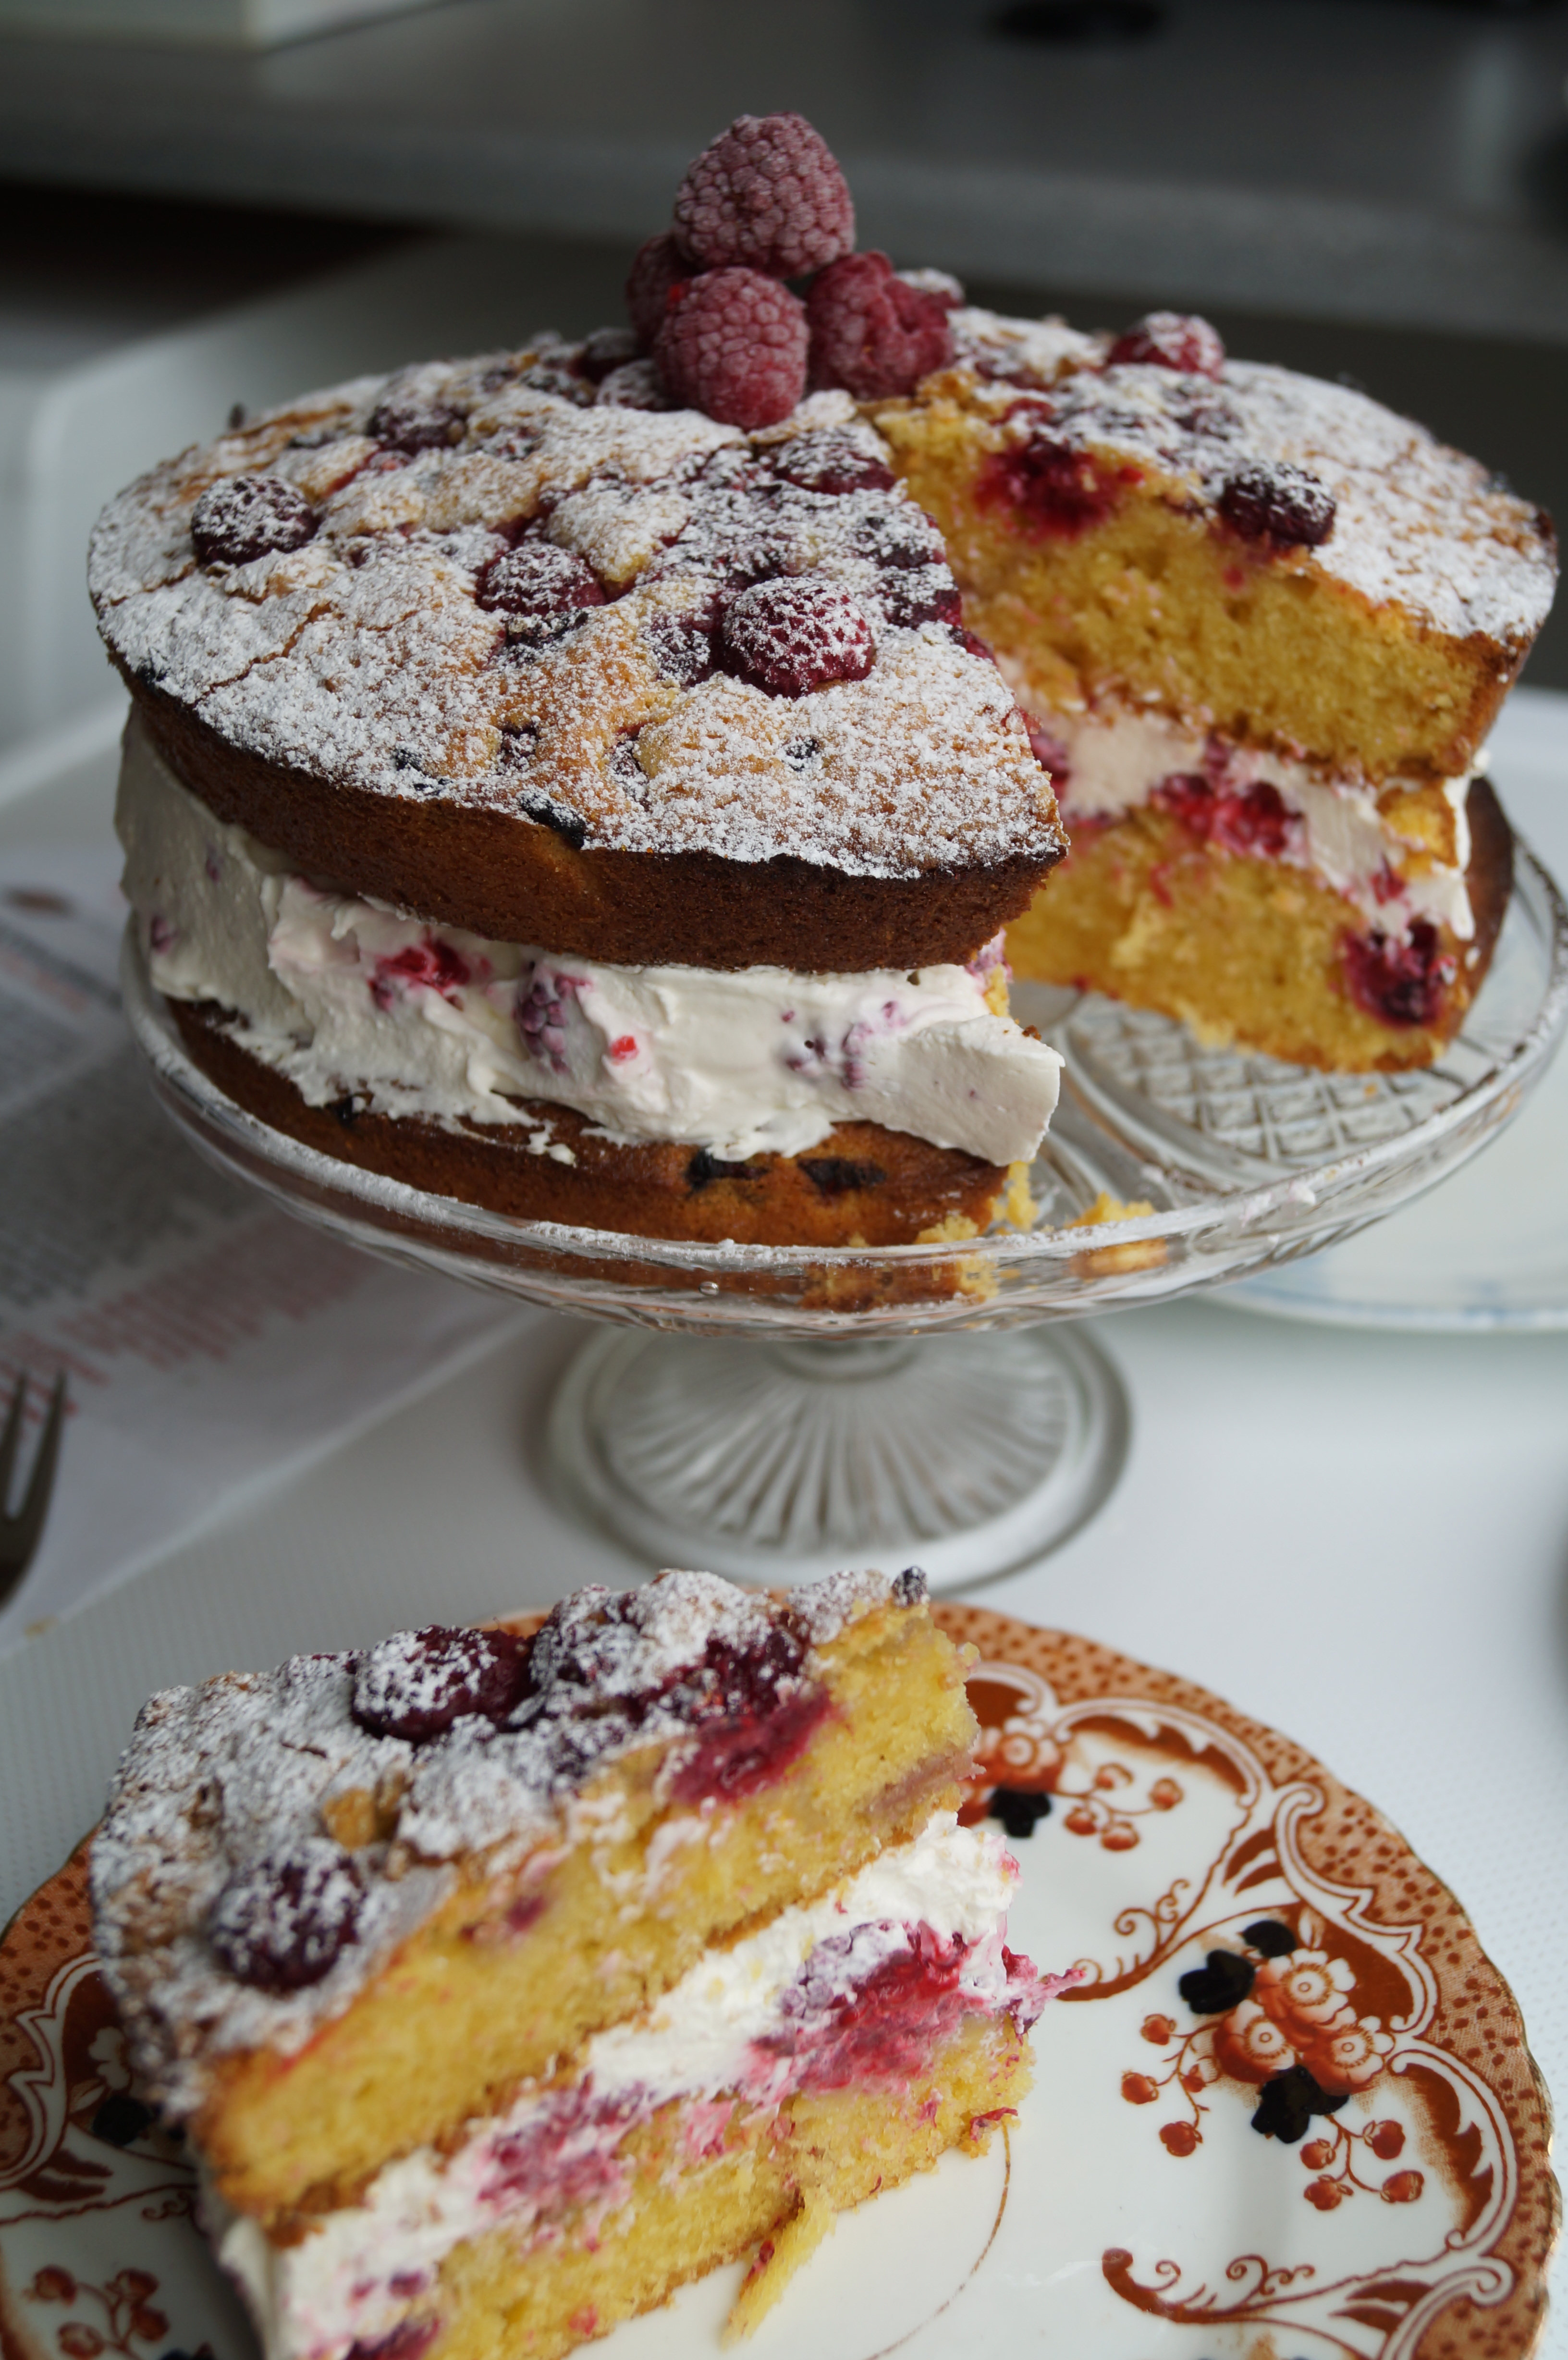
For this Easter Bank Holiday Weekend I thought it would be nice to post a cake recipe. But already I have a bit of a headache (which I think could possibly be attributed to an over consumption of chocolate eggs) so I’ve gone for a light, chocolate-free, fruity number! I made some fresh tropical fruit orb thingys to decorate it, which you can see as Easter eggs or as Spring flowers (or just bits of fruit), and then added some paper Avocets. There’s nothing significant about the use of avocets, I just wanted to draw some black and white birds with long legs to give the cake some height and these wetland birds seemed to fit the bill…(sorry it that a bad joke?).
Spring Cake
Ingredients
For the cake: 150g light soft brown sugar
2 large free-range eggs
100g sunflower oil
200g grated carrot (about 3)
Zest of 2 lemons
1 teaspoon baking powder
200g wholemeal flour
For the filling:
300g cream cheese
Juice of 1 lemon
2 tablespoons icing sugar
170g 0% total Greek Yoghurt
For the icing:
8-10 dessert spoons of icing sugar
Juice of 1 lemon
To decorate (optional):
1 Pineapple
1 Melon
1 Mango
Fresh mint sprigs
You will also need 1 small round cake tin, greased with butter and lined with a circle of grease proof paper
Method
Pre-heat your oven to 190°C
First make the cake: Whisk the eggs and sugar together until pale and fluffy (or in my case until your arm aches because you’ve been making cakes all day and can’t be bothered to wash the electric whisk again)
Whisk in the oil then add the grated carrot and lemon zest.
Fold in the baking powder and flour until fully combined and then tip everything into your prepared tin
Bake for about 25-30 minutes or until a skewer poked into the middle comes out cleanly
Turn the cake out onto a rack to cool completely
Mix the filling ingredients together in a bowl then put into the fridge to firm up a little while you slice the cooled cake horizontally through the middle
Sandwich the cake together with the cheesecake filling and pop the cake into the fridge for 10-15 minutes
Meanwhile, mix the icing sugar with the juice of 1 lemon until thick and smooth – you want the consistency to be somewhere between double cream and smooth peanut butter, so add the icing sugar bit by bit to the lemon juice and add more or less if needed
Use a melon baller to carve little pastel spheres from a fresh pineapple, mango and melon. Ice the cake and then decorate with the fruit, mint leaves and a gentle snow flurry of icing sugar.
I added some drawings of avocets to mine, which I taped to cocktail sticks, but you can add your own drawings or any other cake decorations you like.
Have a lovely bank holiday. What are you baking this weekend? x
The Wedding Cake. Probably the most important of all the cakes. Get it wrong, and EVERYTHING EVER is RUINED!
Please now multiply this baking pressure by a hundred when you learn that this is a wedding cake for a family member…again! Making my brother’s wedding cake in 2011 was the most terrifying culinary challenge for me to date but, this Summer (to be said in that really cool, low, movie trailer voice please, that’s why it’s in bold) I’m making my cousin’s cake!
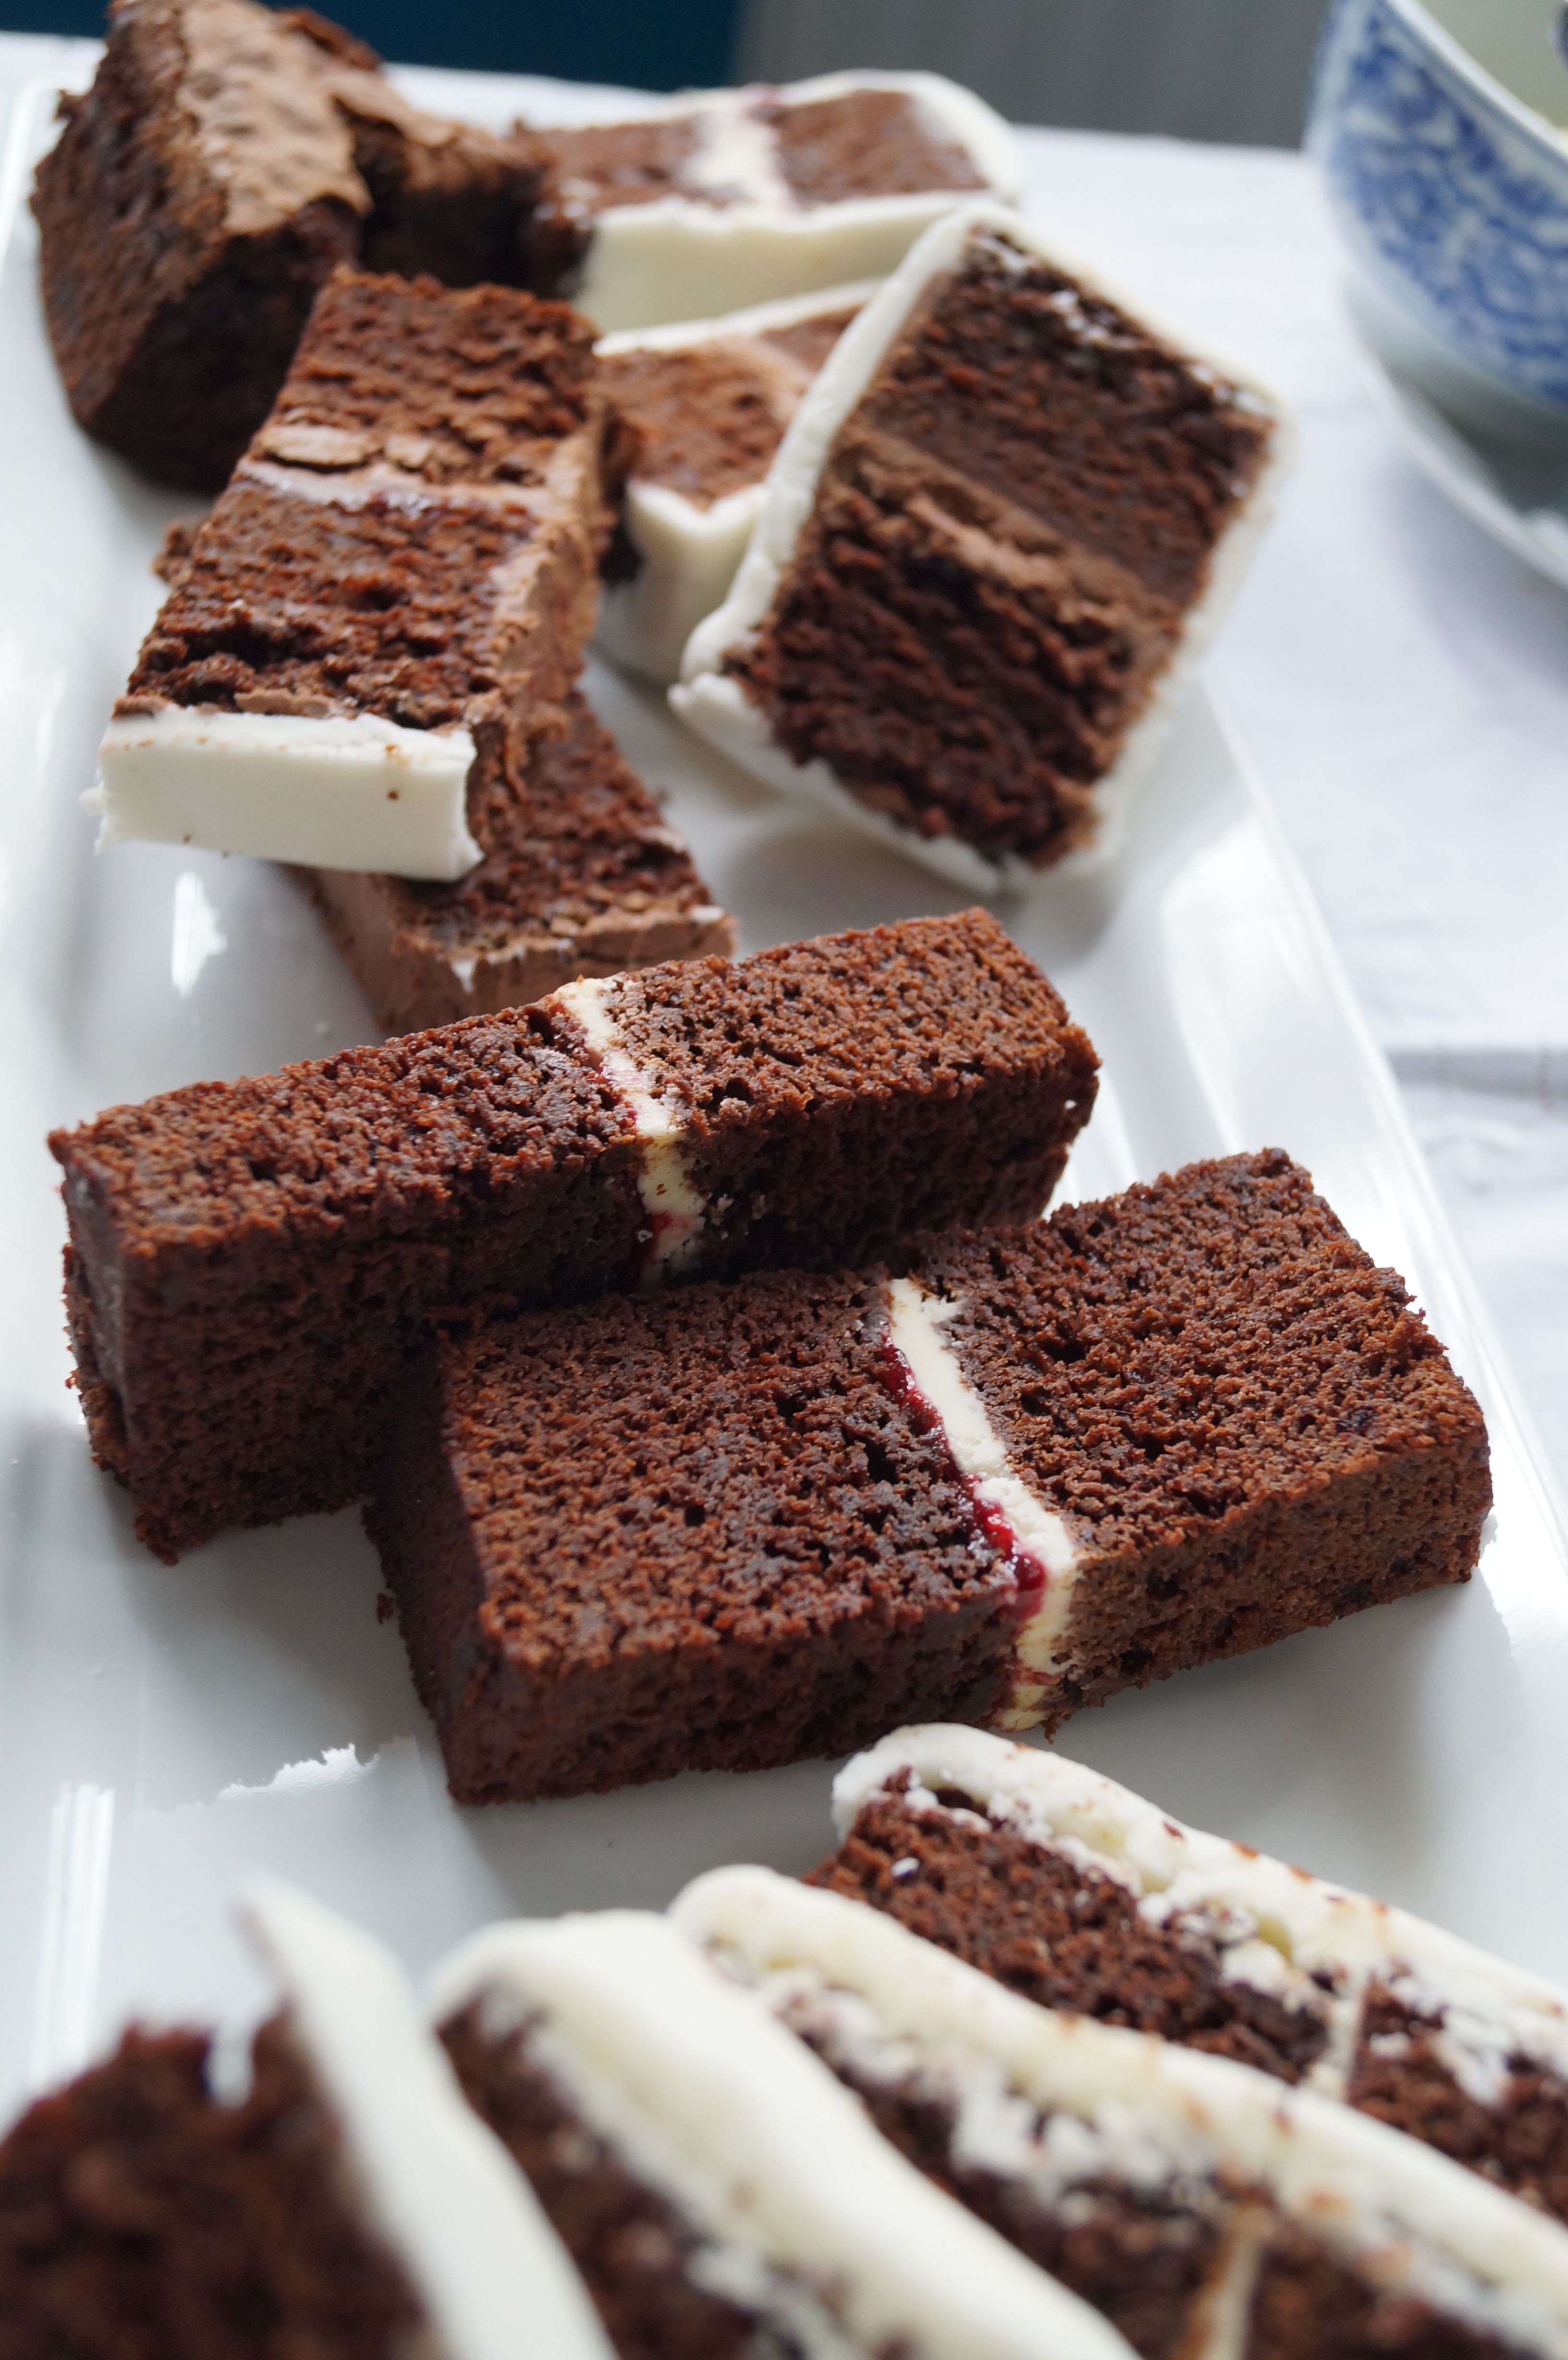
Joking aside, it is an absolute honour to be asked to bake a wedding cake, but it is quite a scary business. The bride to be has a pretty good idea of what she wants so I fired up the mixer for some sample cakes last weekend. I made a chocolate fudge cake from the book ‘Boutique Wedding Cakes’ by Victoria Glass and whipped up some dark chocolate butter cream, white chocolate butter cream and cream cheese frosting for her to try.
Deep in concentration, trying to cover sample cakes in butter cream at 2am (and peripheral vision impaired by my long fringe and trendy thick black rimmed glasses) I failed to judge the proximity of the corner of the kitchen cabinet when I sharply looked up from my work. OUCH! I wasn’t badly hurt but I was a massive wuss about it and had a little cry.
Next morning (neurotic late night baking session over) all that was left to do was to cover the cakes. She’s requested for the cake to be cream or ivory in colour so my immediate thought was to use white chocolate…but the wedding is in July so I think that might be pushing my luck (and sanity) so instead, I made a satin icing (which I think is roll-out icing) adapted from this recipe, using water instead of lemon juice and adding vanilla to give it a yummy custardy vibe…although it’s a bit sticky to work with but I’ve got a good 4 months to practise
My cousin arrived just as the last bit of cake was being iced and had brought her lovely Yorkshire terrier and bridesmaid-to-be Maisy along too!
The cakes went down really well, she made her icing selections and we had a good chat about logistics. I think wedding cakes are 20% sugar and 80% logistics. I cannot wait for her wedding. I will be nervous, but only because I want it to be right for my super-duper cousin and fella (and Maisy too).
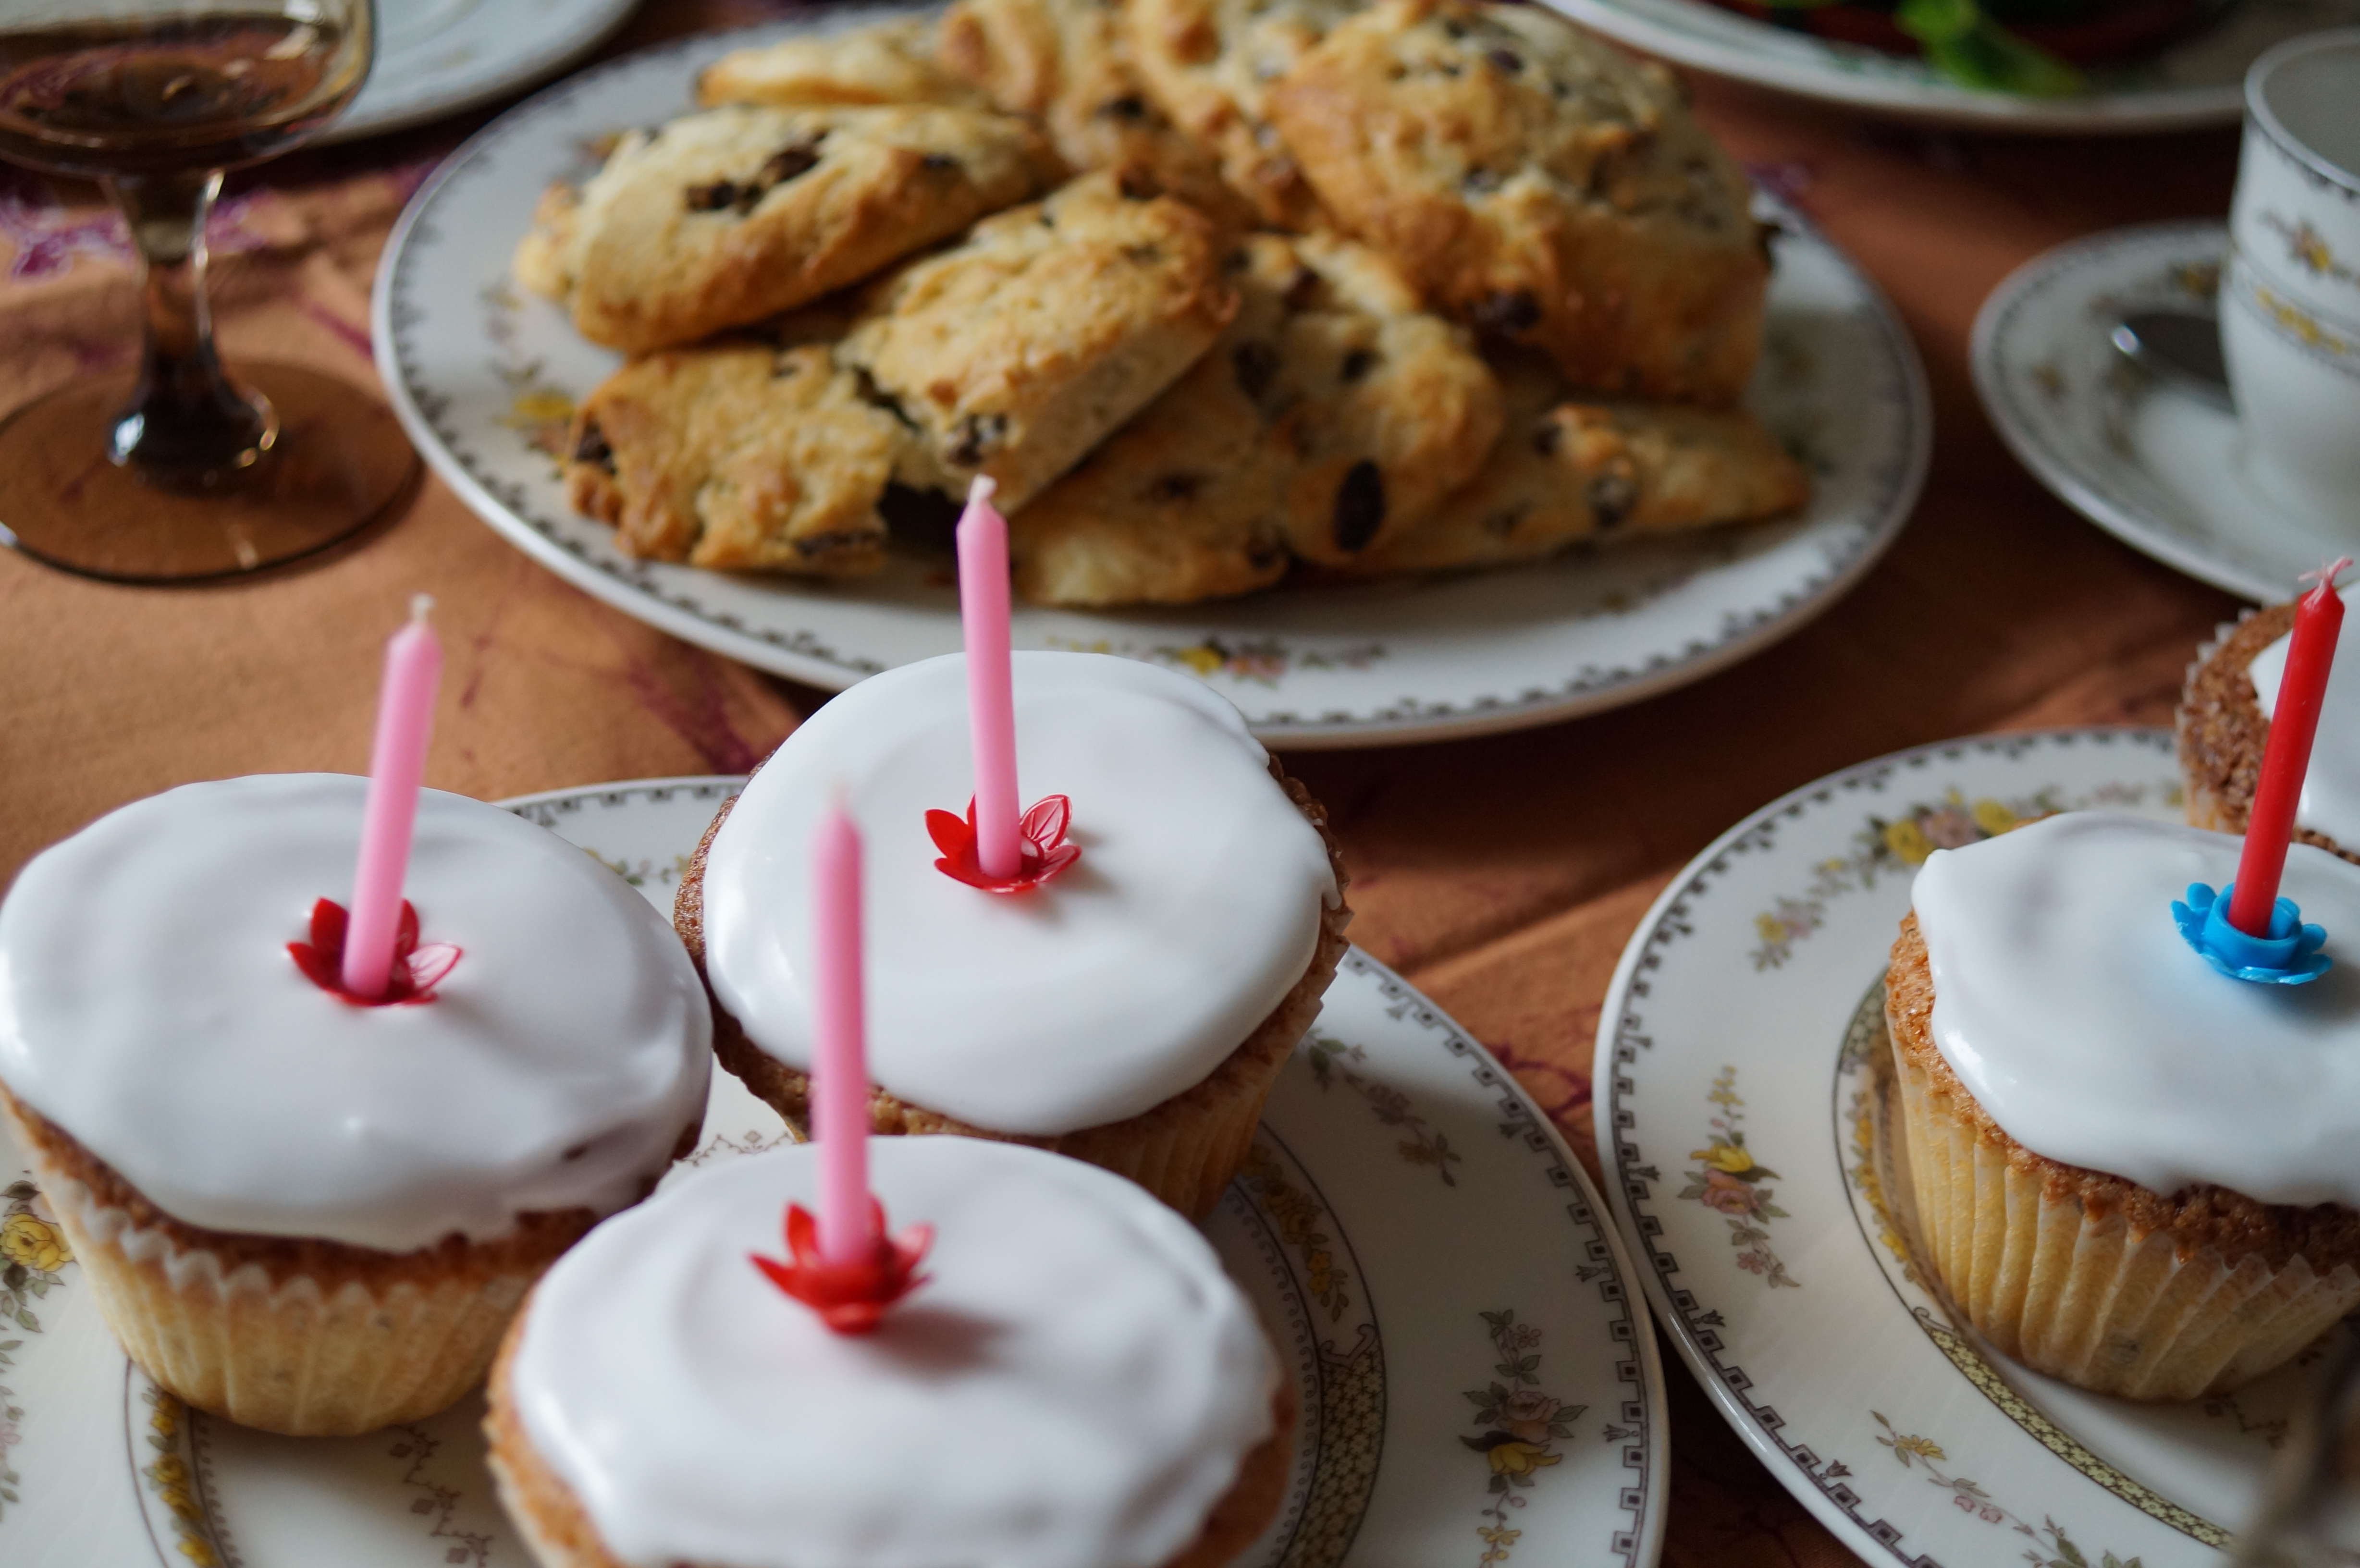
Last week it was my Mum’s Birthday. Normally it’s quite tricky to think of nice things to do – my Mum is a very busy lady and doesn’t really like a lot of fuss; a spa day or manicure would actually be her worst nightmare.
In December I was hooked on watching “Inside Claridges” on BBC2 but there was no time to pop back to London let alone book a table anywhere. Instead I spied a jolly looking tea set in the dresser and decided to make a swish afternoon tea for her at home.
Mum’s Birthday Tea
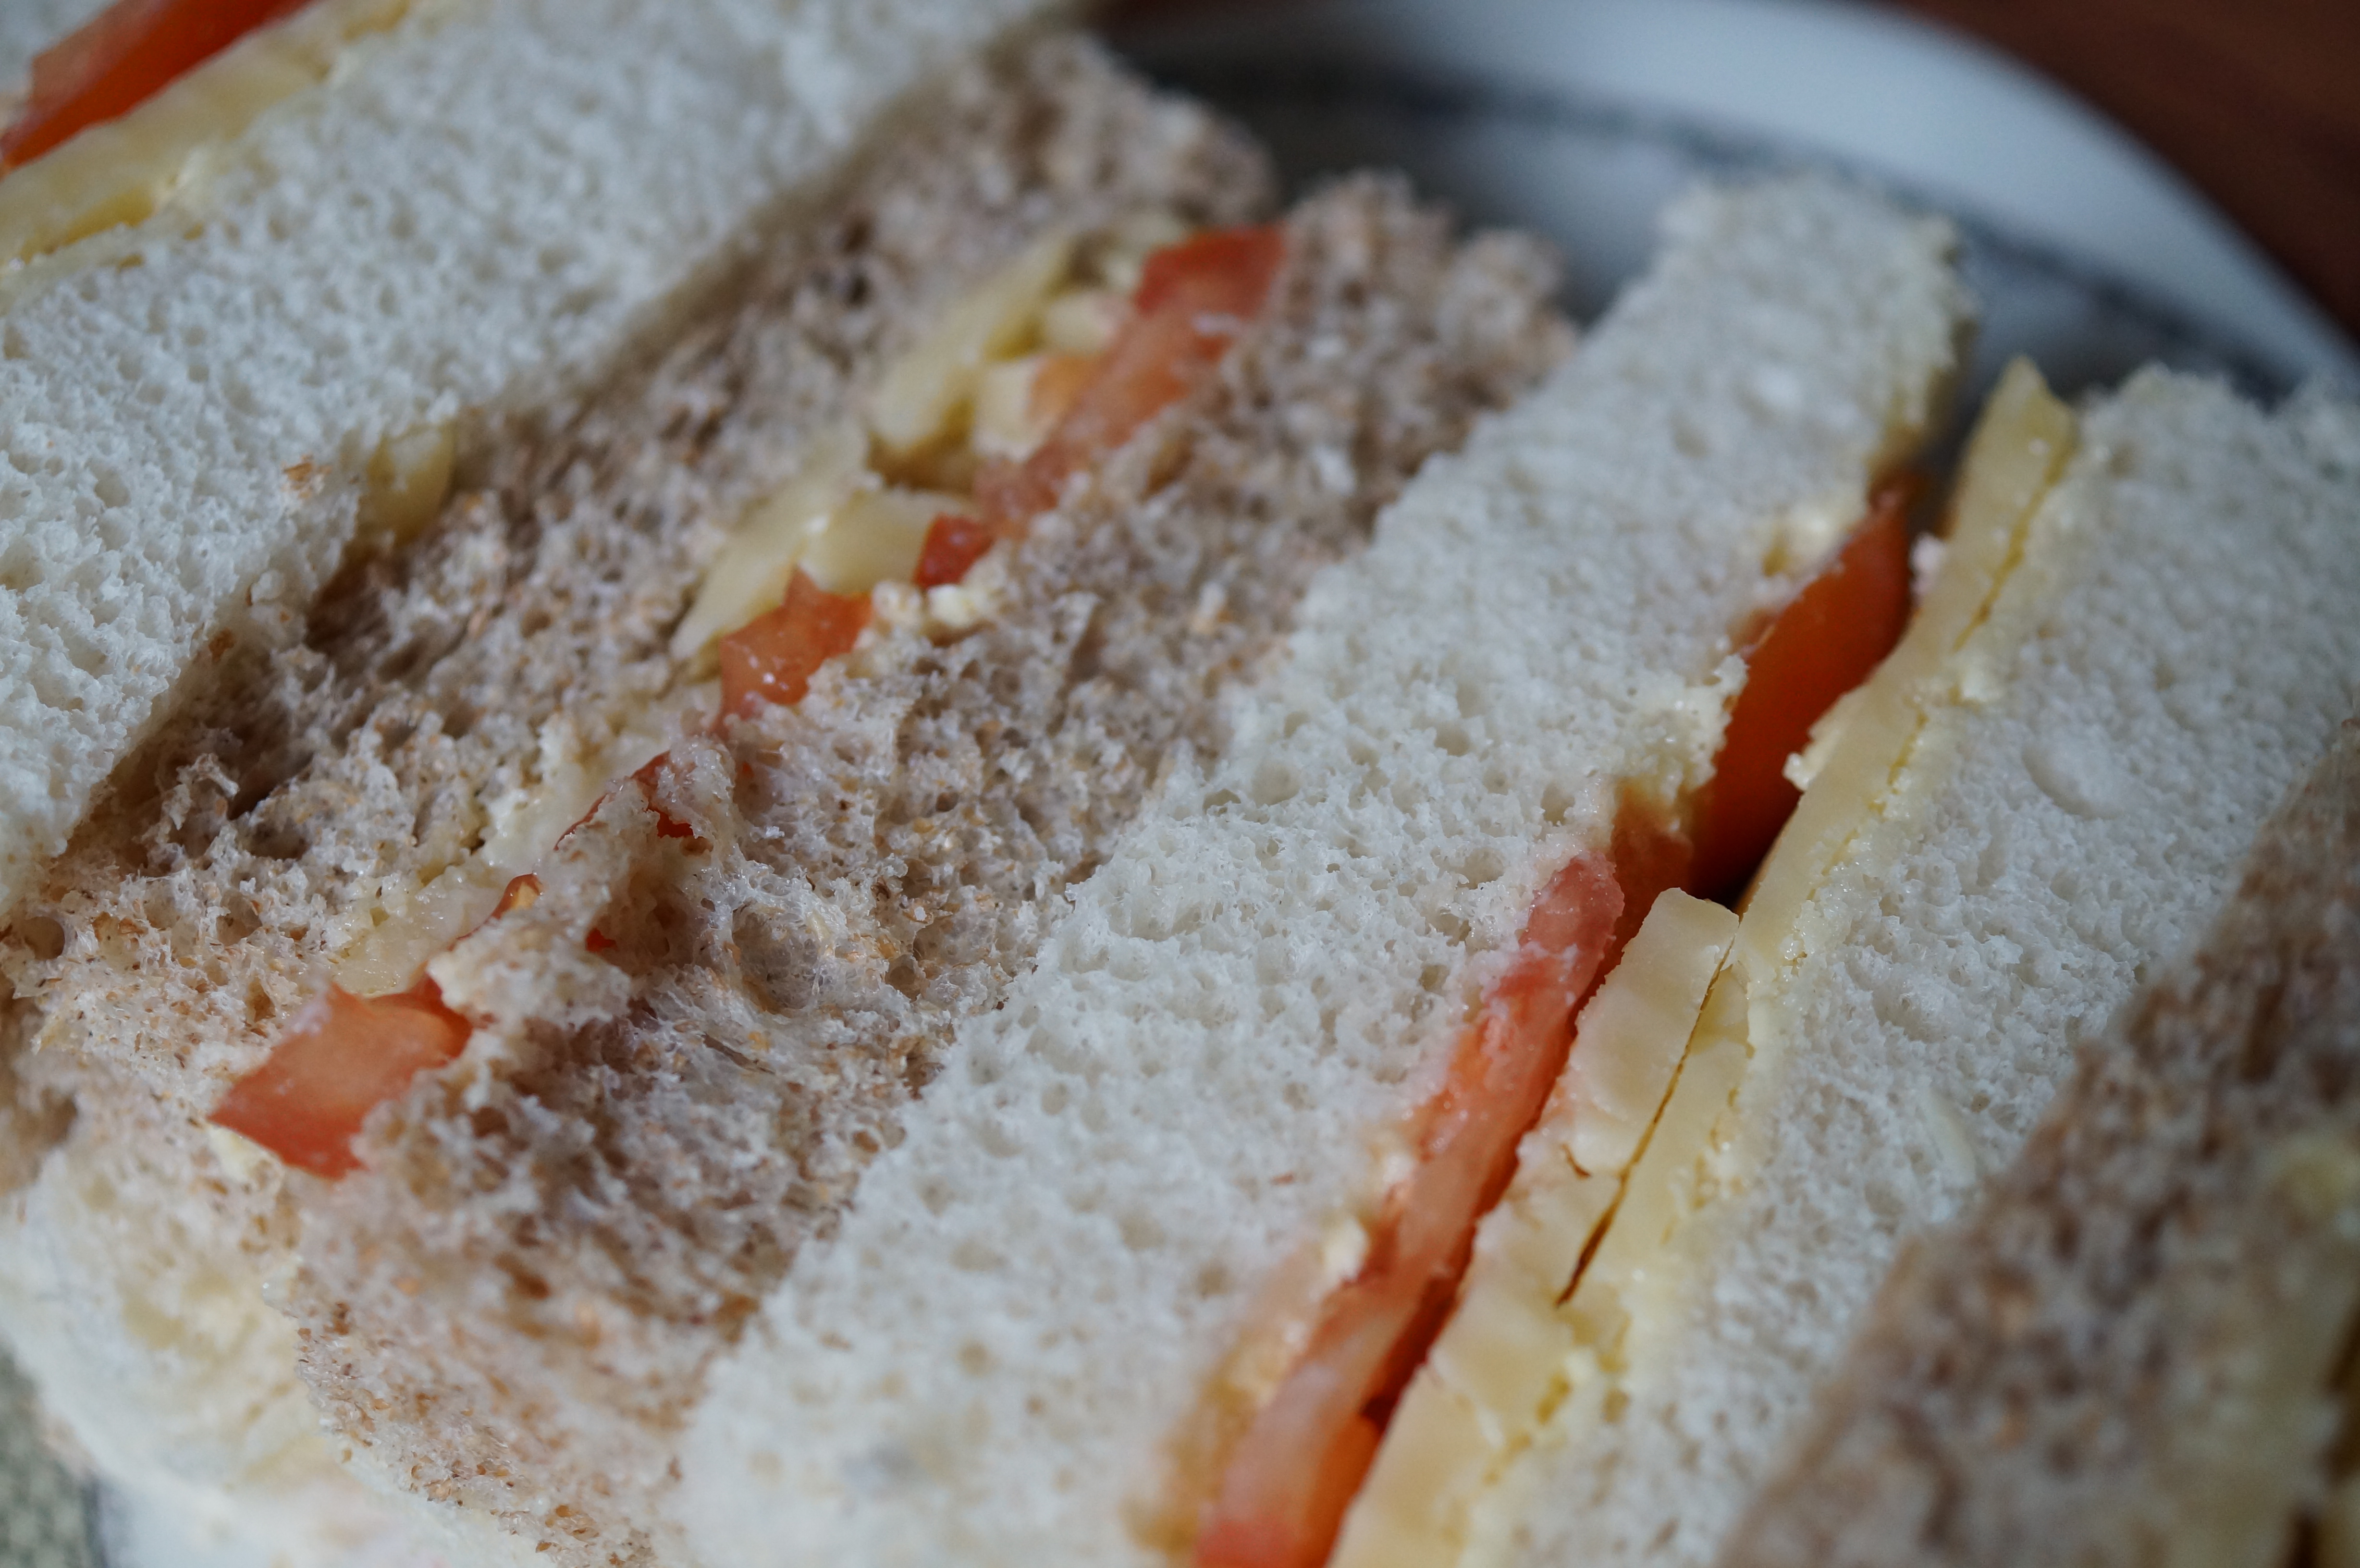
Designing the menu didn’t take too long. She much prefers classic, simple flavours so I went with cheese & tomato and cucumber & cream cheese sandwiches. But, just for good measure I cut the crusts off and made them lengthways like they do at those fancy hotels – well that’s what I think it said in the documentary and in this lovely little book on Afternoon Tea from the Ritz.
She also likes a cake called “Morning Buns” which they only make at Jarrold‘s restaurant but I didn’t have the required 6 hours for the round trip to Norwich either and I suspect the recipe is a closely guarded secret! In their place I made some rock cakes from a Dan Lepard recipe and they turned out brilliantly and very close to what I wanted (I used 160g of sultanas and a dash of vanilla extract in my batch).
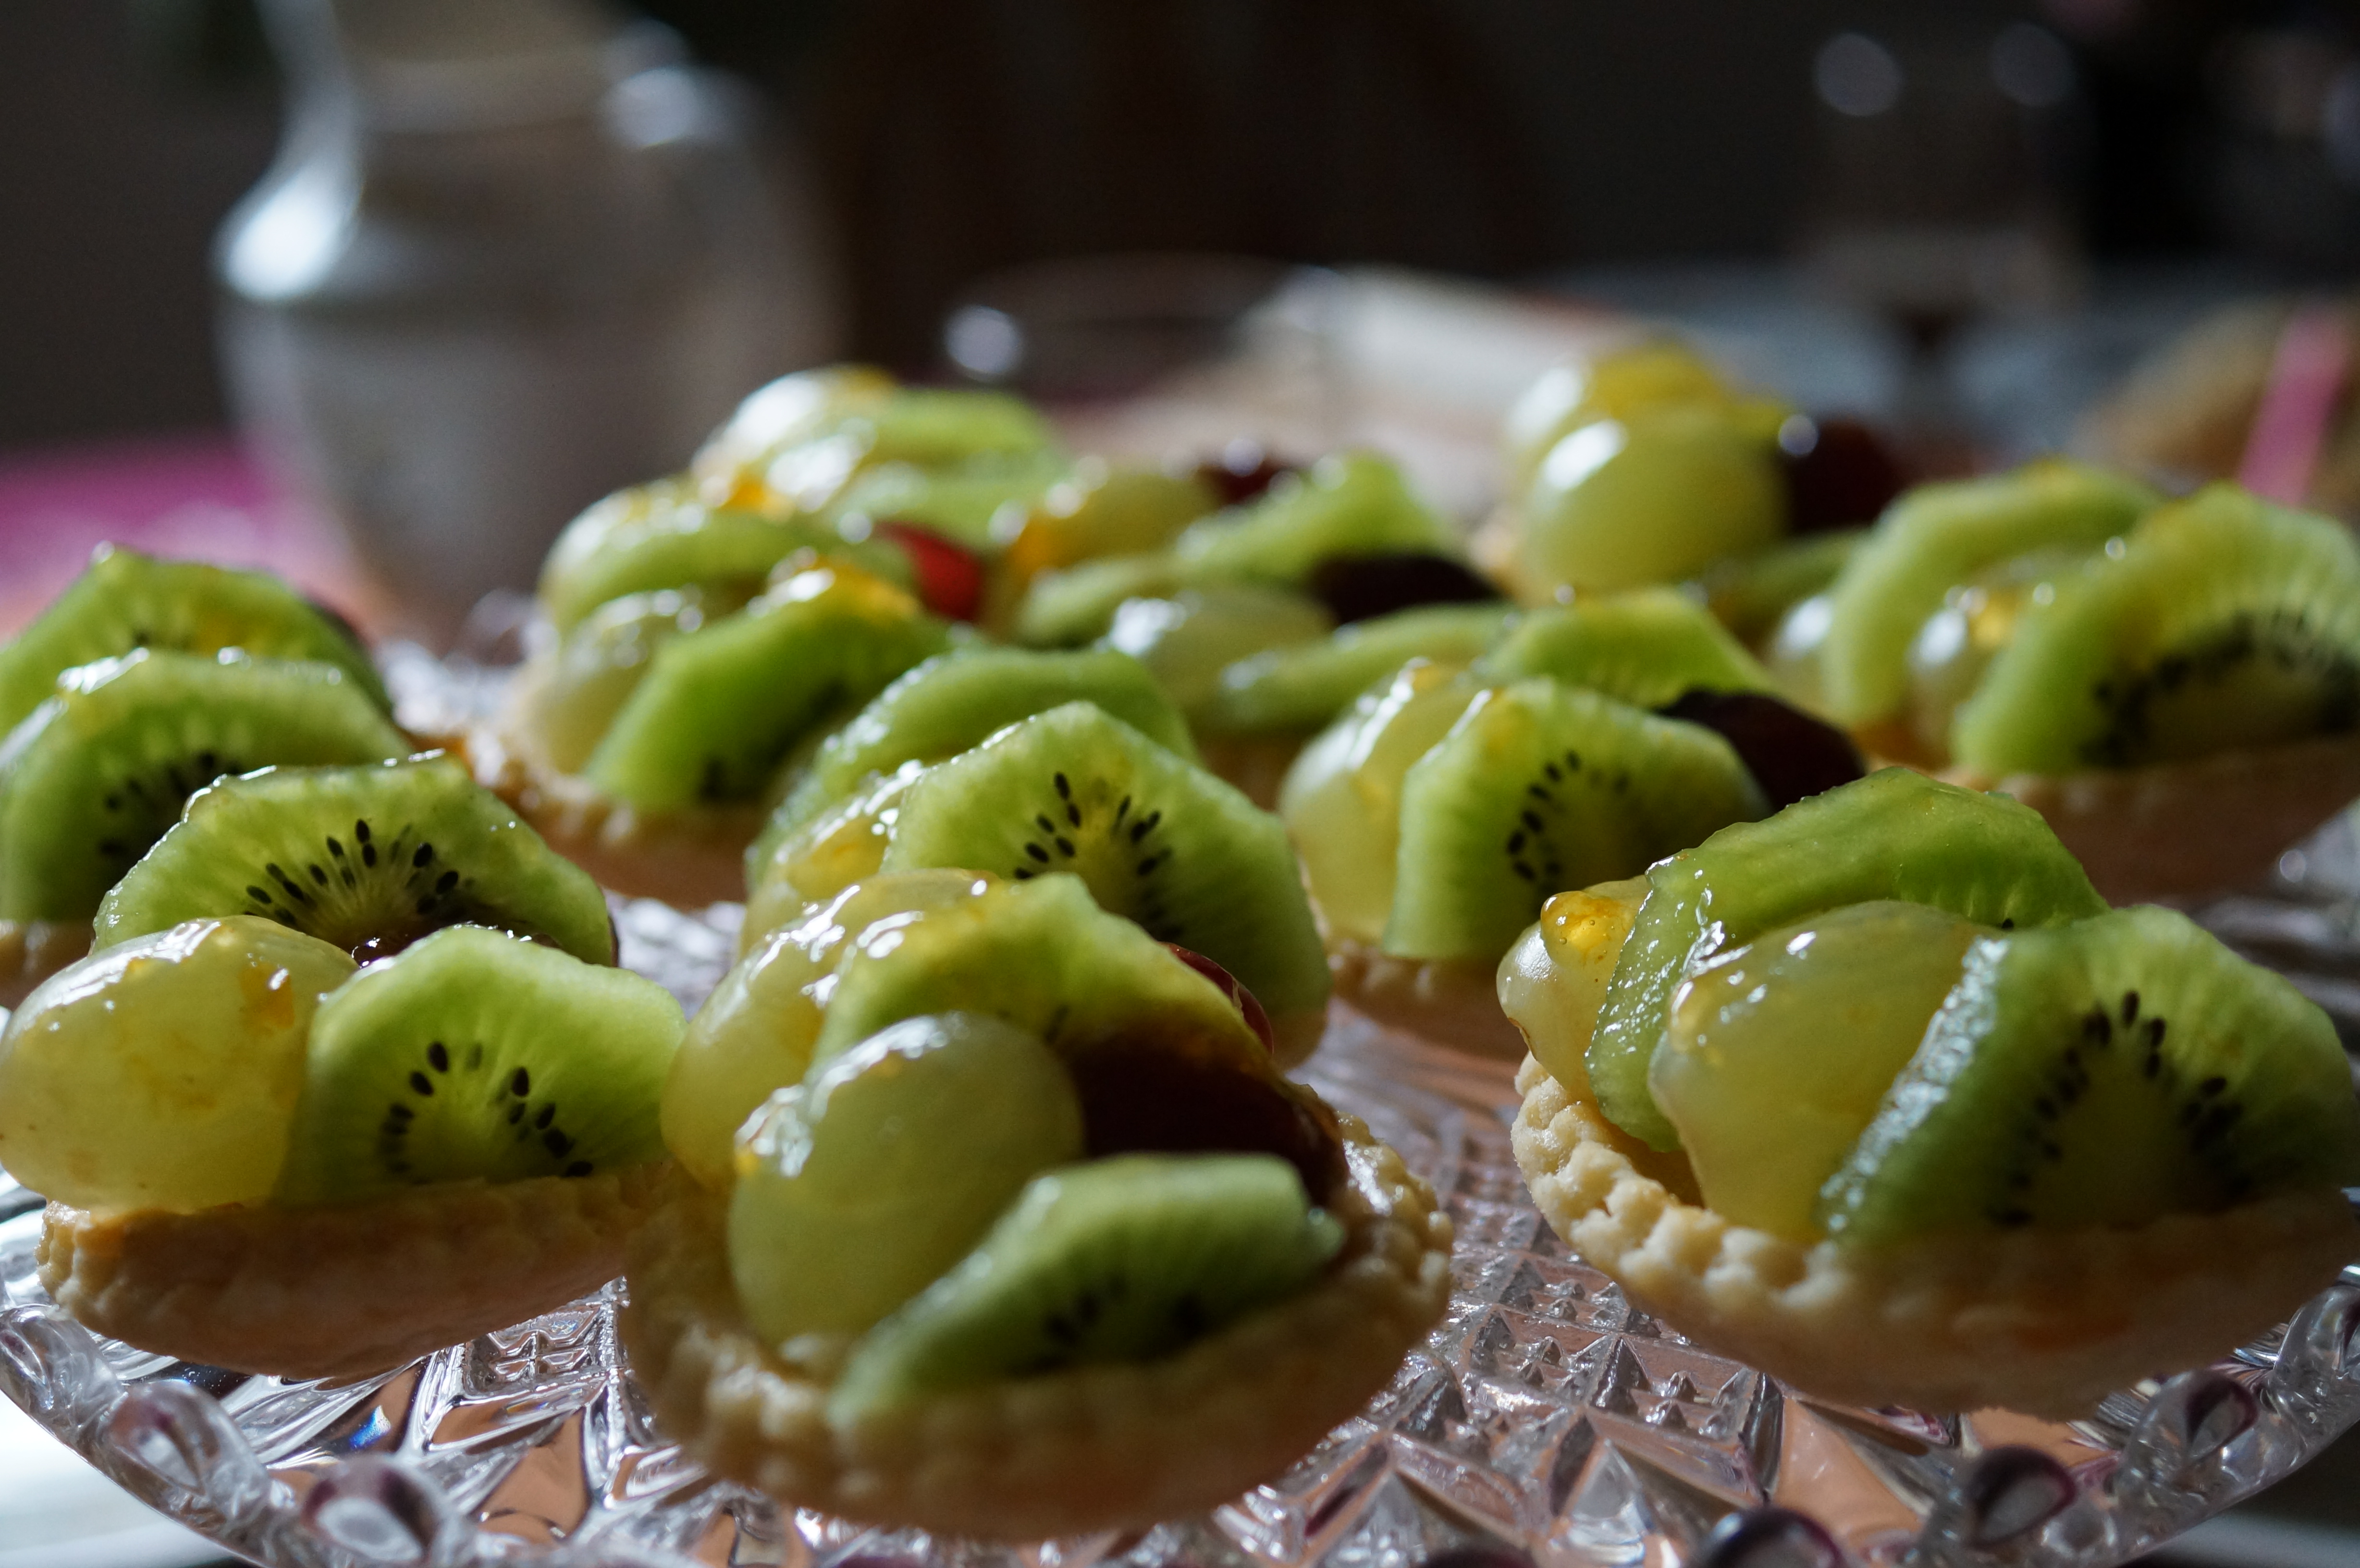
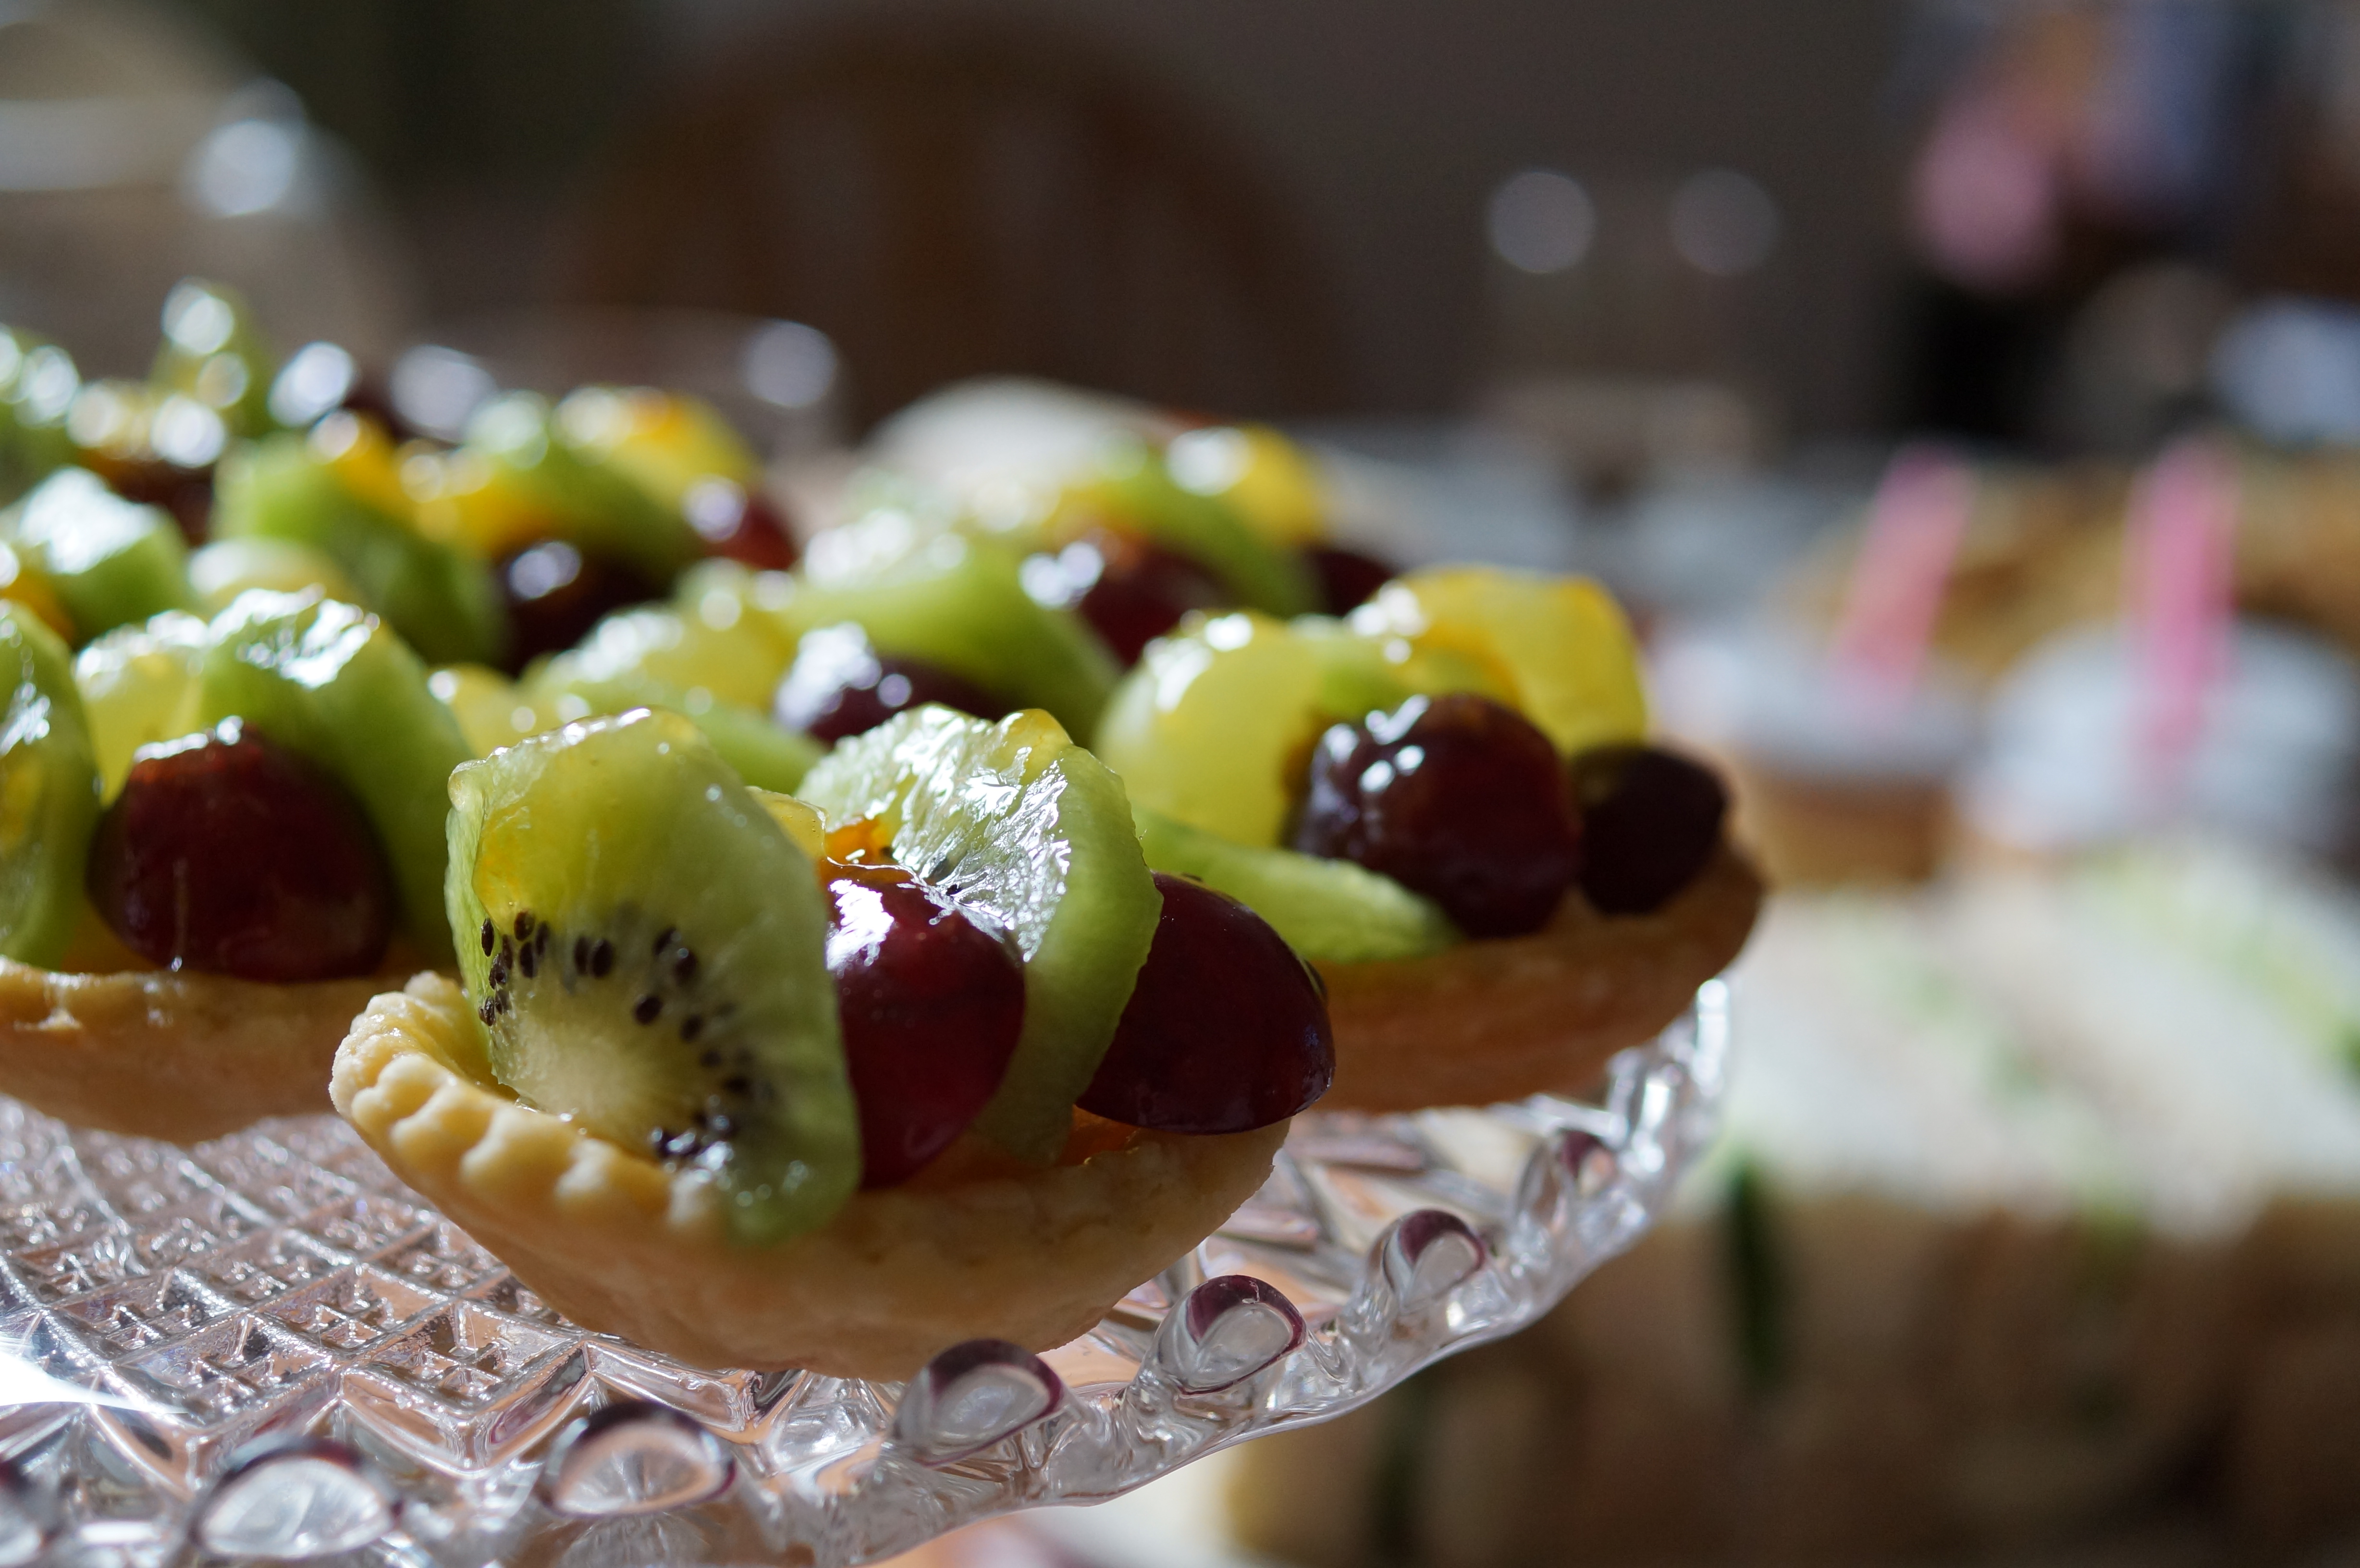
For a splash of colour I made some mini fruit tarts. I only had about an hour to make everything (so whipping up a batch of Crème Pâtissière was not an option). Instead I made a little bit of vanilla butter cream to put into the bottom of the tart shells – just enough to prevent the fruit from falling out! There wasn’t quite enough time to sieve the apricot jam or wash up the pastry brush after the egg washing either so I just encouraged the warmed, lumpy jam to vaguely cover the fruit with a teaspoon (ssshhh, I hope there are no Roux brothers reading this!). I think I got away with it, they tasted lovely and took a fraction of the time of the real thing:
Fruit Tarts
Makes 12
150g plain flour
75g of unsalted butter, diced
1 egg beaten
1 teaspoon of caster sugar
2-3 drops of vanilla extract
cold water to bind
For the buttercream:
50g of unsalted butter at room temperature
icing sugar to taste
2-3 drops of vanilla extract
For the topping:
1 tablespoon of apricot jam
2 kiwi fruits
handful of grapes (or any berry fruit you prefer)
1) Place the flour and the butter in a bowl and rub together with your finger tips until the mixture looks like fresh breadcrumbs and the butter is evenly distributed.
2) Stir in the sugar, vanilla and half of the beaten egg.
3) Slowly, adding a little at a time, pour in some cold water. Mix until the dough comes together.
4) Wrap the pastry in cling film and place in the fridge until you are ready to use it and to allow it to rest a little.
5) Dust the work surface with flour and then roll out the dough to about 5mm thickness and cut into circles using a fluted cutter.
6) When all the tart cases are ready for baking brush them with the remaining egg wash and bake at 150-170°C for 15-20minutes or until lightly golden.
7) Place them on a wire rack to cool while you make the butter cream and slice the fresh fruit.
8) Mix the butter with a fork as you add dessertspoonfuls of icing sugar (I used about 2) and beat well after each addition until smooth. Taste it to check it is sweet enough and then mix in the vanilla extract.
9) When the pastry shells are cool place a small amount of the butter cream (about 1/2 a teaspoonful) into each one and then top with the sliced fruits.
10) Gently warm the jam (and sieve it if you have time) and brush the jam over the fruit to glaze.
11) Serve immediately
Finally; the Birthday cake. Mum and Dad are still swamped in festive leftovers, there’s over half a Christmas cake still knocking around so I thought making a whole sponge cake would be decidedly unhelpful at this point. Instead I made individual muffin sized sponges, flavoured with caraway seeds and topped with lemon icing. A single candle in each one signified the celebration.
Everything was washed down with lashings of tea from a proper pot and afterwards we escaped to St. Mary Mead by watching Miss Marple DVDs… but now I’m thinking we should have been watching Jeeves and Wooster instead – check this out Mum you’ll love it:
First, an apology. I promised a fellow Platter user that I would post my Avocado & hazelnut cakes recipe following this picture but I completely forgot! Sorry.
Chocolate, Avocado & Hazelnut Cakes
Follow Delia Smith’s all-in-on sponge recipe but replace butter for the same weight of avocado (which you blend to a smooth purée) and a heaped tablespoon of cocoa powder. Spoon into bun cases and bake for 15 – 20 minutes.
The quenelle-like piles of icing are made from ground hazelnuts, a tablespoon of cocoa powder and it’s sweetened with a tablespoon of golden syrup and about 20g of butter….or you could just use nutella!
This week has seen much more cake than a few chocolate buns. Right now it appears to be everyone’s birthday! Ok, well not quite everyone but 3 very lovely ladies I know.
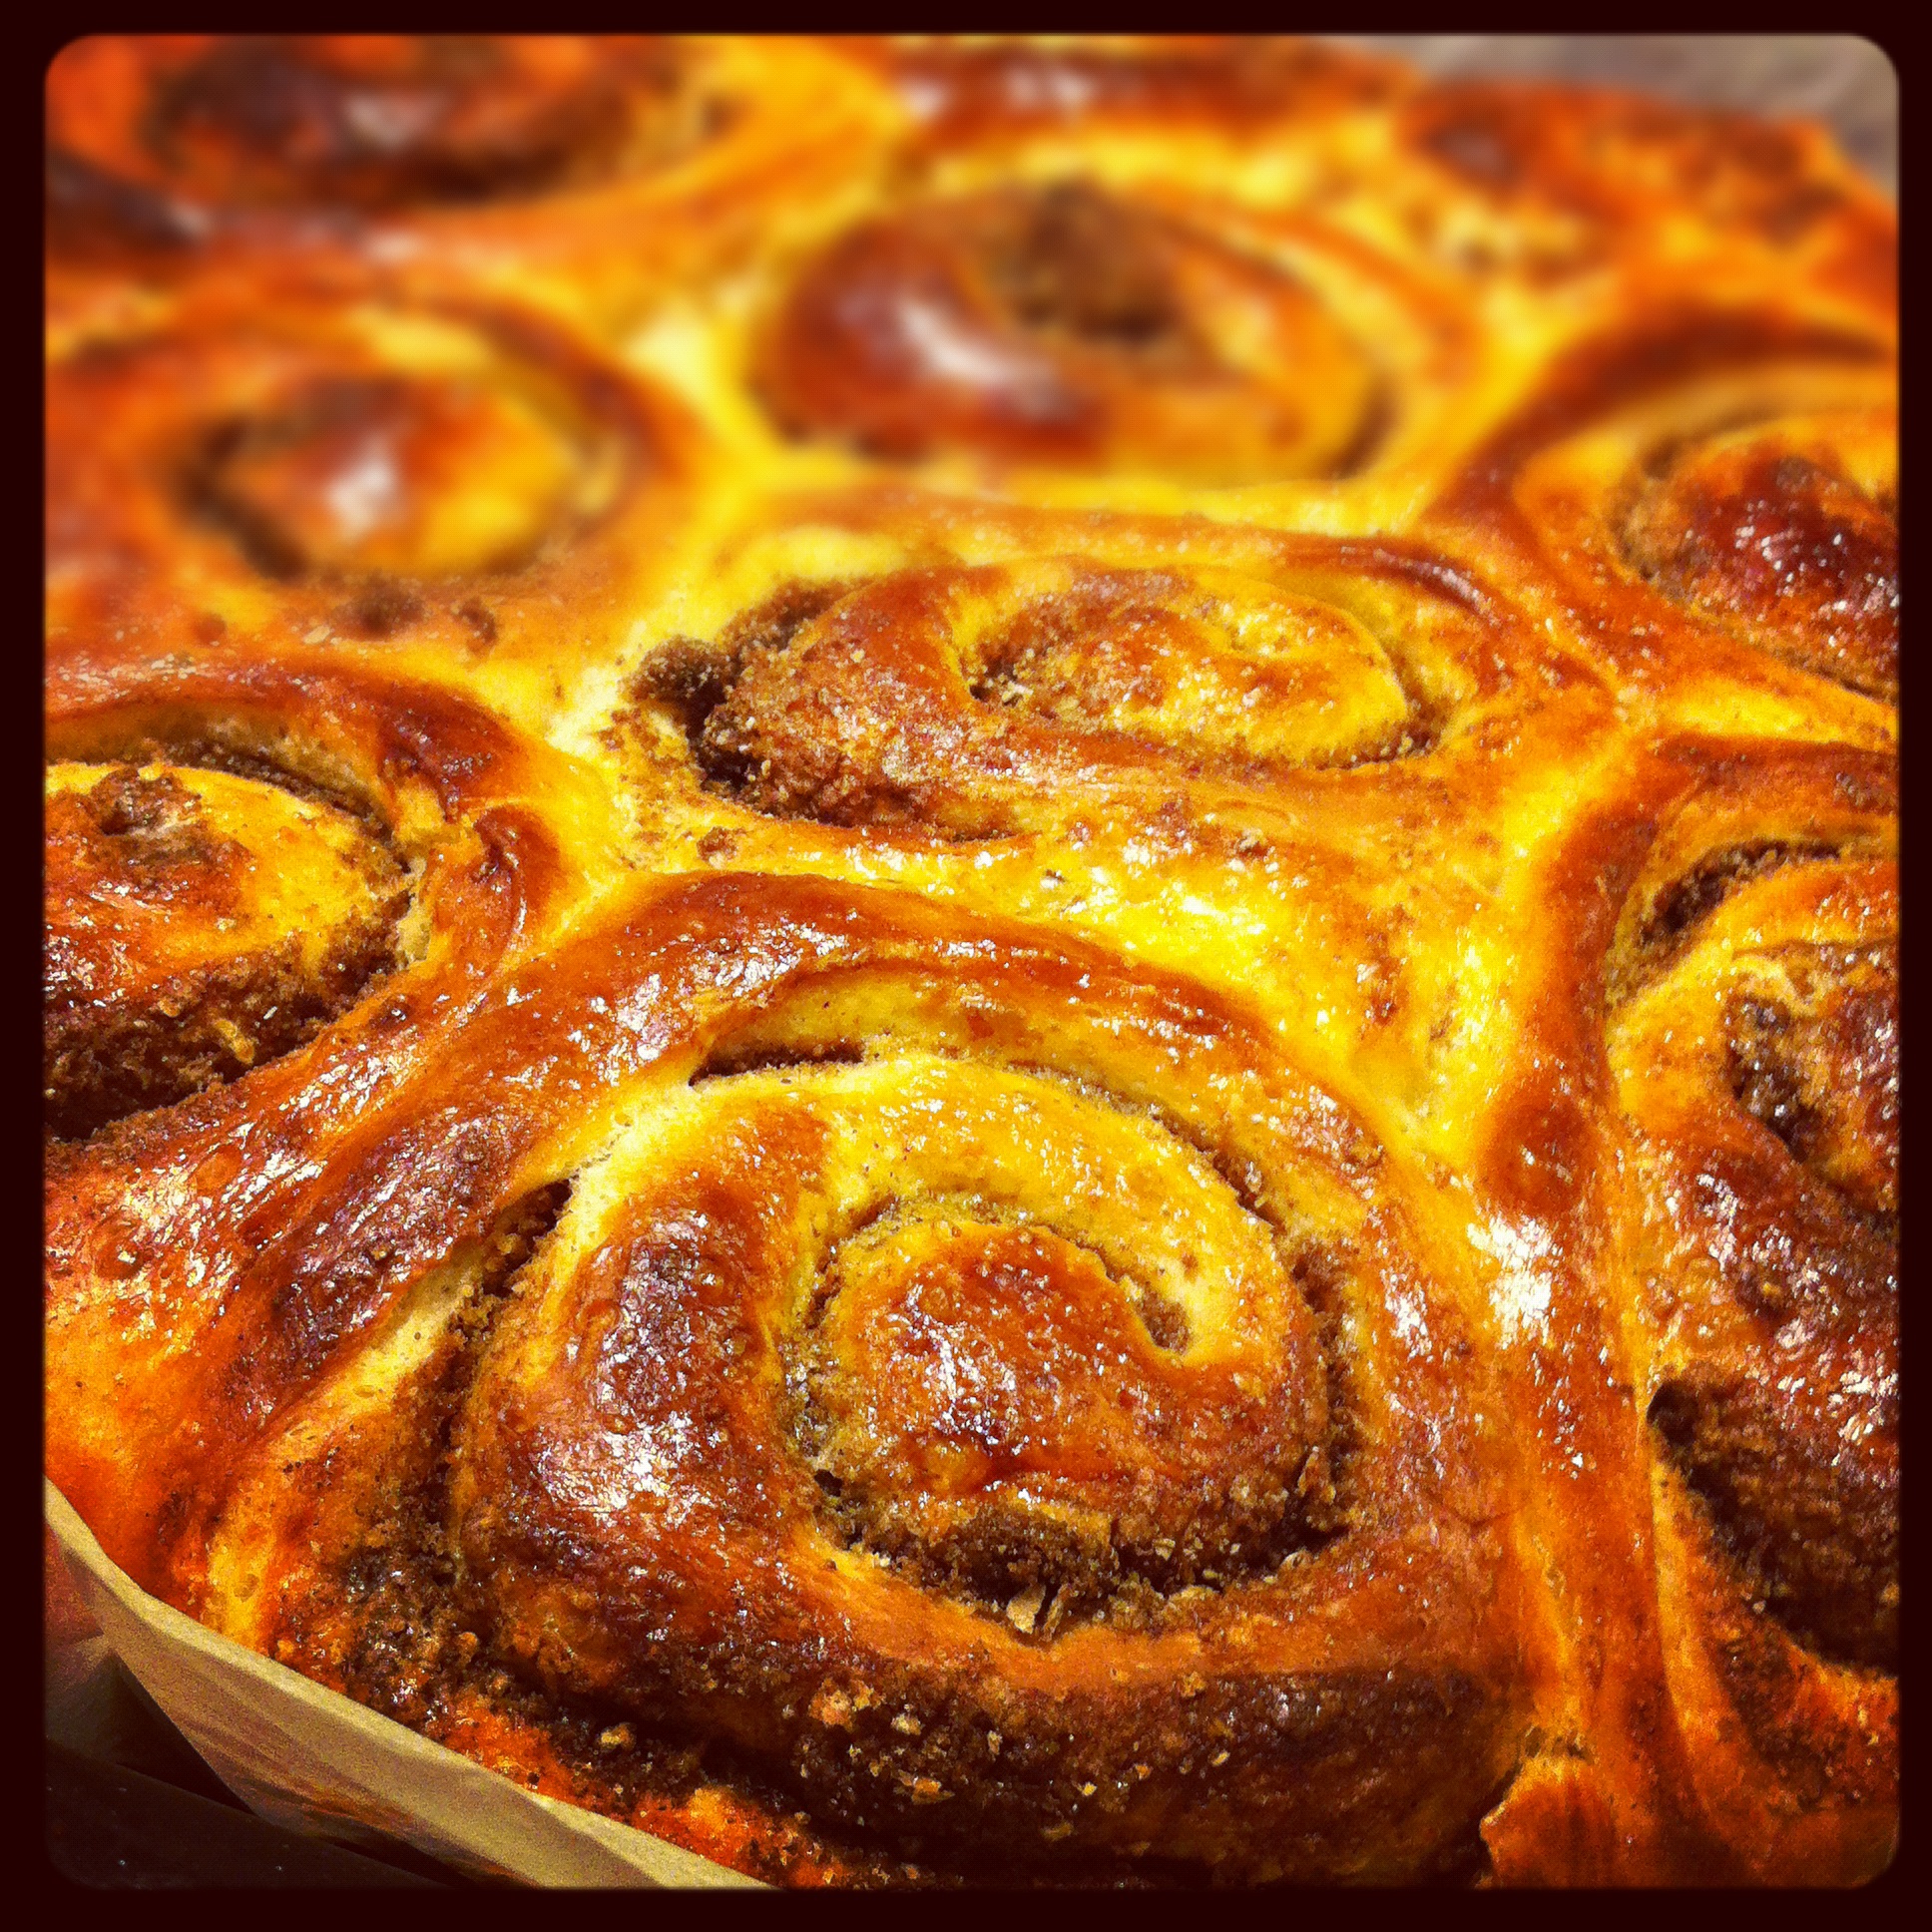
Cinnamon Buns
First it was Ruth’s turn (who I met through Richard when they performed together last year in Othello at the Rose on Bankside) and a surprise brunch birthday party. I knew there was going to be a birthday cake there but I still felt I should bring something to the table. In times of brunch, bread based products are always a winner and if a culinary question is ever bread related I expect Dan Lepard will have the right answer. So, I made his Cinnamon Buns and they turned out wonderfully- thanks Dan!!
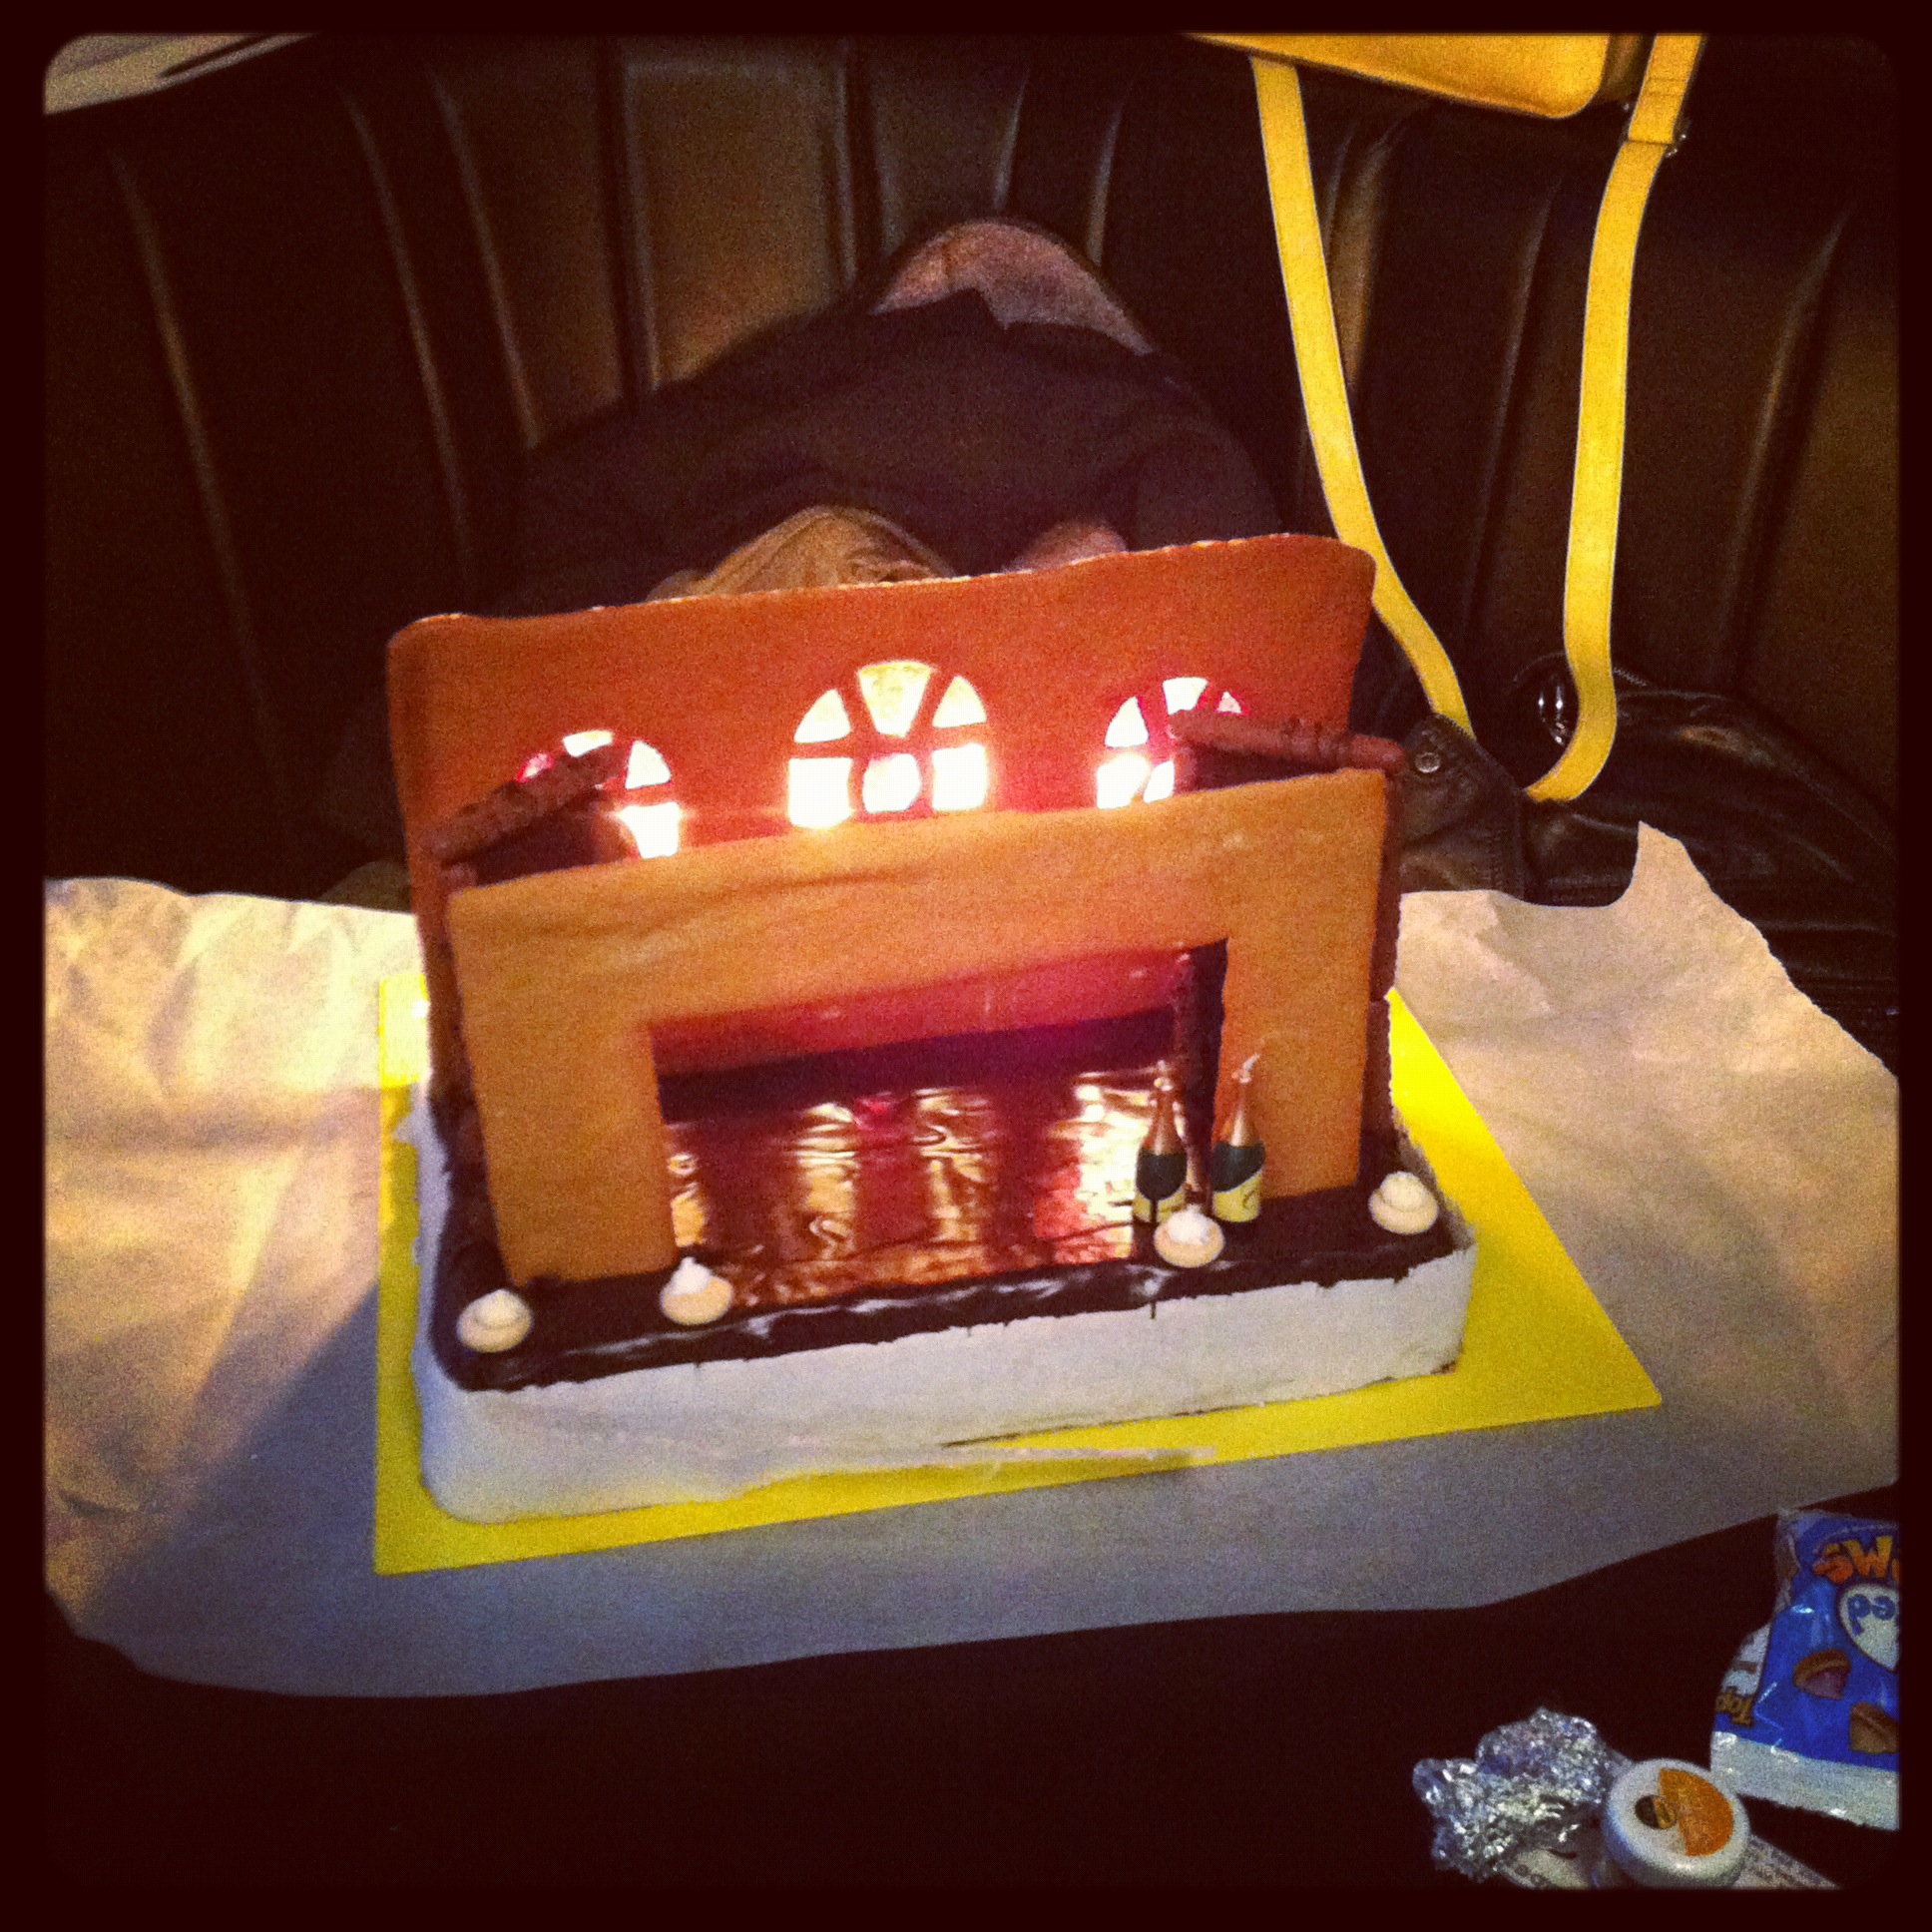
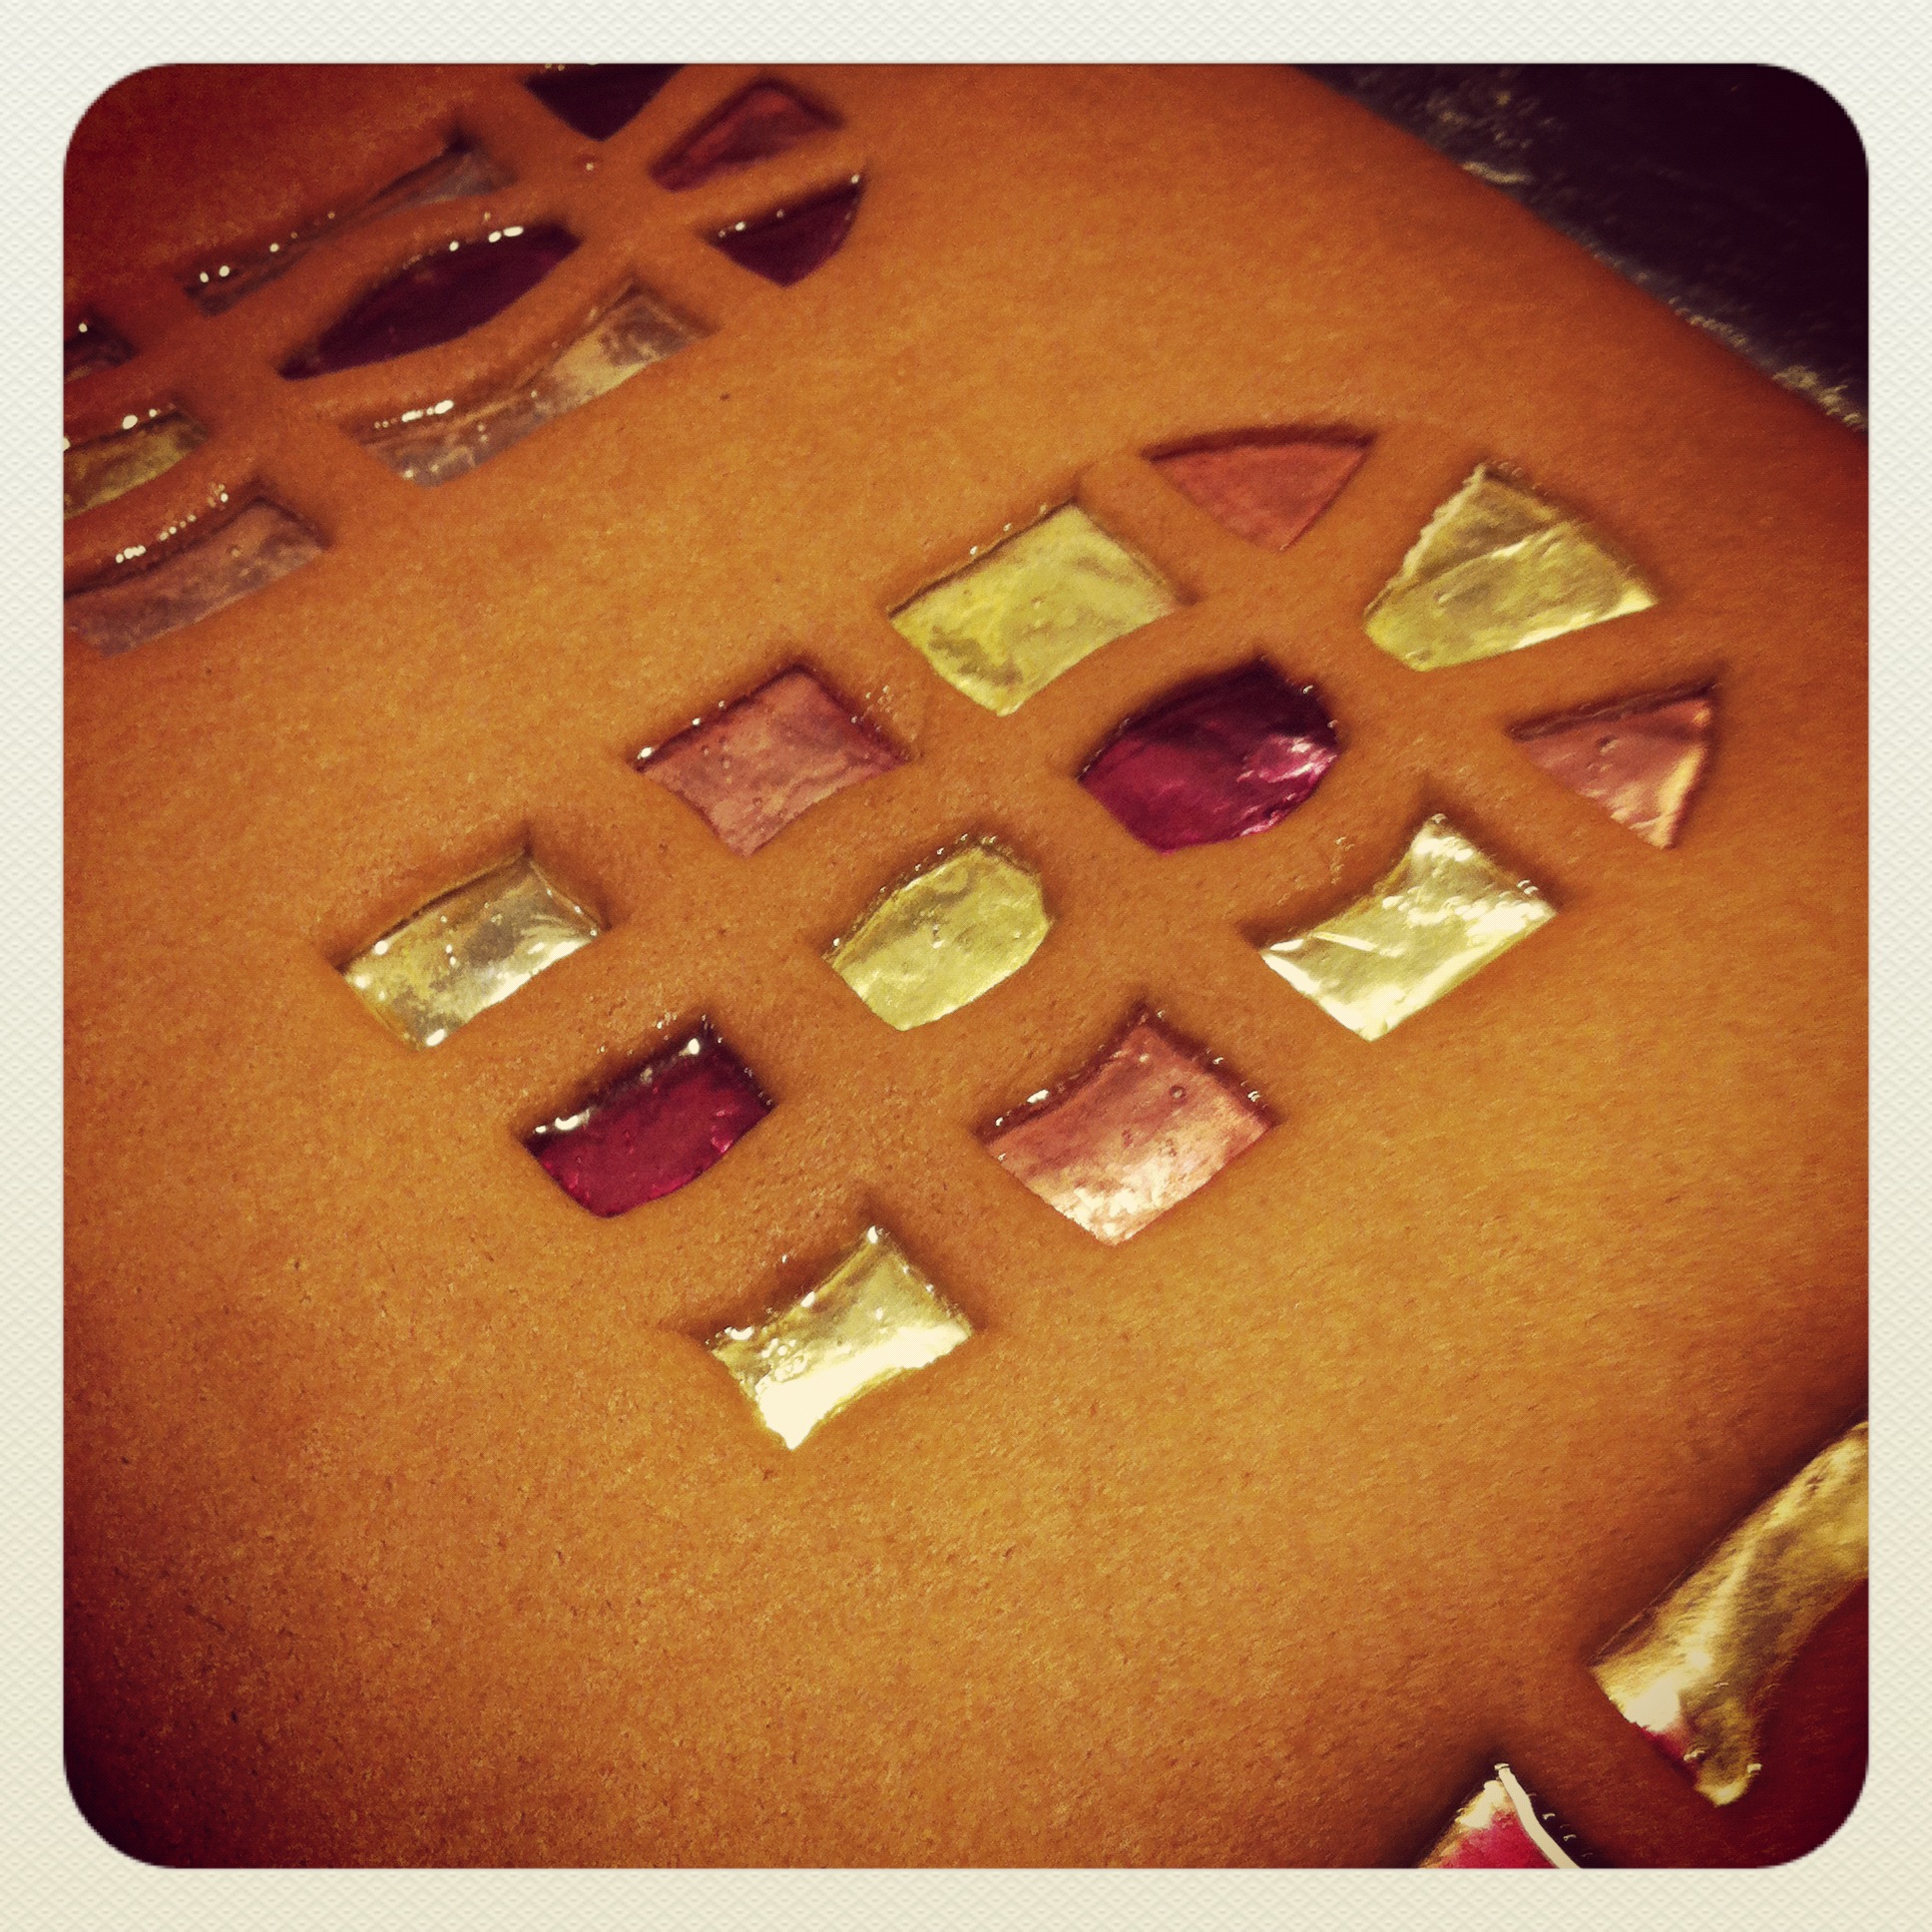
That same day, straight from the surprise brunch we hopped over the Thames to see Rhodora (my stylist!) and celebrate her birthday too. She’s all about the stage management right now, so it was obvious to us that she needed to have a set design cake!
The base is chocolate fudge cake (recipe from Victoria Glass) and then the icing is Mary Berry’s Sacher Torte topping (including the apricot jam) . The flats were made from chocolate and chocolate fingers and the backdrop and proscenium arch are made from the ginger bread husbands recipe in this book from the Ritz Hotel.
Word of warning; if you want to make the cinnamon buns and the theatre cake one evening, just so you know, start early. We didn’t get to work until go 10pm so it was getting on for 2:30am when we finally hit the hay.
Colouring-in Party
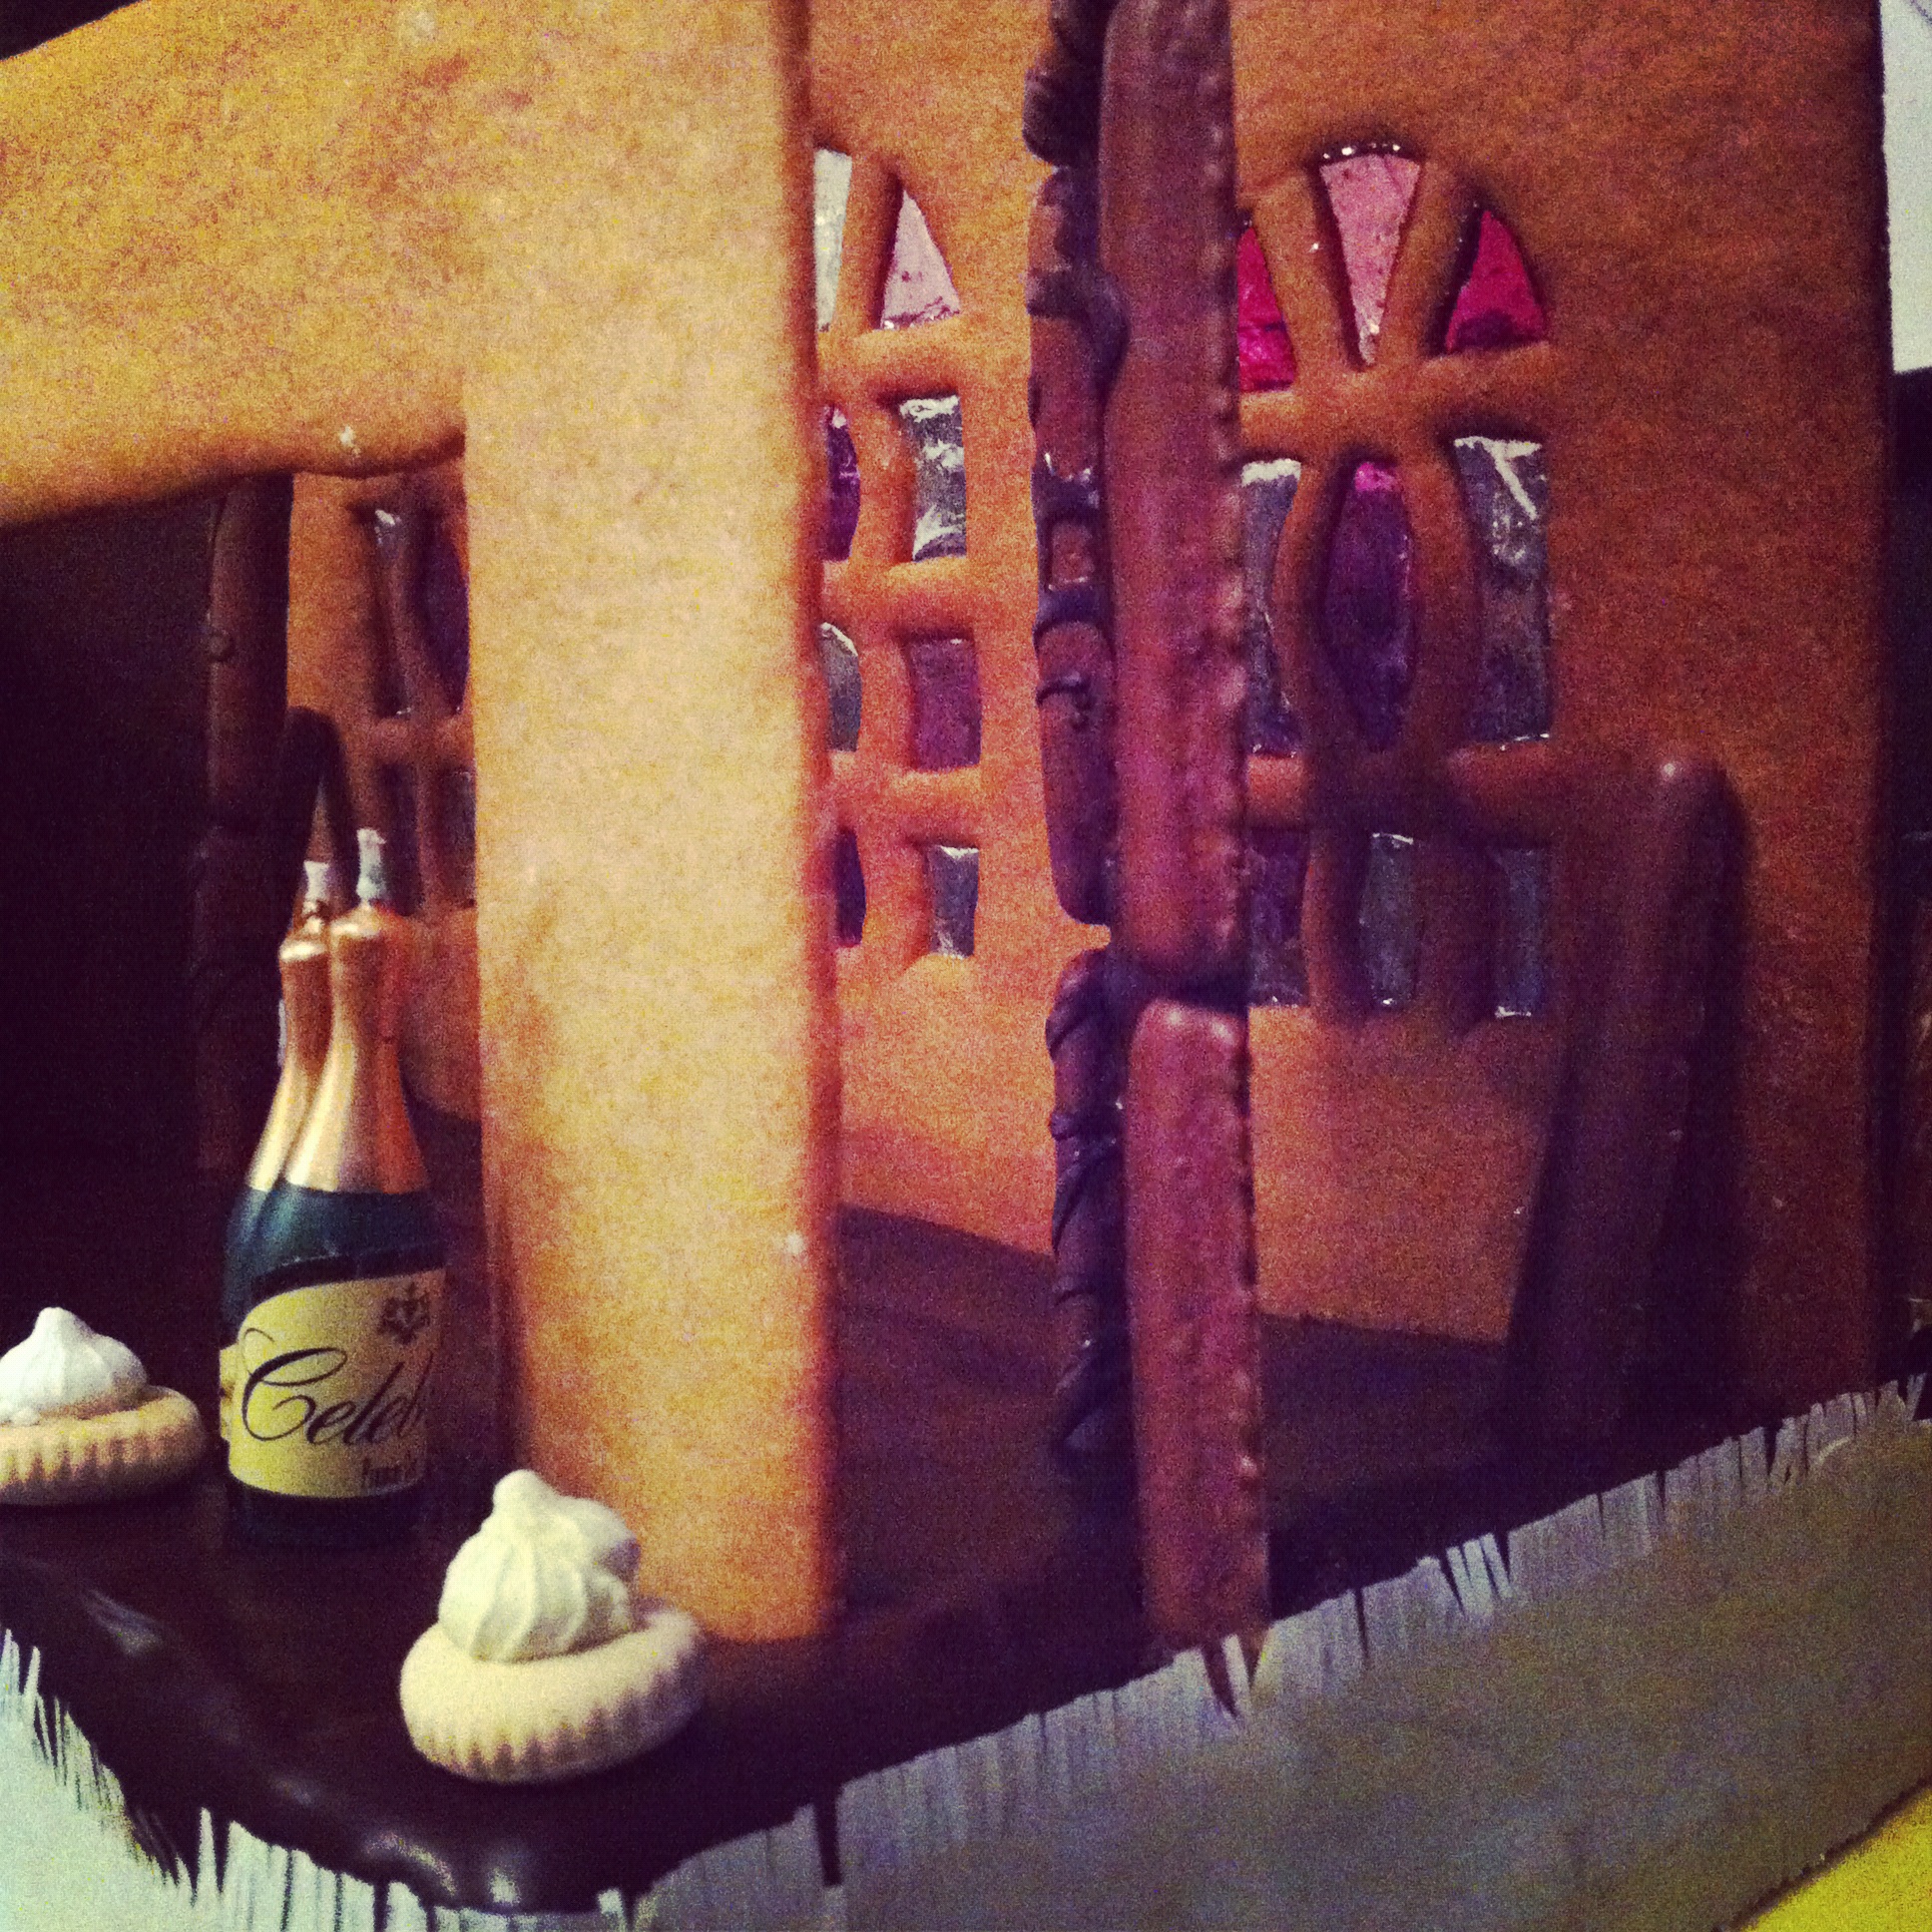
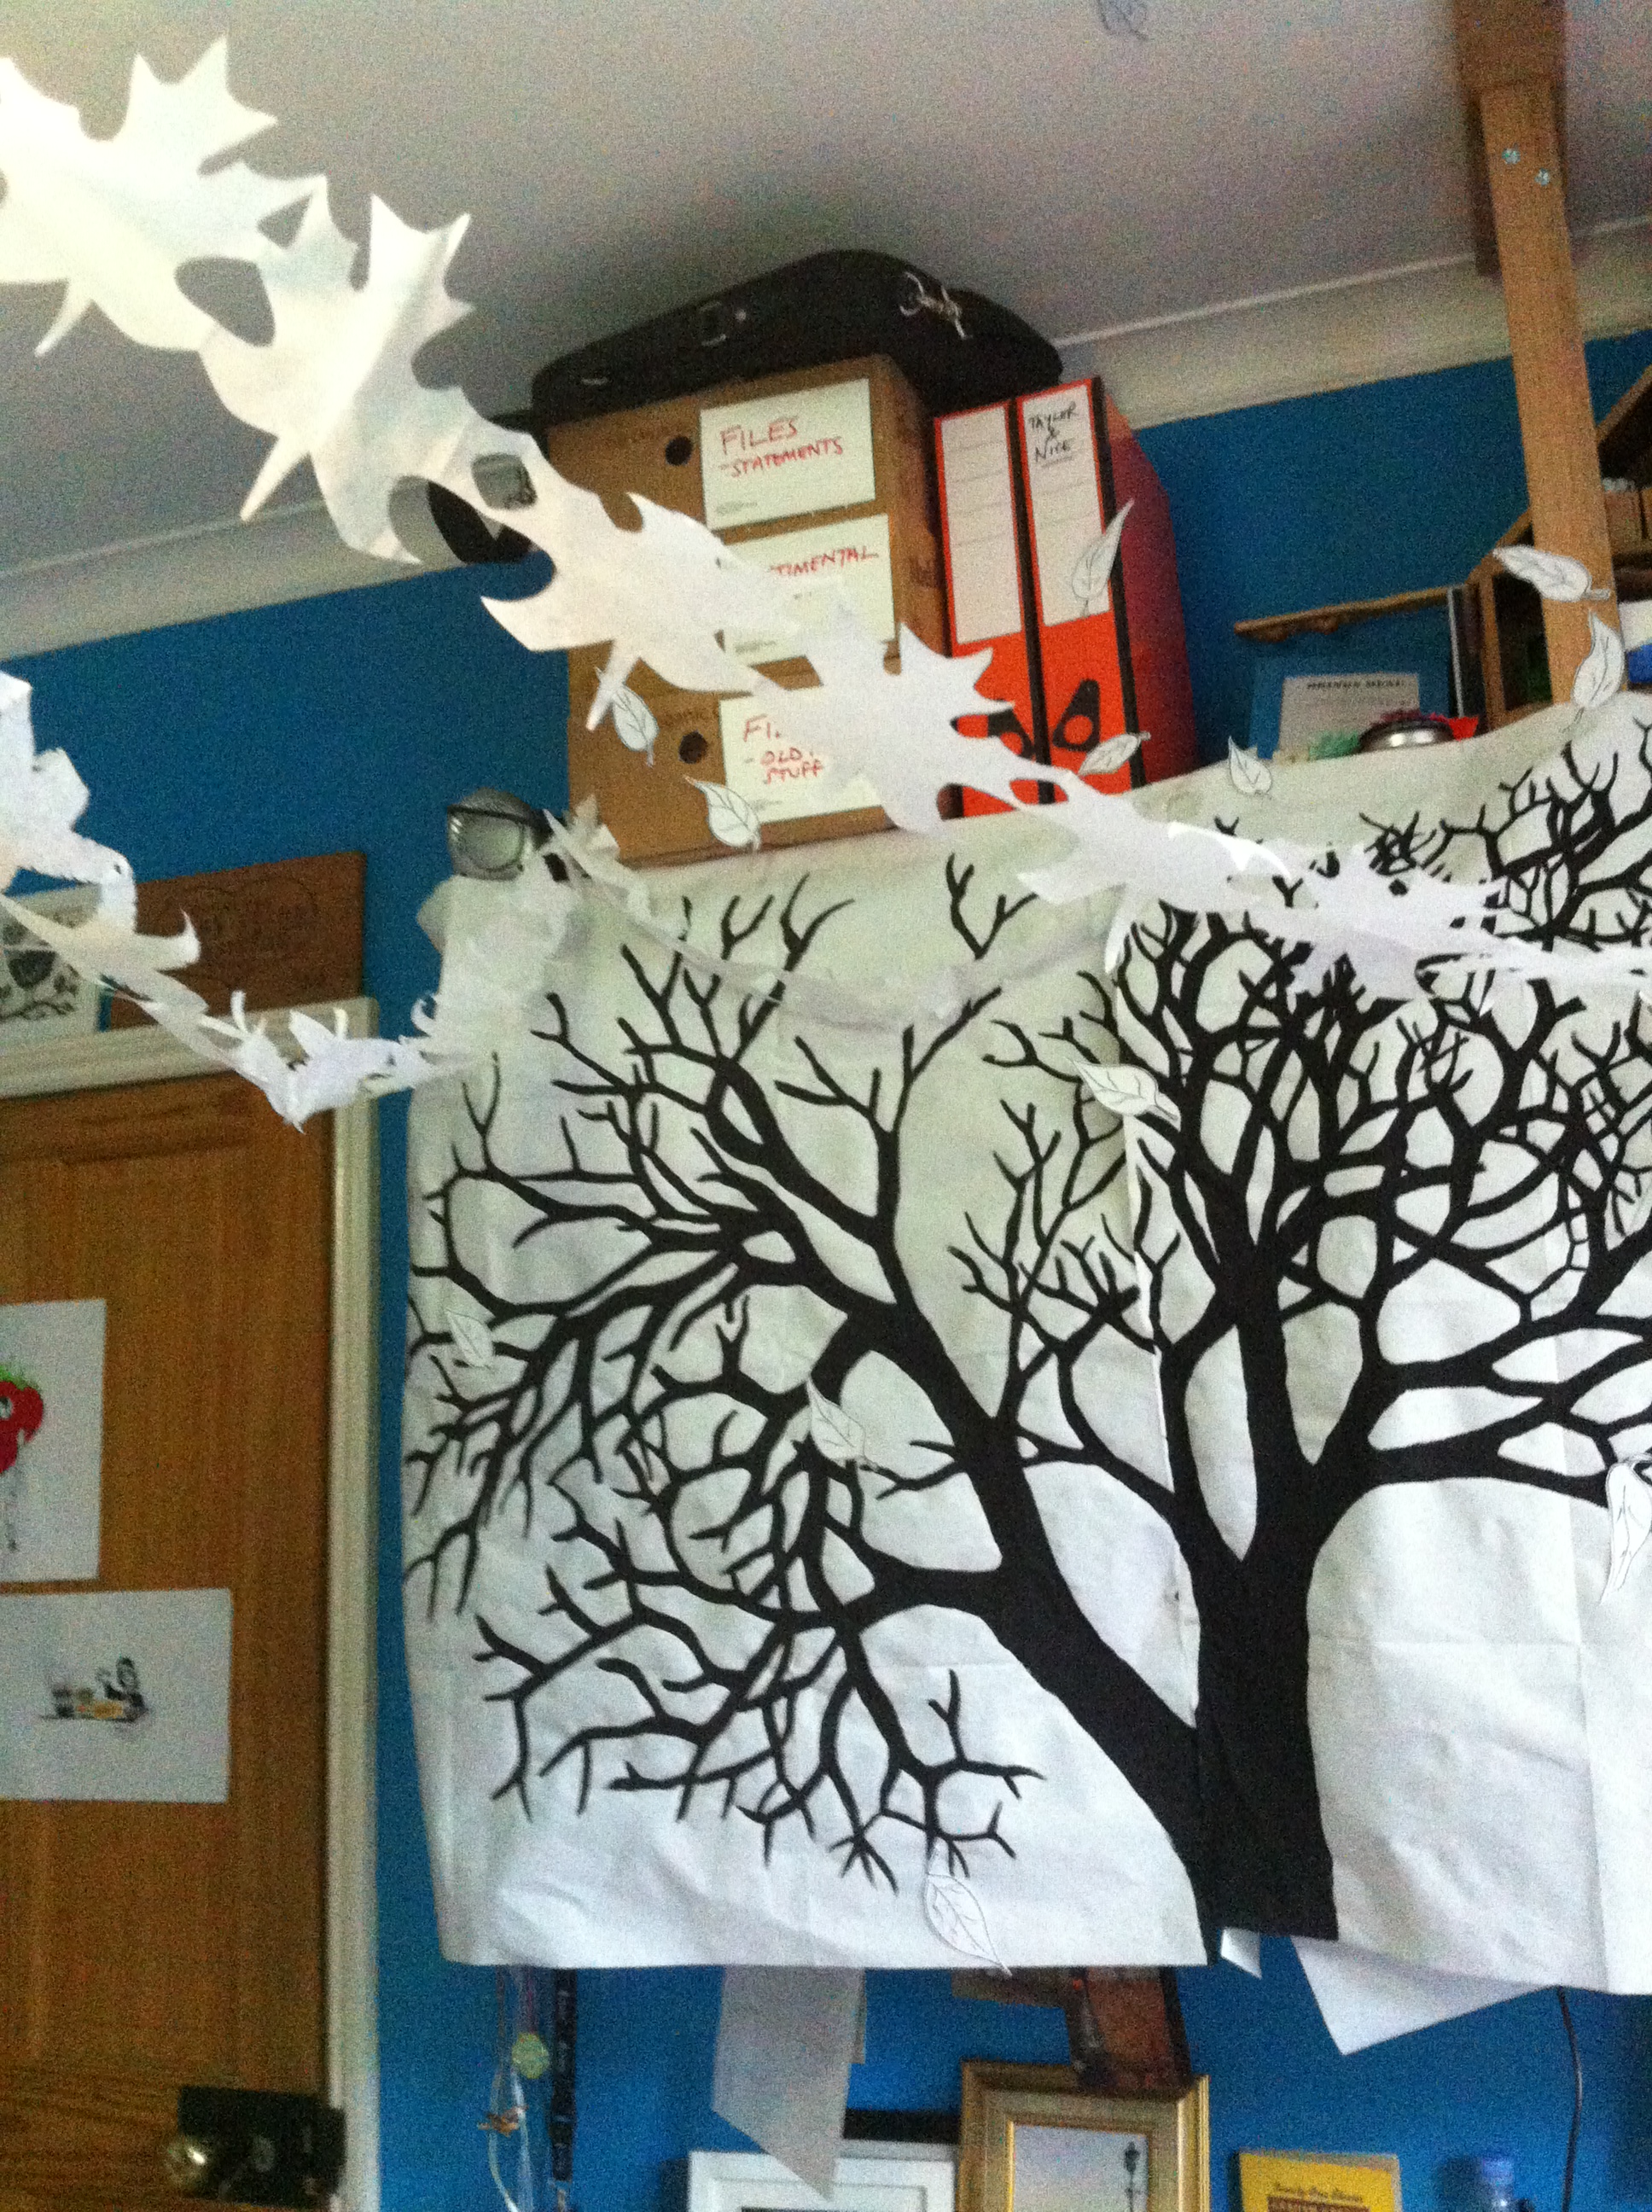
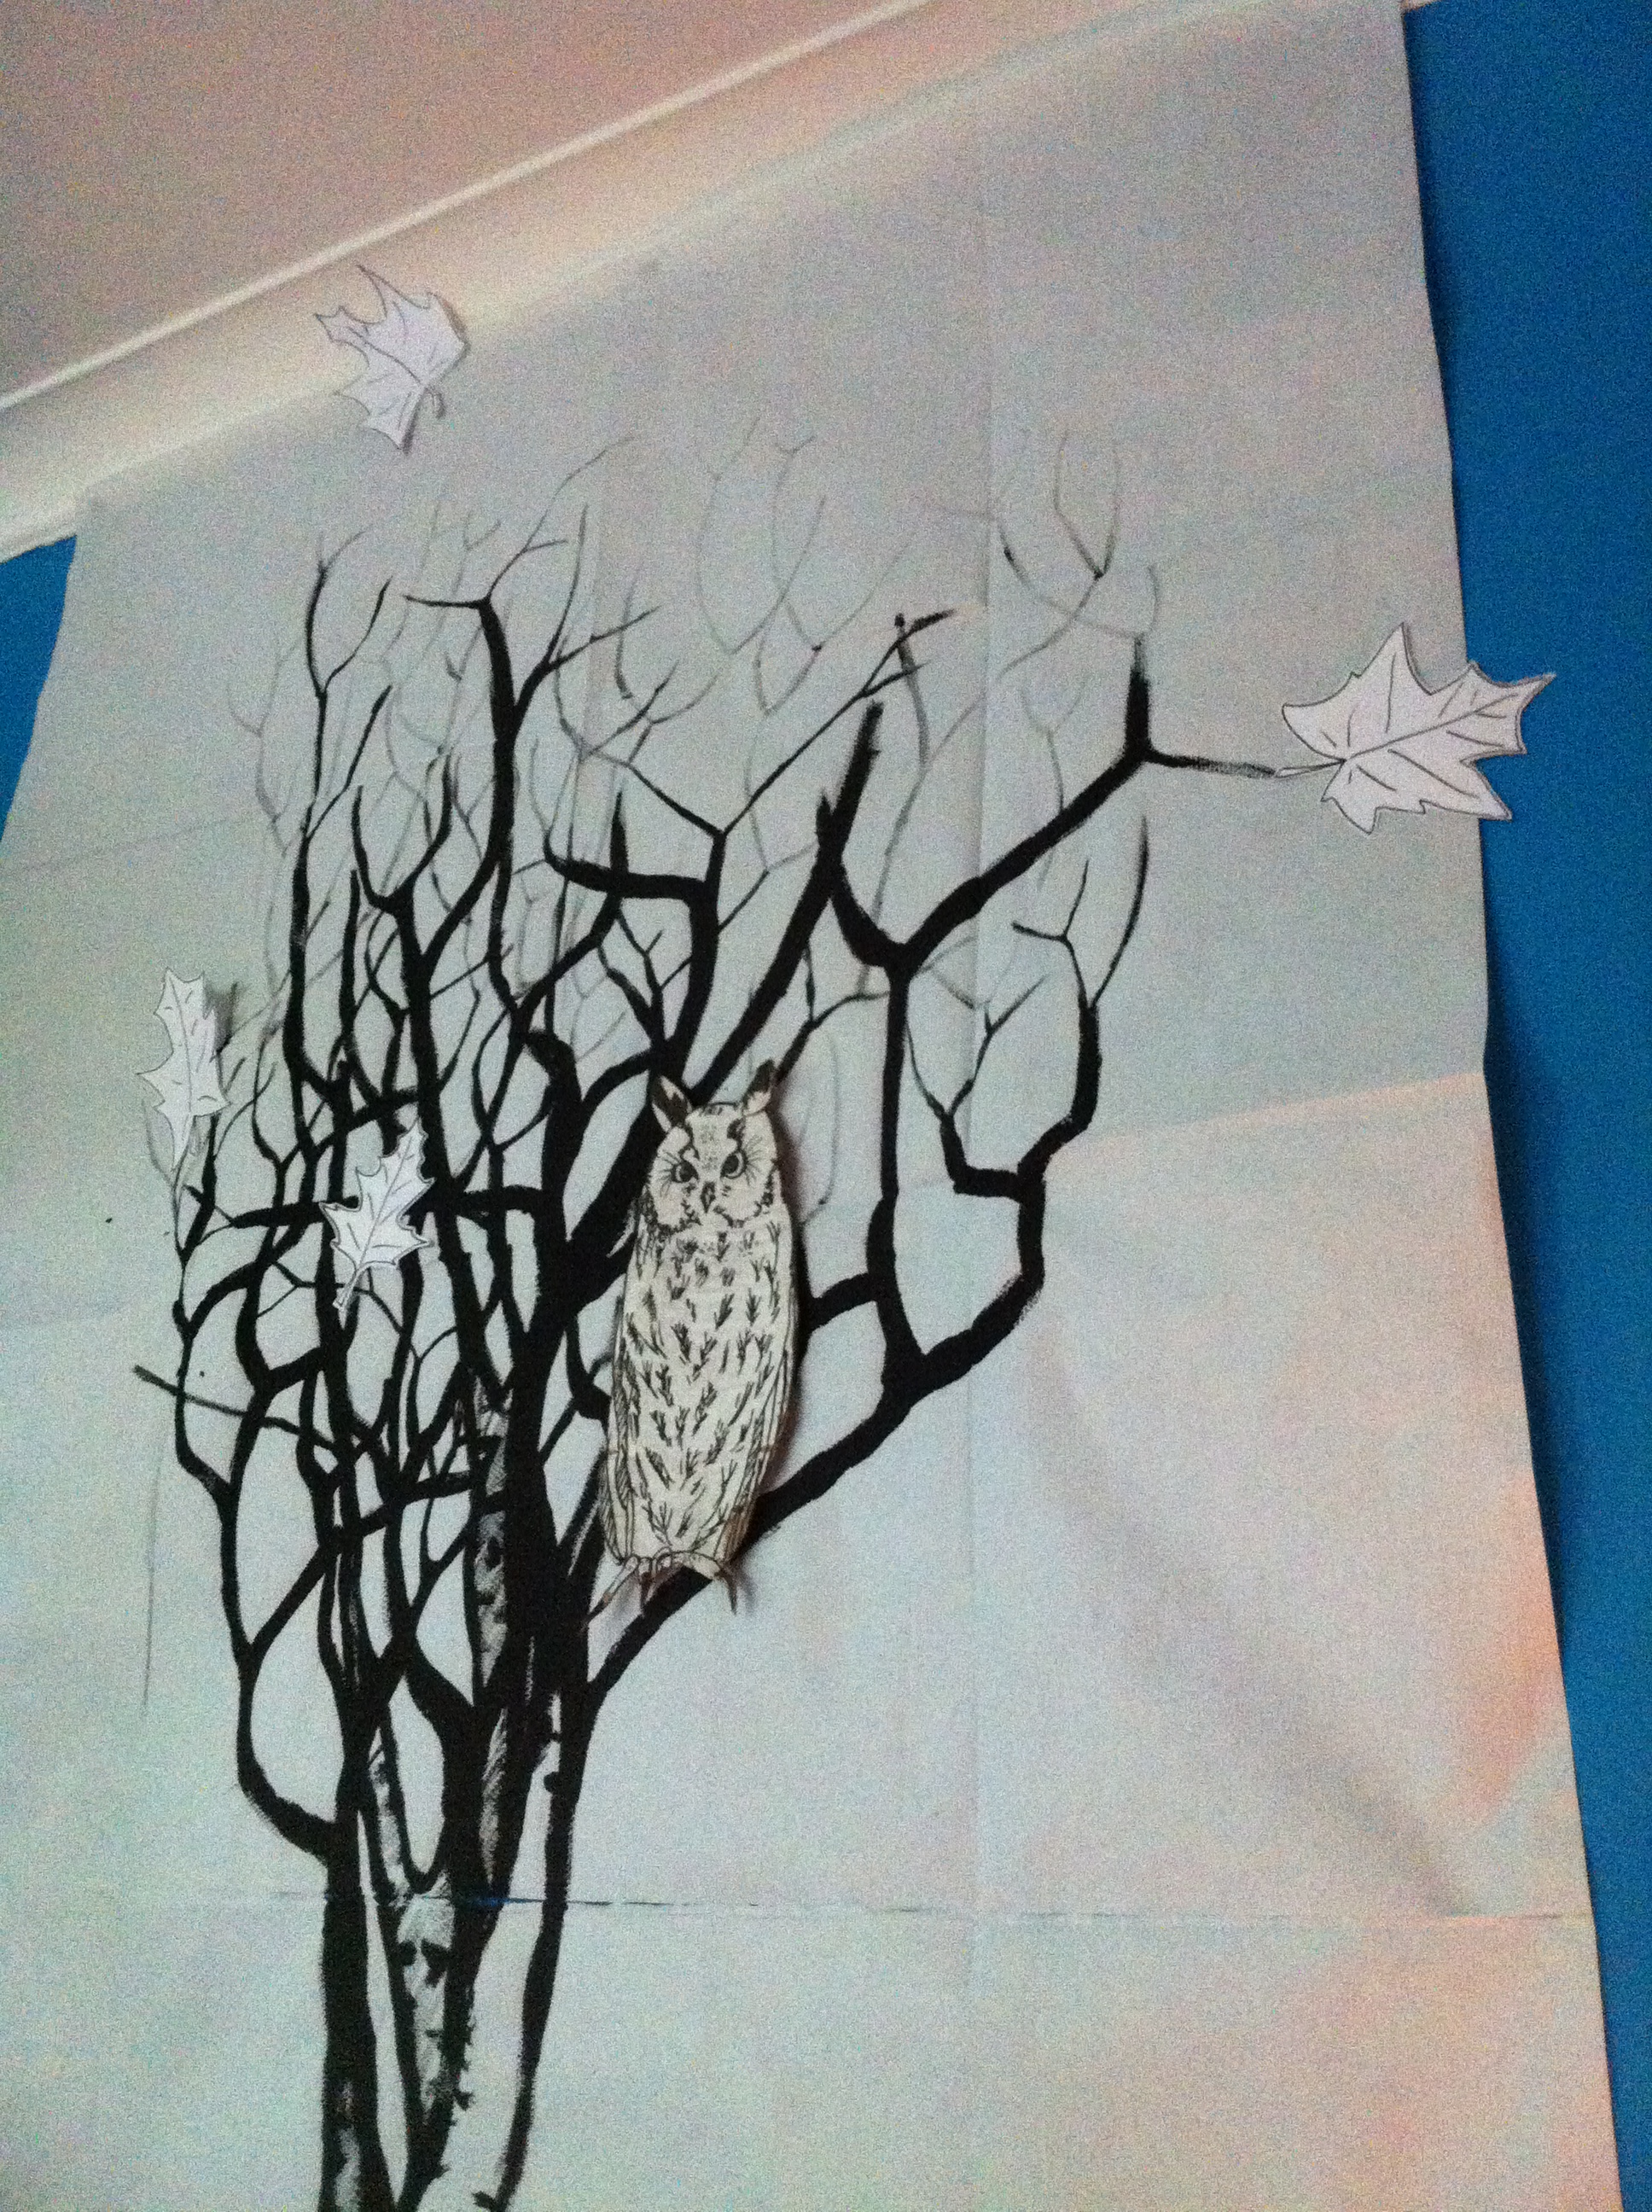
No time to rest, the next day was Helen’s birthday! Helen is an animation director, so a slice of sponge cake and a DVD just wouldn’t do. So I made her a woodland colouring in party! First I decorated our living room using tissue paper and branches from the garden. I made some cardboard owls and then I painted trees onto disposable paper tablecloths with black poster paint and stuck them on the walls.
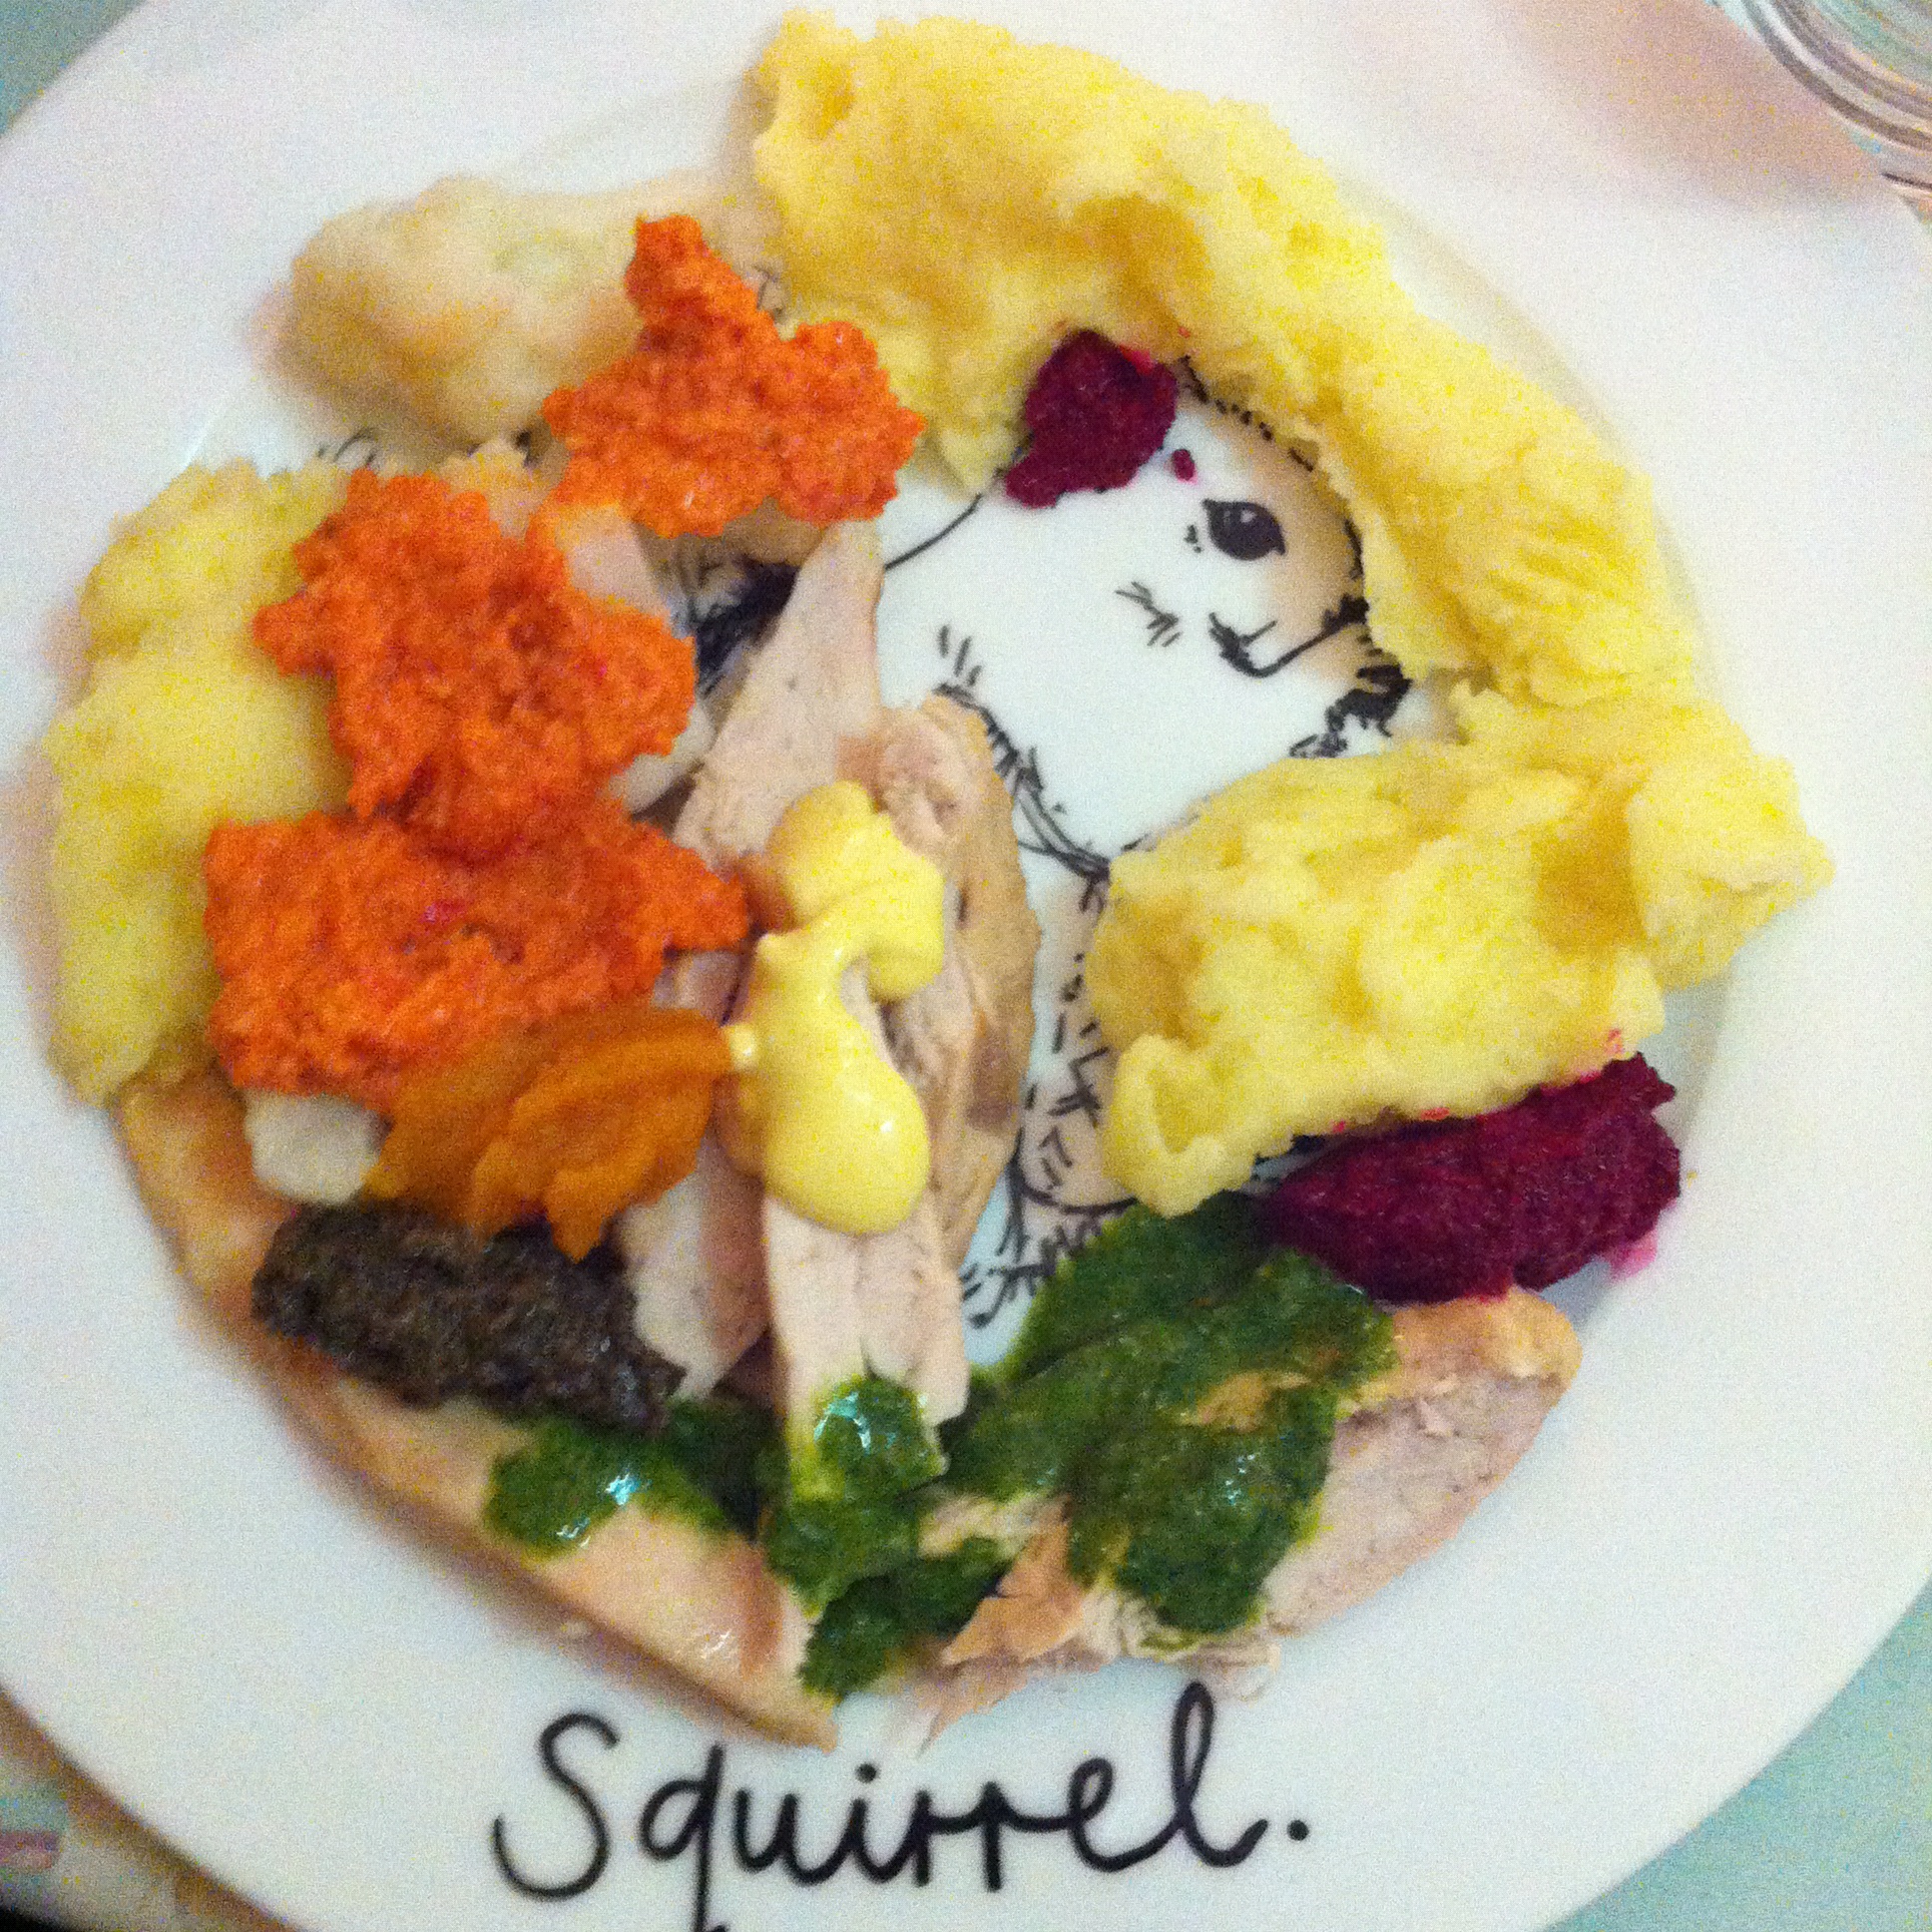
Next I drew some woodland creatures onto white plates using these pens which become dishwasher safe if baked at 170C. Hurrah. For dinner I poached chicken, mashed potato and steamed some cauliflower so that the meal would be comprised of white food. I did this so that she could colour in her meal with a palette of sauces.
It sort of worked and tasted pretty jolly, even if it looked a little bizarre! The sauces I made were (clockwise from top to bottom) Beetroot & Cream Cheese Purée, Roasted Red Pepper Pesto, Spiced Carrot Purée, Saffron Mayonnaise, Salsa Verde and Black Olive Tapenade.
I felt she hadn’t worked quite hard enough for her meal so she had to colour in the leaves on her birthday cake too!
I felt strangely obliged to bake the treats for the trick or treaters this year instead of just picking up a pack of something at the shops. This was in part, due to the fact that I felt as a food writer I should make everything myself (one of many self inflicted pressures) but also the guilt I still feel for the year I completely forgot about it and had to resort to giving the kids unripe plums from the fruit bowl whilst fiercely crossing my fingers that the front of our house would escape a thorough egging!
The recipe I chose was this one for Sugar Cookies. It’s a great, basic biscuit recipe that makes a really large quantity from just 1 egg. The biscuits can be flavoured with nuts, fruit or chocolate chips before baking if you like and if you cut them out with fancy cookie cutters they hold their shape really well. Be warned, they are incredibly sweet so make sure you’ve got loads of people round to share them with.
Sugar Cookies
200 g unsalted butter, at room temperature
400 g plain flour
280 g caster sugar
¼ teaspoon vanilla extract
1 egg
a pinch of salt
½ teaspoon cream of tartar
1) Rub the flour and the butter together with your fingers until it all looks like fresh breadcrumbs.
2) Mix the egg and the sugar together in another in a bowl with a fork and when it is really well combined add it to the flour mixture.
3) Add all the other ingredients and knead together with your hands to form a smooth dough.
4) Roll the dough out on a lightly floured surface with a rolling pin until it is about ½ a centimetre thick. Cut into shapes.
5) Place your biscuits on a baking sheet lined with a piece of greaseproof paper/baking parchment and bake at 150° C for about 15 minutes (until they are lightly golden at the edges – keep an eye on them).
6) Let them cool in the tin for a few minutes before carefully transferring them to a wire rack.
7) Decorate with icing or sandwich together with butter-cream.
I decorated mine with plain and coloured icing then topped with spooky decorations. To make the spiders and creepy crawlies pipe small “v’s” onto a piece of tin foil using melted chocolate to make the legs and leave to set hard. Ice the biscuits and set aside until almost dry. Top with a jelly sweet for insects or a chocolate for spiders and carefully peel the chocolate legs off the tin foil and stick into the biscuit.
It felt like a continuous stream of knocks and shouts all evening. After a rough count up I think gave out about 50 biscuits (which I had not anticipated) so I had to keep running to the kitchen to ice and decorate more to satisfy the seemingly ravenous ghouls and ghosts at the door. I finally collapsed on the sofa with a glass of wine at about 9 o’clock and considered possible holiday destinations for next Hallowe’en!
This week my workload had a bit of an upward spike, that sort of 17-hours-in-front-of-a-laptop type spike. Tuesday was the worst, I finally finished my shift at 2am on Wednesday morning and crawled under a duvet on the sofa in the office as I didn’t want to wake my housemates. Even though I’m pretty certain there isn’t a cricket bat in our house my sleepy logic made me believe that if I was heard climbing the stairs at that hour someone would be sure to mistake me for a burglar and hit me over the head with one.
The rest of Wednesday was almost a total right-off. I’m sure when I was a student I could have only a handful of hours sleep and still be functional the next day but not now, stringing a sentence together yesterday was a serious chore. What happened?!
In the end the only thing to revive me from my zombie-like state were a couple of scones and a double espresso.
I had a just about enough energy to whip these up and it was well worth it. I had some clotted cream left over from a recipe photoshoot at the weekend (as you do) so it would have been rude not to use it up!
Oaty Scones
(makes about 12)
350g strong white bread flour
50g of rolled oats
pinch of salt
3 teaspoons of baking powder
2 dessertspoons of golden caster sugar
85g of butter
juice of half a lemon
180ml milk
2 eggs
1) Preheat the oven to 200°C and line a large baking sheet with a piece of greaseproof paper
2) Stir the dry ingredients together in a bowl and then rub in the butter until it looks like fine breadcrumbs
3) Add the lemon juice to the milk. Add the eggs to the milk mixture and stir with a fork to combine.
4) Pour the liquid ingredients onto the dry ones and stir together
5) Tip out onto a well floured surface and knead just briefly to make sure all the ingredients are combined. Flatten the dough, just with your hands is fine (I couldn’t be bothered with a rolling pin yesterday) it should be about 4-5cm thick then cut into circles with a cutter. You don’t have to make them round, my mum used to cut them into triangles just with a table knife, there was something very clever and mathematical about her reasons for doing this but I just remember them being yummy.
6) Put them on the prepared baking sheet, evenly spaced (they expand a little bit) and bake for about 10mins
7) Serve warm with jam and clotted cream!
Since uploading this photo on facebook & twitter a debate has started as to whether the cream goes first or the jam, I’m all for the jam going first as it keeps the cream nice and cold on the warm scone but other people fiercely disagree with me stating that the cream should be first. What do you think?
To make myself more productive I have taken on lots of collaborative projects as working with others makes me work harder.
This week meant a second meeting with Helen & Sophia who are to be the brains behind my next YouTube cookery show. I am extremely lucky to work with them, they are possibly some of the most professional and talented people I have ever met and I am constantly terrified of letting them down which pushes me on to make sure the scripts are done on time and the recipe is properly tested. Eeek!
This meeting was no different, I made sure my “homework” of completing the first draft of the script was ready and I had a quick tidy round. About 15 minutes before they were due to arrive I suddenly decided that I should give them something to eat. Cake; cakes are always good, right? But 15 minutes is a bit of a push even for me but most foodies have at least one or two solid recipes they can pull out at a moments notice and this is mine.
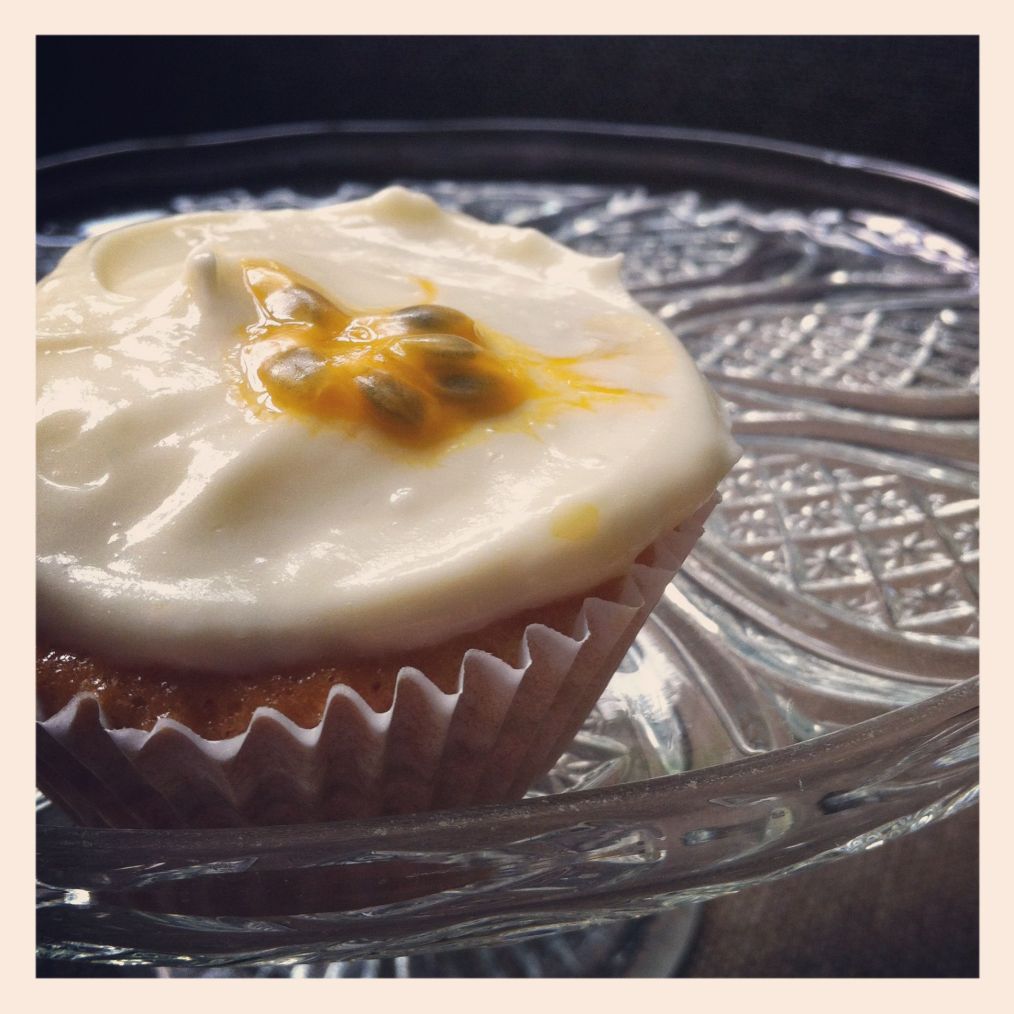
Orange Buns:
(excuse the imperial measurements – it’s the one recipe which I don’t do metric – weird, I know)
For the cakes:
4oz self raising flour
4oz self raising flour
4oz of sugar
4oz butter, melted
2 free range eggs
1/2 tsp of baking powder
1/2 tsp of bicarbonate of soda
zest of 1 orange
juice of half an orange
For the frosting:
2 tablespoons of cream cheese
juice of half an orange
icing sugar to taste
1 passionfruit to serve.
Method
Preheat the oven to 170°c
Line a 12 hole bun tin with cake cases – this is brilliant for speedy cooking because you don’t need to grease the tin!
Mix all the cake ingredients together and whisk with a handheld electric whisk until smooth and pale.
Drop spoonfuls of the mixture into the cake cases dividing it evenly and bake for 15-20 minutes or until the cakes are cooked through (check by inserting a cocktail stick – if it comes out clean then they are ready)
Put the cakes on a wire rack to cool and get back to the meeting!
Sneak back to the kitchen and mix up the frosting, adding a dessertspoonful of icing sugar at a time until it tastes sweet enough to your liking. Whisk until smooth then plonk dollops of the frosting onto the cooled cakes. Top with a few passionfruit seeds and serve. Winner!


 Orange Buns: